StevenC2020
-
Posts
13 -
Joined
-
Last visited
Everything posted by StevenC2020
-
I recently switched from Canon's EF-S 18-200mm f/3.5-5.6 IS lens to the RF 24-105mm f/4-7.1 IS STM lens after changing my camera body from the 60D to the RP. When I tried developing the first batch of photos from the new gear, I noticed a lot of lens distortion because the RF's lens profile isn't listed in the Develop Persona. Is there a way for me to enter the lens profile or select an EF equivalent that allows Affinity to automatically correct lens distortion the way it did with the EF-S 18-200mm?
-
That seems to help. Thanks, Jowday!
-
Thanks. I guess I should've just posted the .dng from the beginning, since that's what I typically look at. I usually ignore the .jpeg from the camera because the blues are always super oversaturated and not what I want my photos to look like. That said, the .jpeg and .dng files are equally sharp when I view them through Lightroom/Photoshop/Photos, which is why I just uploaded the file that was faster to screenshot lol. Anyways, I got some helpful things from this thread, and was never trying to replicate the EOS-60D's messy .jpegs to begin with.
-
No, I posted the Affinity export with NR and Develop Assistant disabled, alongside the jpeg in the original. The jpeg looks just like the .DNG I uploaded in Photos, though. Some of the feedback here is helpful, since I was mainly looking at Affinity's in-house sharpening tools or ways to disable its default NR tools while developing the RAW image, since I previously just used Photoshop to develop the RAW image before moving everything to Lightroom to do the rest.
-
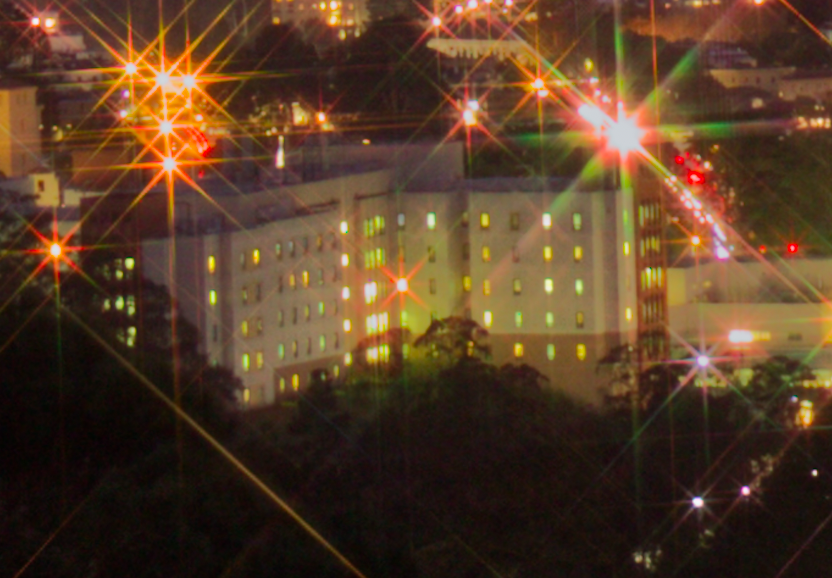
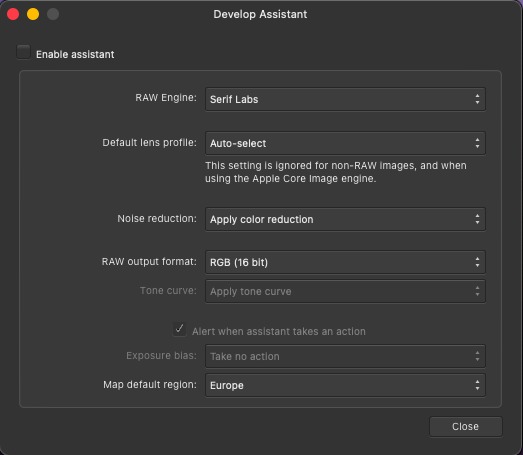
Thanks, everyone! These are helpful tips. I'll try enabling Develop Assistant to take no action on the NR and try capture sharpening to see if that helps. @Kirk, yeah, the stars are intentional lol. I used a Hoya 8-point star filter for this effect.
-
Thanks for doing all that, JohnZeman! Appreciate it. Just to clarify, are you saying you sharpened it after developing the RAW file?
-
That's right, those are helpful sharpening tips. In terms of noise reduction, does it seem like I've gone through all the options for preventing noise reduction from happening during processing?
-
I see. Based on this thread, it sounds like there's no more options to explore within Affinity for either turning off noise reduction or sharpening the RAW file. Is that correct?
-
It's still sharper when viewed through Preview on my Mac and when processed on Lightroom.
-
Here's a RAW file, which is still sharper than the Affinity output. Let me look into a different RAW engine and see if that solves the problem. IMG_7426.CR2
-
I'm noticing that the TIFF files I export from Affinity after I develop the RAW files I import are extremely soft in comparison to the originals. Below are screenshots of the jpeg that came from the camera and the TIFF file I exported after developing the RAW file through Affinity. I've turned off Develop Assistant and the noise reduction option in the Details tab while developing the RAW images, but the exports are still turning out really soft. Any thoughts on what else I can do?

-
Thanks! That was really helpful. I tried the more elegant technique, but couldn't figure out how to turn the rectangle into a child layer. Was I supposed to use the rectangular marquee tool for that? In any case, I used the first technique to create the photo below. I think it's workable, although there's a bit of an unrealistic blue tinge to the clouds in the middle right. This is a different kind of blend than the skylines I posted in the first photo, though, so I guess it's a bound to be a bit messier. It might actually be resolved if I figured out the rectangular tool in the second solution you posed, since that might leave the original layer unaffected and free to extract additional layers from to cover these blemishes.
-
I recently migrated to Affinity from Photoshop and am still learning to translate some of my Photoshop work stream to Affinity. Most things I can Google, but it's hard to find a tutorial for blending two photos into something like the attached image. On Photoshop, I'd just create a layer mask on my selected layer before using its gradient tool to gradually fade one photo into the other. The gradient tool and layer masks on Affinity seem to work differently. Anyone know how to create a similar effect on Affinity?