
solved
-
Posts
39 -
Joined
-
Last visited
Posts posted by solved
-
-
18 hours ago, loukash said:
Good question, because an artboard being actually kinda hybrid container/object thingy, it can have a fill on its own!
Thank you again, another feature I was not aware of. Solves most of the issues in Designer I had with my question. In this case, a "fit to Artboard" function or Photos approach with Fill-Layers still would be a nice thing for some situations.
-
18 hours ago, loukash said:
Except for #1 & #6, the rest of this workflow should work 100% with keyboard shortcuts. You may need to assign some of them first, that is…
- select the artboard object – e.g. click on the artboard name on the canvas with the Move tool
- Edit > Duplicate – duplicates the artboard in place incl. content
- Layer > Hide – hides the duplicate artboard temporarily because:
- Select All – selects now only the content of the visible artboard
- Edit > Delete – see above
- click on the name of the empty artboard to select it again
- Layer > Convert Artboard To Object – a rectangle!
- optional: Layer > Arrange > Move To Front (or forward, whatever)
- Select > Previous (or Next, depending on #8) – selects the hidden artboard
- Layer > Show (or Show All if it was the only hidden object)
If you have an external macro utility, you can automate steps 2–5 and 7–10 as a keyboard shortcut sequence.
On Mac, that would be possible with Automator and AppleScript via System Events (the only method to script Affinity at the moment). Even easier with nifty macro utilities like Keyboard Maestro.Interesting approach, thank you for taking the time putting this together. I appreciate that. The Fill-Layers solved my problem for now, but one day I might have a more advanced problem for your advanced solution here.
-
18 hours ago, R C-R said:
In AP, have you considered using Fill layers for this instead of rectangles?
Also, why are you filling artboards or canvases with rectangles?
Perfect, thank you very much, this solves my little problem in a very elegant (and non destructive) way and saves me a lot of time. I just did not know that they exist. Now I do and I will use them for quick background color changes, create gradient overlays or mask them with a white brush stroke or stamp etc. And all that non-destructive because they are vector based, nice. Just what I needed. At least in Photo this makes my "fit to canvas" point superfluous.
-
Thanks for the response...
Interesting tip with the "spreadwidth", did not know that. And yes... still too much work;)
Using Templates and Assets extensively,, but they just do not to solve this little "problem". Dragging and snapping is fine, just hoped there is a faster way to accomplish this task.
-
I am dragging way too much rectangles to fit the artboards dimensions in designer or to fit a canvas in Photo.
Draw a rectangle with the rectangle tool and then dragging the corners to snap to the artboards or canvas corners does work fine but it just takes too long. Is there a quicker way or a shortcut I am missing ?
Something like "fit to artboards size" or "fit do canvas size" ?
-
18 hours ago, NotMyFault said:
Hi,
nice to meet others with similar mindset of trying impossible things, or do possible things with the wrong tool (Photo).
The most capable tool in principle for this challenge is procedural texture filter. Unfortunately, it currently lacks most color format conversions, even basic RGB to HSL must be done with basic math. (I have these ready to share if needed).
I think a simplified version of your target “result” using a triangle shape might be practical.general steps:
- convert from source color format into LAB (assuming LAB is good enough approximation)
- define equations to clamp colors on the 3 sides of the triangle (stored in temp variables)
- If you could provide the equations for the 3 sides of the triangle this would help
- Use sign() function as helper for if/then/else decision trees to combine intermediate results
Looking forward to collaborate in this challenge
Timo
Looks like I triggered someone ;)
-
15 hours ago, Old Bruce said:
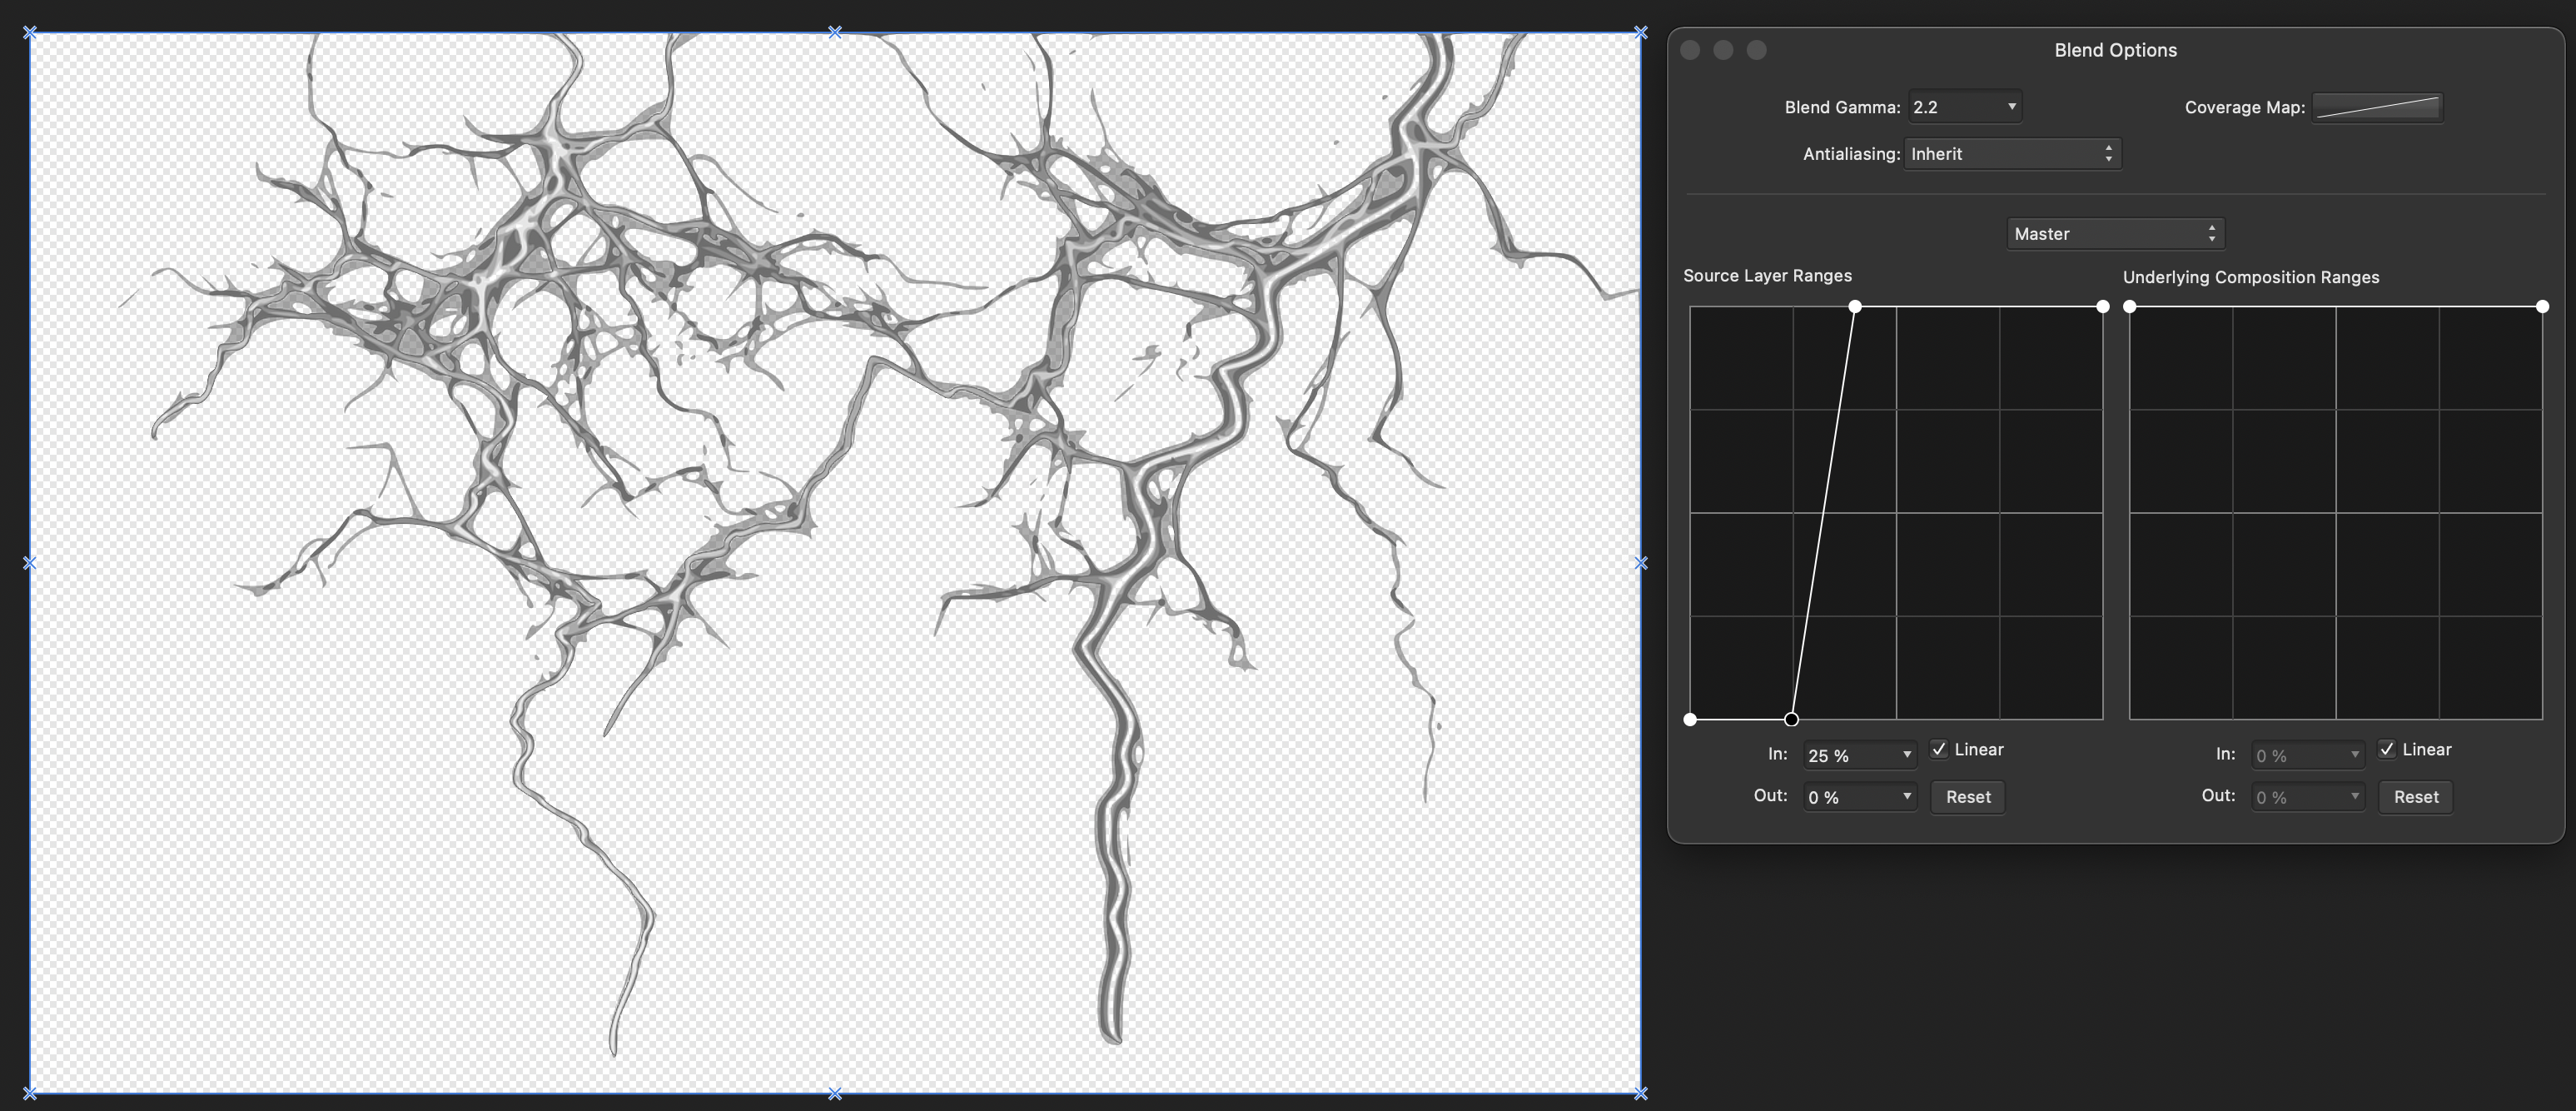
Try using a Soft proof Adjustment layer
Thanks for the input, did that with an opacity of 75%. It does the trick quite well...
-
Just guessing...
It looks like he uses texture, grain and some airbrush brushes in pixel layers overlaying the actual vectors to achieve that look. At some parts the vectors could be rasterised and then further edited (blurred, smudged etc.) as pixel layers to get rid of that "vector look" you mention.
-
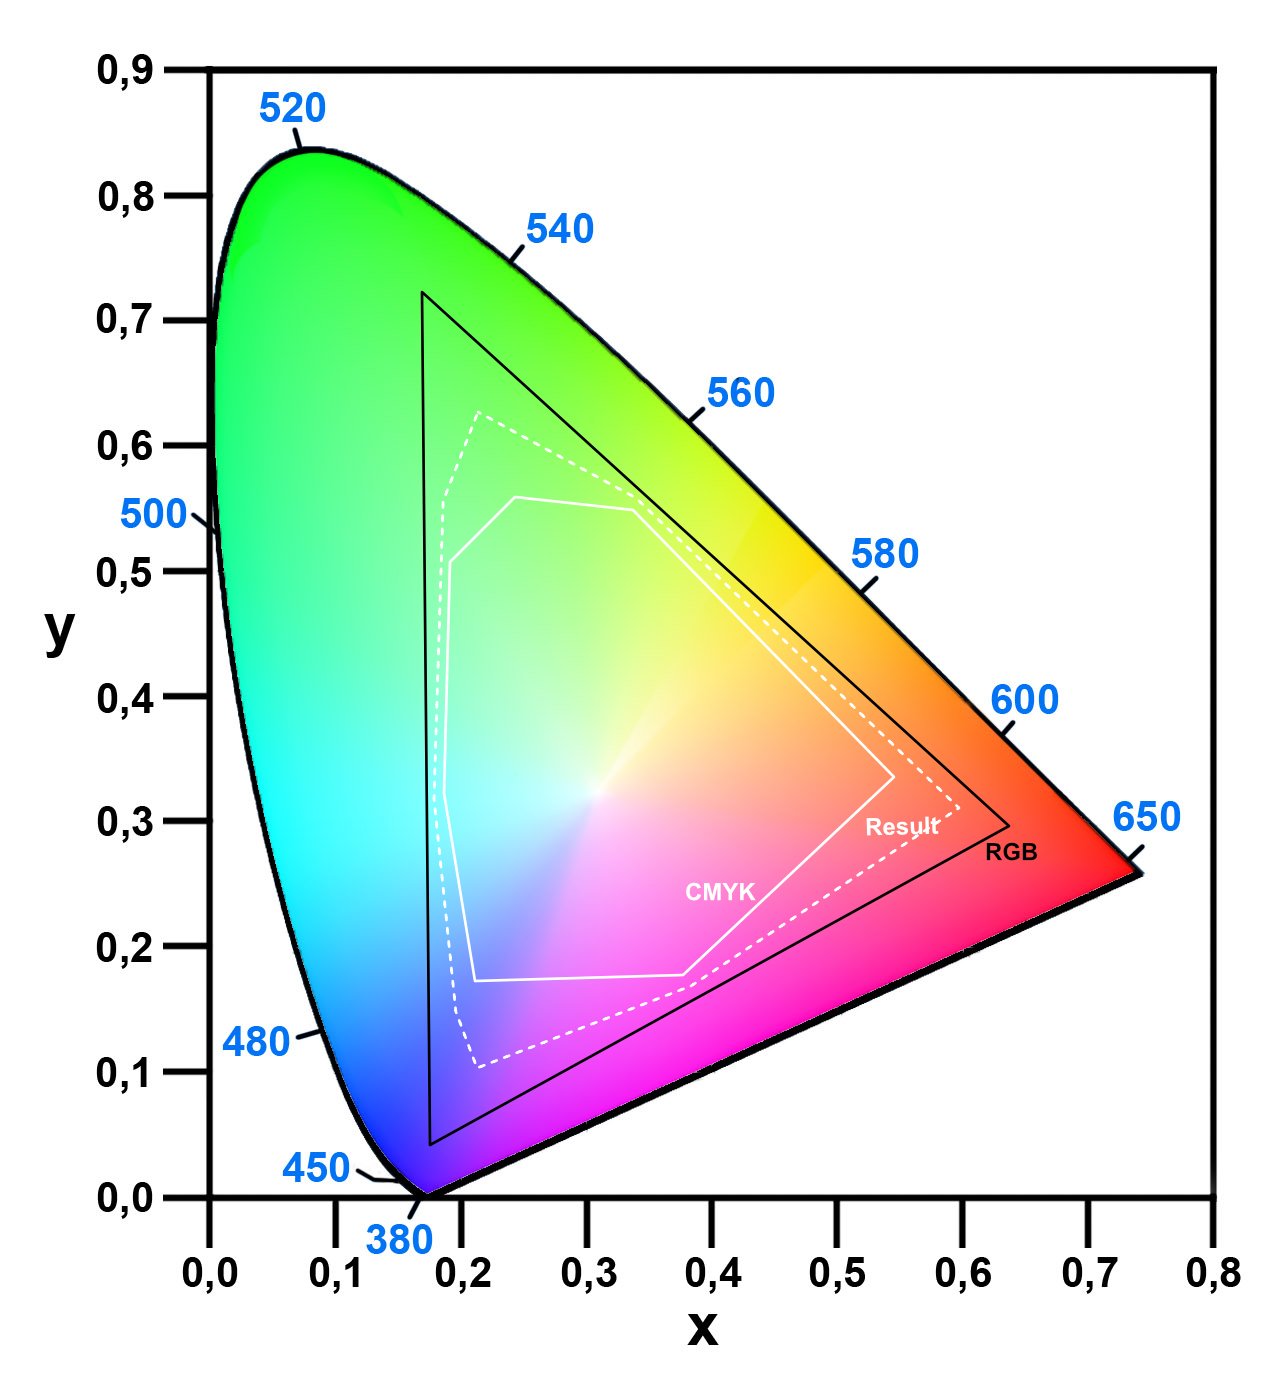
I want to simulate the limitations of color gamuts from 2 different color profiles in a editable way.
A random picture containing colours that are possible in the RGB spectrum, could be a color circle for example. Using filters, adjustment layers or other techniques to simulate something in between RGB and CMYK is the goal. Less colours than possible in RGB but more colours than possible in CMYK.
The result should be something in the middle between RGB/8 sRGB IEC61966-2.1 and CMYK/8 U.S Web Coated (SWOP) v2.
I am curios and I want to learn, so any input regarding this is welcome.

-
-
-
2 minutes ago, walt.farrell said:
It looks like a standard pressure curve, and one of the controls for the nozzle switching is pressure, so perhaps it applies when the user is using a mouse rather than a pressure-sensitive stylus.
correct. The Affinity Help explains it like this:
- Nozzle-specific controller (Pressure, Velocity, Rotation, etc.)—For multi-nozzle brushes, pick a controller from the pop-up menu and click the adjacent Ramp profile icon to select a standard profile from lower thumbnails or create your own using the ramp chart.
-
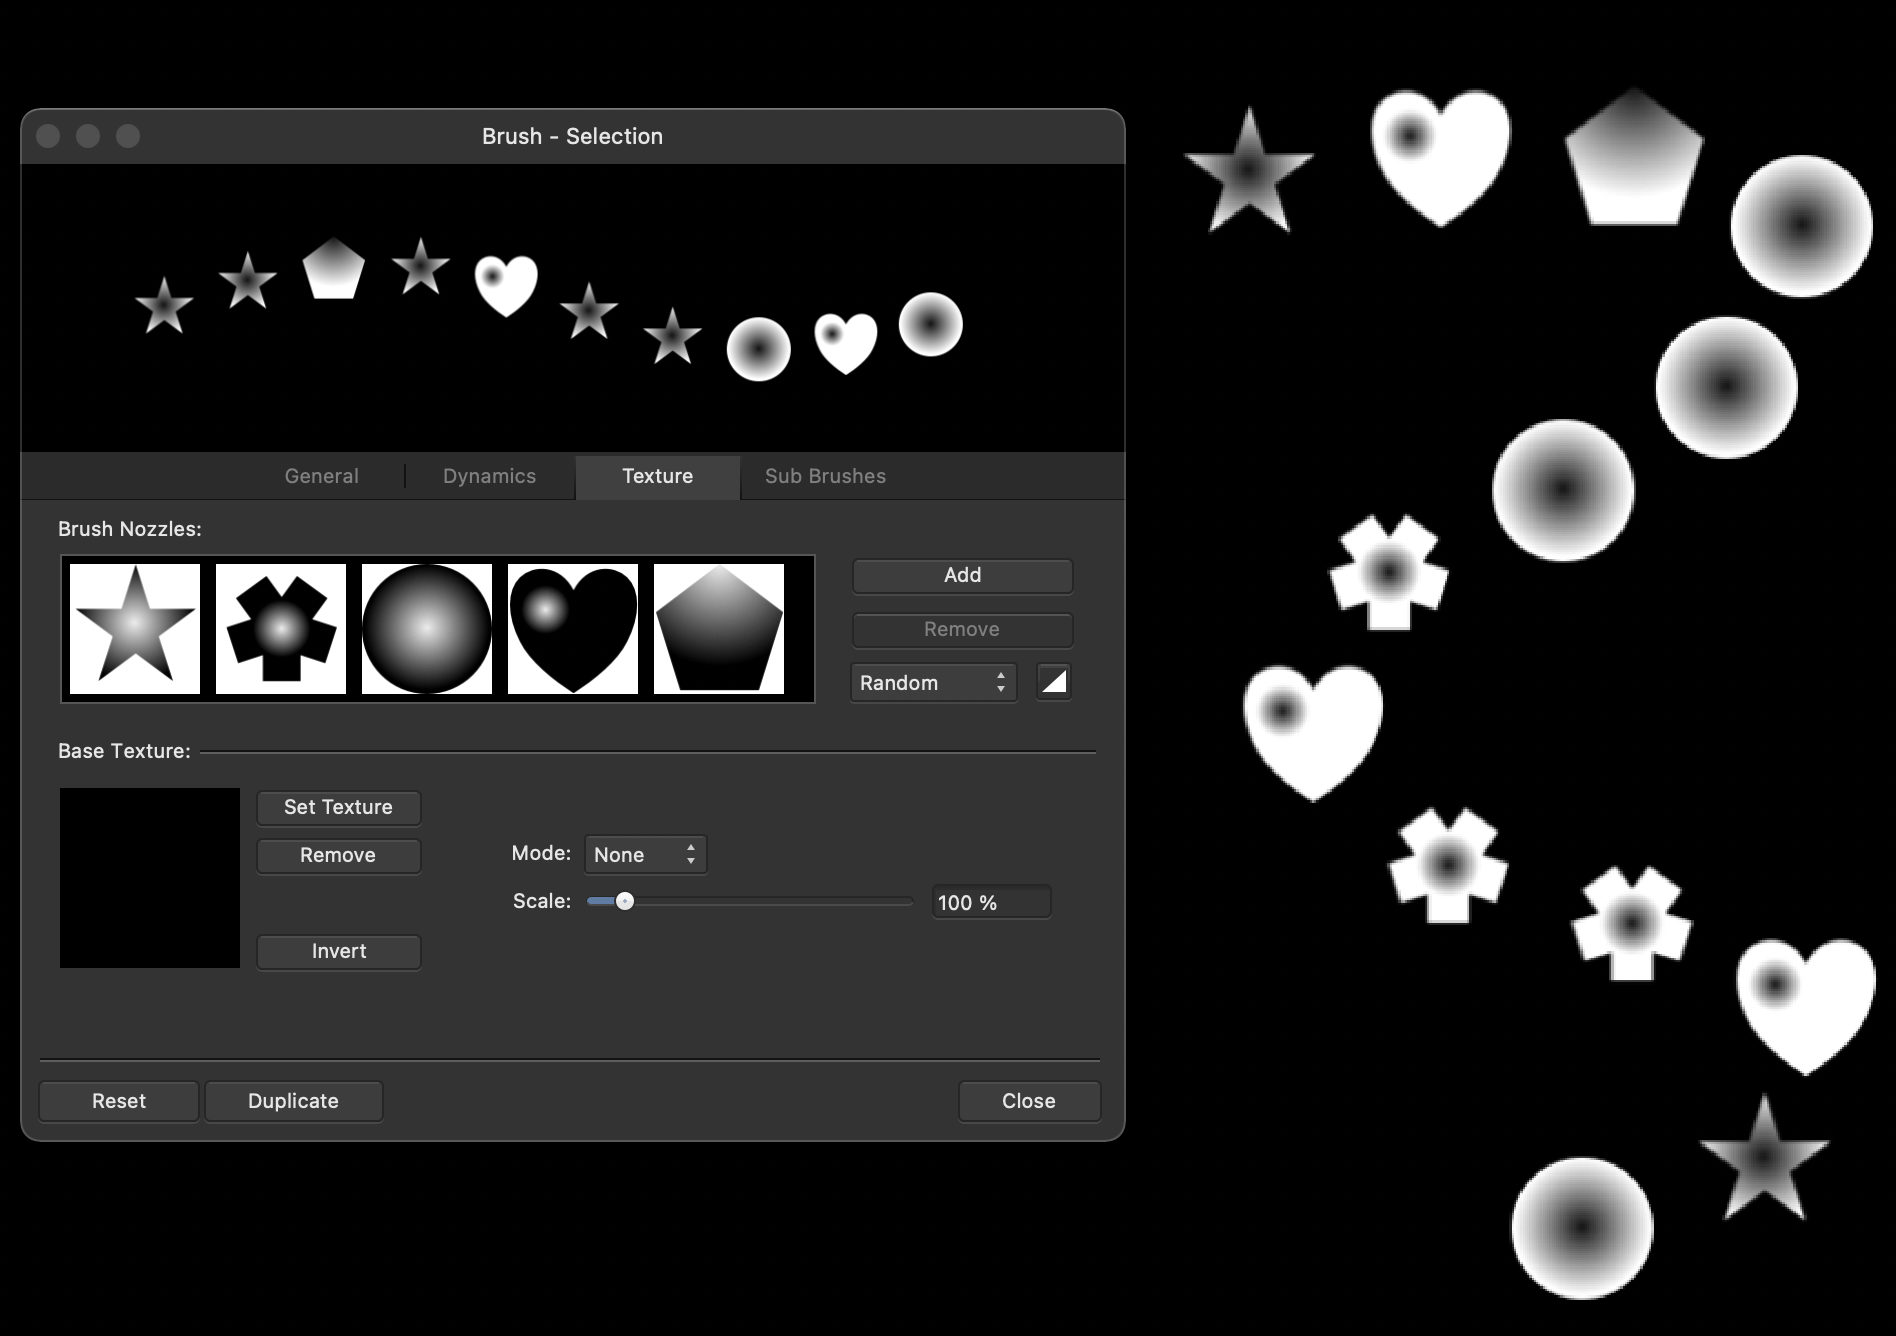
1 minute ago, R C-R said:
Have you tried changing the curve in the popup to the right of the Cyclic setting?
No, for what is this curve setting ?
-
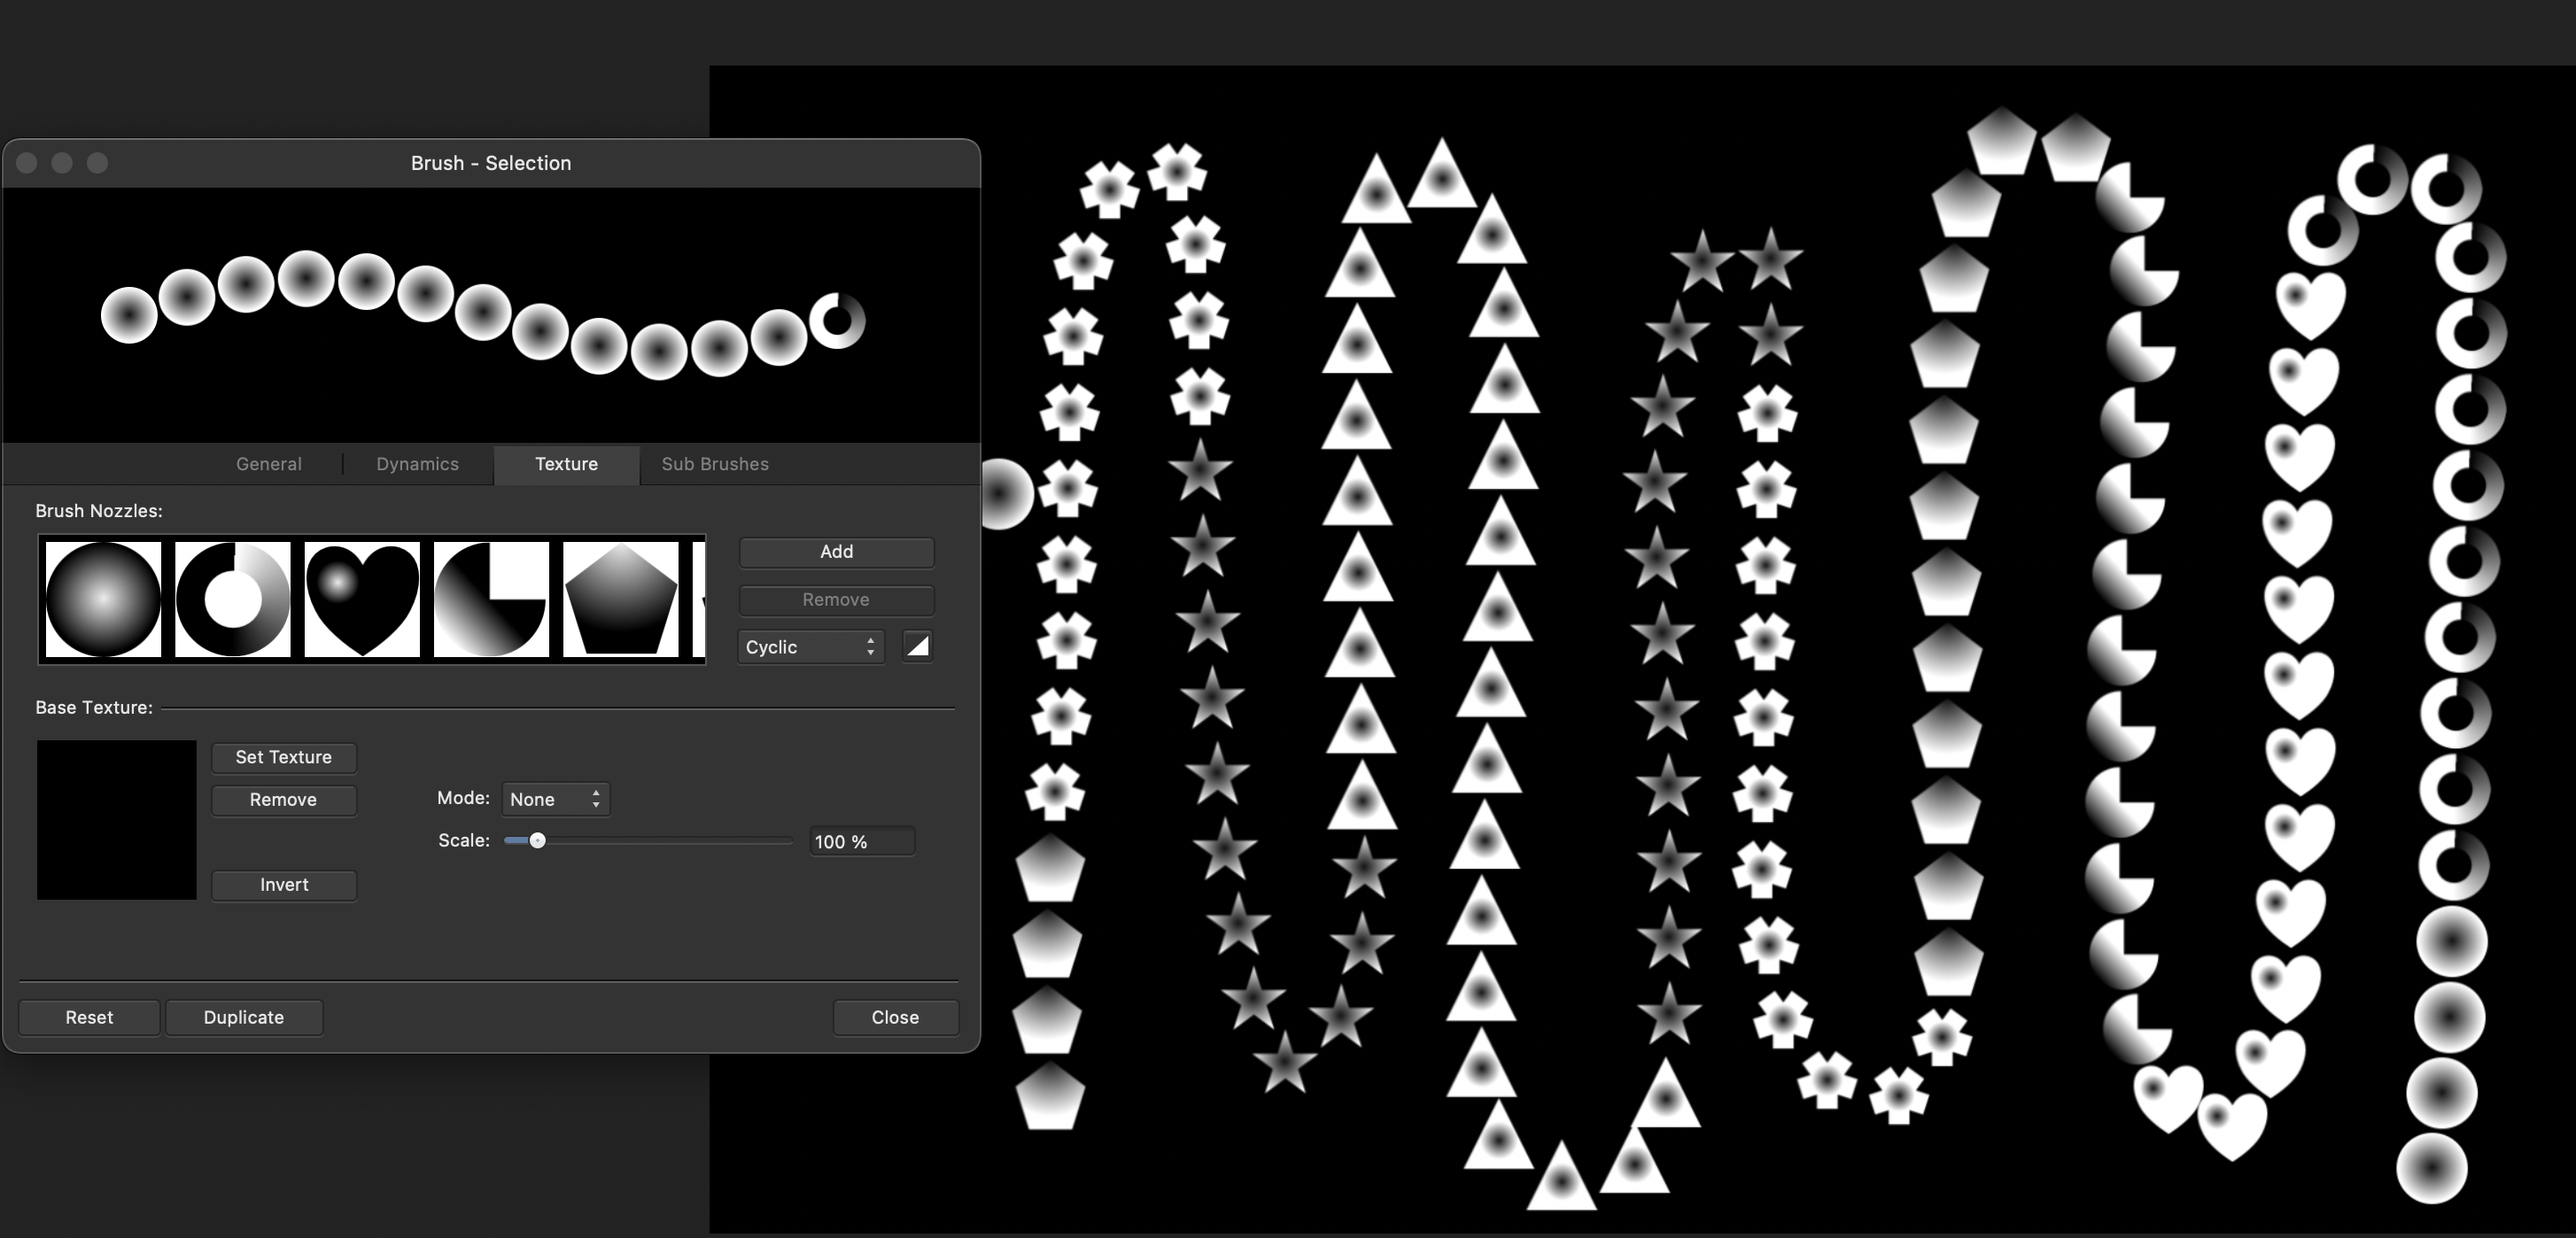
9 minutes ago, R C-R said:
I have no idea if or how well this would work but have you tried changing "Random" to "Cyclic"?
For some use cases it could work very well. Yes I have tried all the possible settings.
Cyclic results in a brush stroke like this:
-
I am working on my own custom brushes.
I am creating brushes with 5 - 8 different nozzles. The random setting in the nozzles texture panel works quite well for some brushes but I need to control the sequence of the nozzles a little more.
The problem is that the random setting produces a stroke where the nozzles often get repeated twice or more in a row. In my example you can see that the "square star" appears twice in a row and the "circle" 3 times in a row in a single brush stroke.
- Is it possible to iterate in one sequence trough all the nozzles ? In this case:
Star -> Square Star -> Circle -> Heart -> Polygon -> Star -> Square Star -> Circle -> Heart -> Polygon and so on...
- Random would work too but without repeating the same nozzle twice in a row.
For example:
Circle -> Polygon -> Circle... would be acceptable.
Circle -> Circle -> Polygon... A circle after a circle should be avoided. The random setting unfortunately generates a lot of this patterns where on brush nozzle gets repeated twice or more in a row.
If I got it right, this post is about the same question, but it is quite old and does not really provide more information on this topic.
-
2 minutes ago, walt.farrell said:
On Windows, I would simply:
- Use File > Open from the application, then
- Select multiple files, then
- Click Open.
If the Mac version allows similar functionality, you might try that rather than opening them from Finder.
...it does, but it's unhandy in this workflow. I simply select the templates, rightclick and choose desired application in the finder. Anyway, like i said, it's not the worlds end, just wondered about the concerning messages since the file was created by an authorised affinity app.
-
I see, sorry for the confusion...
The whole procedure was the following:
I created lots of templates in Affinity Designer for use with Designer. Then I created lots of templates in Affinity Photo to use in Photo. Both end with .aftemplate.
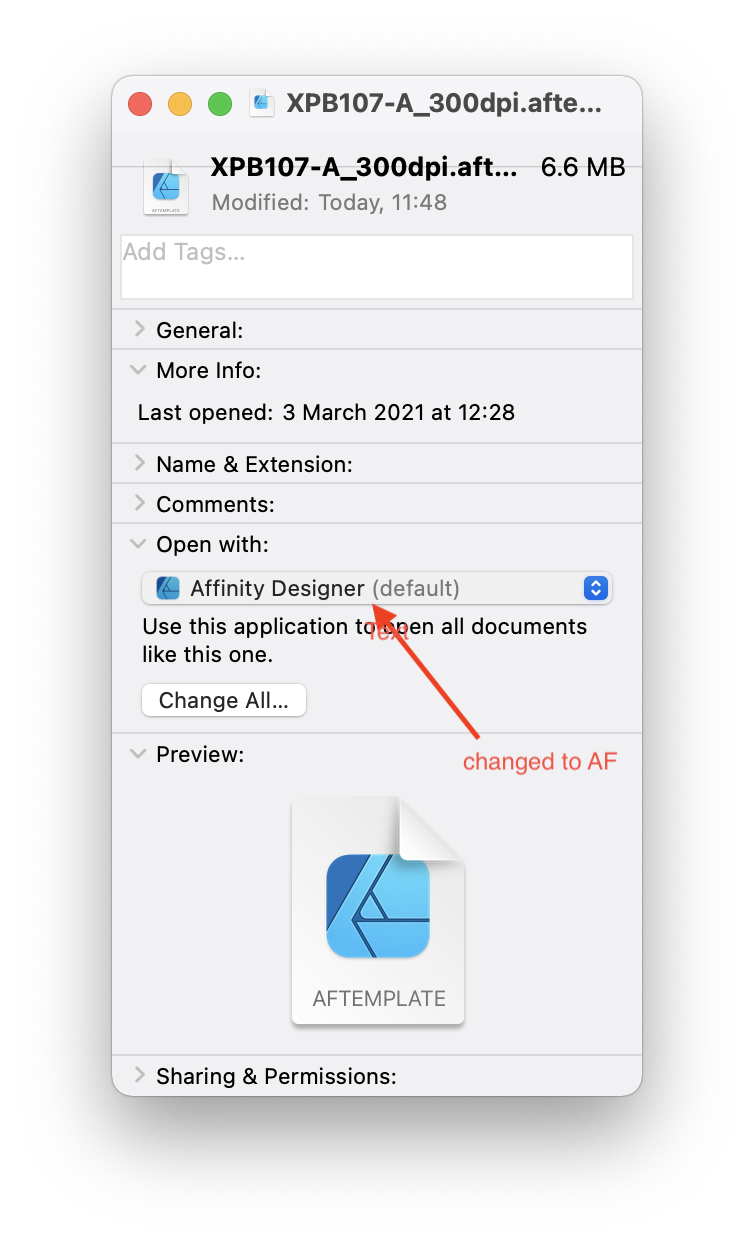
Then I took a template generated with Affinity Designer and changed it to open with Designer instead of the default set Publisher. I also checked the option to open all files with the .aftemplate ending with Designer.
Since I need to create lots of templates, It is easier to open a batch of templates direct from the finder to check them for mistakes I may made during creation. Therefore I took the ones created in Photo and changed from open with Designer to open with Photo, this time without the change for all files option. Now the templates changed to Photo won't open from finder anymore and generate those messages. I only changed templates generated in Photo to open with Photo.
The Templates work when open via File>New...>Templates.
Second reason for this workflow is that Affinity still displays custom template file folders in a random order...
So when dealing with lots of different templates I need to do that in the finder until Affinity has a fix for this issue.
Sure, I can set all all of the Templates back to open with Designer, and open them via right click and select the desired application. But when handling large numbers of files, it helps to see if its a template I made for Designer, or for Photo and open with a double click for convenience.
-
41 minutes ago, walt.farrell said:
Just a guess: You purchased the applications from the Mac App Store, and the sandboxing functions in MacOS are "protecting" you.
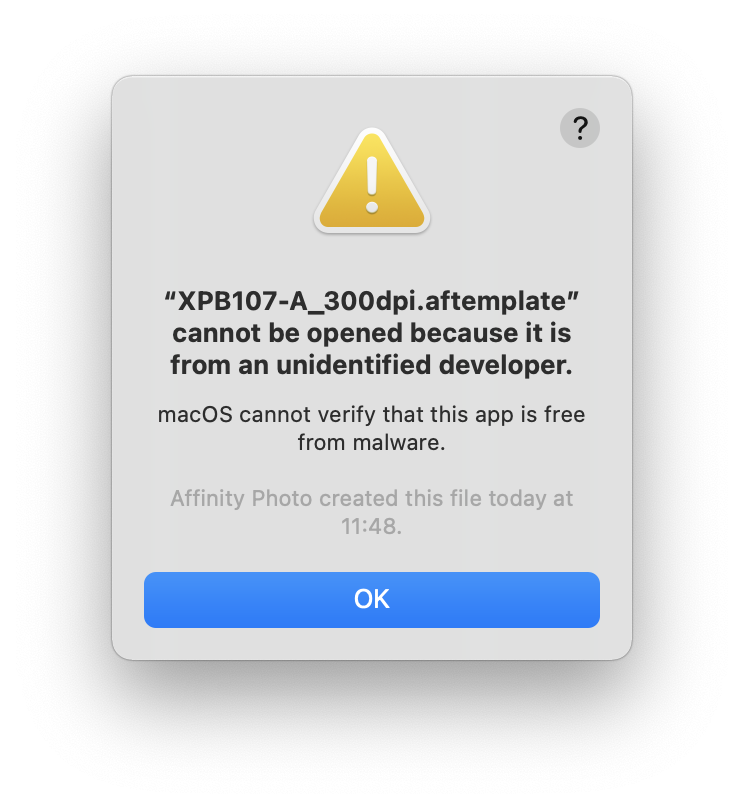
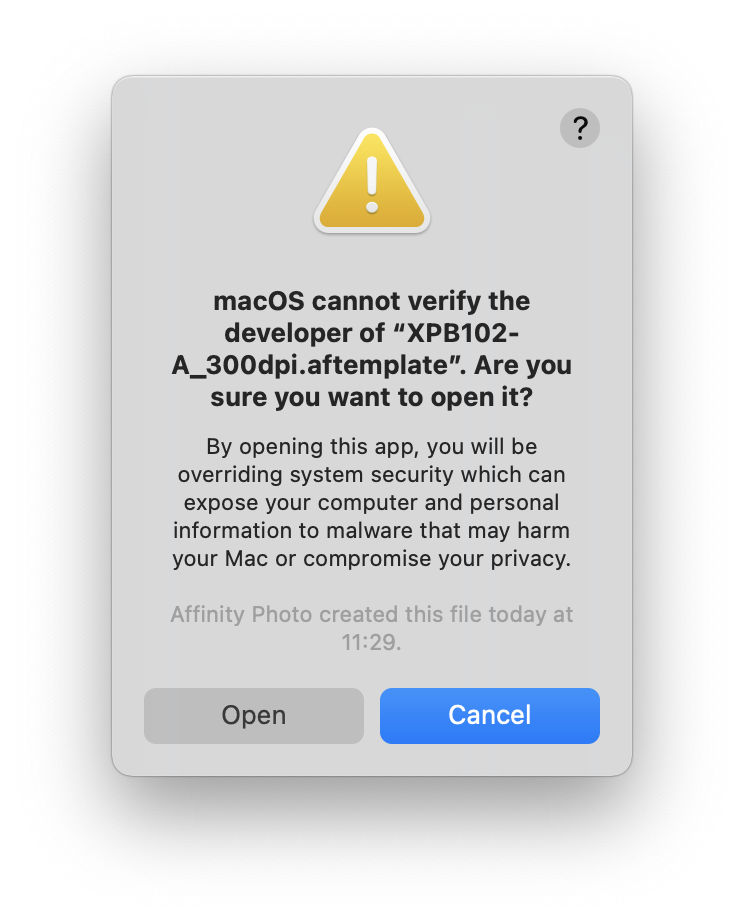
Yes I did, but this is some weird overprotecting in this case 🤨. "Affinity Photo created this file..." but now its not safe anymore ??
Does not make sense to me in any way. It's not the worlds end, but still I like to be able to change the default app to open with on a double click.
-
-
I created a few templates in AF this morning. I was able to open them in AF new>templates>myCustomFolder> abc.aftemplate and direct from the finder as well.
Since I changed the "open with Affinity Publisher" to "open with Affinity Photo" the templates can not be opened from the Finder anymore. Resulting in strange warning messages from MacOs. The templates can still be opened via AF>new>templates, but I need to open multiple of them in one action to check them for errors. Thats why I opened them in finder directly.
-
There are no Artboards in Publisher (same in Photo), so there is no value to change for that slider. I dont know why its in the Prefs, it only makes sense in Designer...
-
14 minutes ago, firstdefence said:
You could fake it by overlaying a patch for each colour, layer opacity at 75% to show the effect. This would save having to build it all.
Yes, thats a good idea. Gonna go with this, saves me a lot of time...
Thank you, that helped me a lot.
-
2 minutes ago, firstdefence said:
You can't sharpen that point because there are no nodes to work with, even if you expanded the stroke the 3D effect wouldn't change and the node nearest the curve will be a sharp node.
The fx is like a virtual raster effect.
The only way to get sharp 3D is to construct it, using the contour tool to get a quick sharp inner shape helps but the facets and shading all need to be manually drawn in such is the art of vectors.
Makes sense 🧐, thank you for clarifying this.
-
Not sure if I got this right, but I think I am having the same question here.
I need all the corners to be sharp. The inside corners are round and they should be sharp to be consistent with the outer ones. But I cant find a setting to achieve this.
My initial question:

Shortcut to resize a rectangle to artboard or canvas size ?
in Pre-V2 Archive of Affinity on Desktop Questions (macOS and Windows)
Posted
Still amazes me how well this forum works. Thanks to everyone for contributing!