kirkt
-
Posts
440 -
Joined
-
Last visited
Everything posted by kirkt
-
Soft/coarse grain:
-
A couple of renderings. Fine/sharp grain:
-
Comparison of workflow steps:
-
Some images: Working Dialog (it's a little bit busy at the moment):
-
Here is another, similar approach using the Distort > Equations to generate noise and then applying it. I broke the grain into the Shadow-Midtone grain and the Highlight grain to control the look of the grain application. This is all performed by the user-controlled blend mode used. I cannot figure out how to select and group multiple layers while recording a macro, so the resulting layer stack is not as tidy as it could be. The macro: 1) applies a B+W conversion adjustment layer - this is editable after the macro runs, so you can adjust the color contributions to taste. 2) Stamps the B+W conversion and applies Equations to make a grain layer. I have exposed the parameter "Grain Control" to give the user access to the random seed in the noise function. 3) The noise layer is duplicated so that the Shadow-Mid and Highlight grain have the same noise pattern. 4) A Gaussian blur is applied to each noise layer to control the sharpness/fineness or softness/coarseness of the grain. There are Live Adjustment layers, so they are editable after the macro runs. 5) A curves layer is added with a gentle contrast "S" curve to re-establish contrast - this is editable after the macro runs. 6) A levels adjustment layer is added for the user to fine tune the black point, white point and gamma of the resulting image. In general, the application of the grain layers will affect the tonal values of the underlying black and white conversion, so adjustment of tone and contrast will be required after the macro runs. I suggest first accepting the default values and playing with the blend modes to see how they affect the rendering of the grain layers. I also would suggest grouping the two grain layers and turing their opacity down - this can be done in the dialog while the macro is running, but you must adjust each individually. Adjust each to taste in the dialog and then you can group the two layers and turn the effect down to taste by adjusting the group opacity. The black and white conversion in the macro is simply the default conversion with all color sliders set to the their zero position. This conversion should probably be adjusted after the macro runs to get the best conversion. Thanks to paolo for encouraging me to try to understand the Equations interface with this interesting application. Please feel free to download the macro and edit it, etc. I am still learning all of this, so the implementation is weak and the equations are not real sophisticated. kirk Dropbox link to macro file: https://db.tt/pNOXLuvXmy
-
This works fine in RC5 for me - you can set your color pref for 32bit files or override the preferences with the linear profile you want to assign by enabling and using the "Profiles" dropdown in the Developer Persona. Try specifying other profiles (ProPhoto, AdobeRGB, BetaRGB, etc.) to see if it is a problem with your specific profiles not working as expected. kirk
-
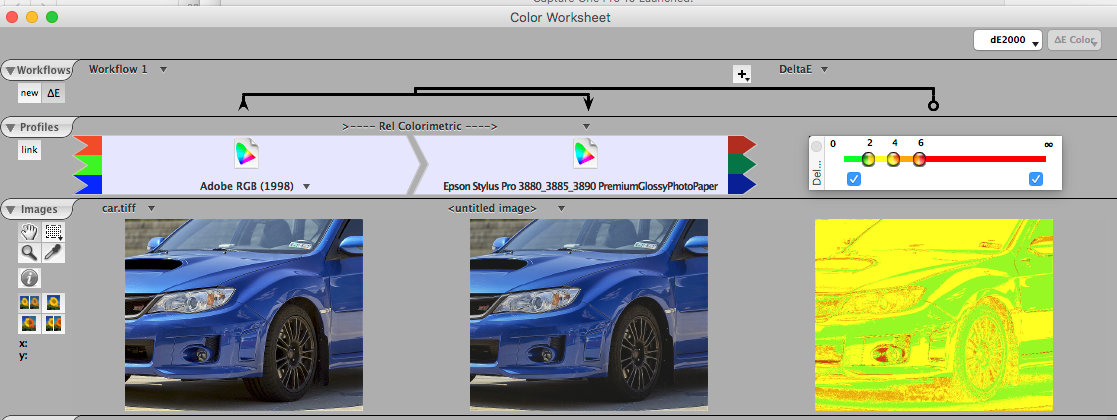
If it is possible, it would be terrific if the "Gamut Check" feature in the Soft Proof adjustment layer provided a false-color overlay/map that gave an indication of how far OOG the pixels were, say in deltaE, instead of a gray overlay that does not indicate how far OOG each selected pixel actually is. Even better would be a preference to map the false color overlay to different dE values - that way, the user could specify the level of dE discriminated in the OOG overlay. For example, green for a dE <2, yellow for dE between 2 and 6, red for dE > 6 or something like that. This would be useful in assessing OOG colors for print, for example, and what adjustments would be necessary to bring the current document into gamut for the intended output space. Sort of highlight and shadow clip warnings in a typical raw converter. I can envision making a saturation adjustment or a Lab curves adjustment and watching the OOG indicator map change from lots of red and yellow to a little bit of yellow and calling that adjustment sufficient for the conversion into the destination color space. Color Think: http://www.chromix.com/colorthink/pro/pro_worksheet?-session=SessID:47E61C221d6c420F6BuomWB1C0FC provides this kind of gamut map, but is a professional color tool that is expensive and requires a lot of additional knowledge to use, and is not an embedded tool in an image processing application. The attached example shows a particular blue in AdobeRGB and how it would map to an Epson printer profile, with the "gamut map" showing how far OOG some of the blue areas are. Thanks! Kirk Thibault Berwyn, PA

-
OpenEXR and HDR (Radiance) are the two 32bit file formats available for export/save in AP. kirk
-
I sort of figured this was covered before, but a search for LUT and Infer LUT came back with nothing. Sorry about that. Thanks for the tip! kirk
-
Hi folks, There are several different ways to achieve looks in your image editing workflow, and one of them that can be useful is the LUT (Look Up Table). Affinity Photo has an adjustment layer called "LUT" which permits the user to include a LUT in their layer stack, giving non-destructive control to the image look, etc. through a color LUT. The typical use of the LUT adjustment layer is to load a pre-made LUT (in various forms, like .cube, etc.) and season to taste. The AP LUT adjustment layer also provides an interesting second method, the "Infer LUT" mode. As the name suggests, the Infer LUT mode asks the user to load two images: the first image is sometimes referred to as the "Identity" image - the non-modified reference image; the second image is the modified image, typically the Identity image put through some sort of processing to get the final, transformed look. One handy tool for storing inferred LUTs is the HALD LUT identify image - here is a brief explanation of the HALD: http://www.quelsolaar.com/technology/clut.html It is essentially a compact image composed of color patterns that can be visualized as a 3D color matrix. It is usually stored in a non-lossy file format, like PNG. When you apply edits to the identity HALD image, the colors in the image change accordingly, and the edits are "recorded." When you compare the original Identity HALD image to the edited HALD image, the transforms in color can be inferred and, voila, you have a LUT! It is efficient and compact, so you can get good resolution of the LUT transform in a small package. AP can use the HALD identity image and a transformed version of that image to infer a LUT. Why is this cool? Because you can use any piece of software you would like, create a look you want on a working image (any image) - once you have the look you want, you insert the HALD image into the workflow and apply the exact same transform and save the resulting, edited HALD image. You can build a library of the Identity HALD and then all of your edited HALD images and load the Identity and the Edited HALD image that has the look you want to apply into the AP LUT adjustment layer and POW! You can apply your look via the Infer LUT mode. This is a nifty way to export all of your presets from something like Lightroom, where you paid $$$ for the VSCO film pack presets, for example, into a useable HALD LUT. Because it's fun, I've included a link here: http://blog.patdavid.net/2015/03/film-emulation-in-rawtherapee.html That describes film emulation looks using this same technique, along with a bunch of freely downloadable HALD LUTs for those films. The context is within the film emulation module of Raw Therapee, but the functionality is identical to AP's Infer LUT. When you download the film emulation HALDs from the above link, read the README.txt file for more details. The collection includes the identity HALD and a bunch of HALDs that capture various film looks. The looks are all made in 8bit sRGB, but no one is going to analyze your look transform if you use it in a 16 bit document or a slightly larger color space, so have at it! Remember, you can do this with any look you create, in any application, as long as you can repeat the procedure (for pixel-based operations) or insert the identity HALD into your non-destructive layer stack. Also, LUTs do not capture non-tonal/color operations like chromatic aberration correction, etc. Also, with respect to film emulation, this is for tonal edits and does not emulate grain. Have fun! This is a great feature to have in AP, but maybe not as celebrated as it could be! kirk
-
Affinity Photo Customer Beta (1.5 - RC1)
kirkt replied to Andy Somerfield's topic in [ARCHIVE] Photo beta on macOS threads
The amount of effort in such a short time frame to implement the new changes to Apply Image is much appreciated. And all of those other features and bug fixes too. Remarkable work, thank you for your effort. I cannot thank you enough for the time and effort you put into your extensive library of video tutorials as well. They perfectly introduce the feature or concept and the range of the video collection is outstanding. kirk -
I can confirm this behavior on my machines as well. Apply Image is getting better with each beta though! The current beta on my machine shows a preview of the apply image that appears like a halftone or checkerboard artifact is superimposed on the preview - this is when the destination is a mask on an adjustment layer. kirk
-
No problem - I'm sure it will get sorted, just noting it here for the Devs. kirk
-
@p_mac - Thank you for the suggestion - however, even if I simply do a channel replacement (like DR = SG), it shows the Apply Image progress bar as full, but the entire application is unresponsive waiting for the Apply Image to finish and return control to the user. The actual processing is depicted in the preview of the operation, but making it a permanent change by clicking the Apply button triggers the problem. kirk
-
[beta 9] Apply Image starts to apply, but the progress bar freezes and the application becomes unresponsive. CMD-OPT-Esc to force quit shows Affinity Photo in the list, but there is no indication that it is not responding. Apply Image works as expected when you apply image from an external image file. kirk
-
Affinity Photo Customer Beta (1.5 - Beta 8)
kirkt replied to Andy Somerfield's topic in [ARCHIVE] Photo beta on macOS threads
Clicking the "Apply" button for Apply Image causes AP to crash [beta8]. There does not appear to be any way to select a Destination and a Source that are different layers in the working document. That is, the Source is also always the Destination. This begs the question: why are there "S" and "D" designations at all in the equations fields if S and D are identical layers. I would like to see the Apply Image dialog contain a dropdown menu that lists of all of the layers in the active document next to the "Use current layer" button - you could make the Destination layer active before invoking the Apply Image command, and then choose the Source layer from the dropdown list. This way the Apply Image command would become useful for mixing channels from various layers in the document, and the Source and Destination would be explicitly known and could be different layers in the same document. Kirk -
Affinity Photo Customer Beta (1.5 - Beta 7)
kirkt replied to Andy Somerfield's topic in [ARCHIVE] Photo beta on macOS threads
Thank you for the clarification. So are you saying that you can only apply a layer to itself using Apply Image? Or can I select Layer1, for example, before I invoke the Apply Image command (to make it the Destination), then, after the dialog opens, select Layer2 and click the Use Current Layer to make Layer2 the Source? kirk -
Affinity Photo Customer Beta (1.5 - Beta 7)
kirkt replied to Andy Somerfield's topic in [ARCHIVE] Photo beta on macOS threads
Thank you for the excellent explanation - one dumb question - how does one explicitly define the "source" and "destination"? I assume the source is the active layer (the one that is highlighted in the layers list). What is the destination - a new layer to be created by the Apply Image operation? Is it possible to mix multiple layers in the stack in a single expression, or, say the RED channel from Layer 1 and the GREEN channel from Layer 2? Say I had a layer stack like this: Layer2 Layer1 Background Could I write an expression that was something like: DR = 0.5*[Layer1]R + 0.5*[Layer2]G or something similar, where the tokens in the square brackets are the layer names, or layerIDs. Even better: [Layer1]M = [Layer2]G for example, where "M" is a (perhaps newly created) mask for the layer defined in the expression. This would be a powerful way to combine existing layer channels to create layer masks. Thank you for the explanation and the incredibly quick implementation of this new Apply Image set of tools! kirk thibault berwyn, pa -
Affinity Photo Customer Beta (1.5 - Beta 7)
kirkt replied to Andy Somerfield's topic in [ARCHIVE] Photo beta on macOS threads
Thank you for retooling the Apply Image dialog - is there any chance you can provide a brief explanation of its new features - specifically the tokens used to access various image elements in the Equations for modifying each channel? For example, what do "D[channel]" and "S[channel]" represent? "D" -> "document" and "S" -> "source layer" or something like this? Are there other tokens? Also, how does one actually apply the changes? The Apply button is grayed out and inactive after I modify the equations (for example, using the Lab model and making Da = Sb and Db = Sa, channel switching). Thank you! kirk thibault berwyn, pa -
Photoshop Apply Image Functionality Needed
kirkt replied to JimGoshorn's topic in Older Feedback & Suggestion Posts
Another thread has, coincidentally, recently been started that includes requests for the Apply Image functionality, as well as access to all channels and, of course, automation. https://forum.affinity.serif.com/index.php?/topic/25530-color-correction-prepress-missing-tools/ Thanks, kirk -
Color Correction / Prepress missing tools
kirkt replied to Davide.Barranca's topic in Older Feedback & Suggestion Posts
Please also see this recent "hot" thread regarding the same request for Apply Image functionality: https://forum.affinity.serif.com/index.php?/topic/10847-photoshop-apply-image-functionality-needed/ thank you, kirk -
Color Correction / Prepress missing tools
kirkt replied to Davide.Barranca's topic in Older Feedback & Suggestion Posts
I would also like to see both of these important features implemented in AP, please! These are essential image manipulation tools for use in selections, masks and channel-based operations. The current "Apply Image" command is of little use compared to the "traditional" Apply Image command referenced by Davide. Thank you for your tireless development of AP. kirk -
Apply Image
kirkt replied to bash's topic in Pre-V2 Archive of Affinity on Desktop Questions (macOS and Windows)
Maybe an explanation of how Apply Image works like (or will work like) Photoshop would be in order. At the moment Apply Image exists but you cannot apply a channel/layer from the existing image to a layer or channel in the same image, etc. or another open image of the same dimensions. You have to load an external image to apply it to the current image and there is no access to the channels of the external image either. Pointless for most uses of masking and image processing in the PS methodology of using Apply Image. There is no "Calculations" dialog either to attempt to replicate the Apply Image operation in PS. kirk -
Topaz Filters
kirkt replied to tonyt's topic in Pre-V2 Archive of Affinity on Desktop Questions (macOS and Windows)
You need to tell AP which folders to search for plug-ins, and the plug-in support. This is done in the Preferences > Photoshop Plug-ins tab. Not all plug-ins will function even if they are detected. Search the forum for several threads on this topic. kirk -
I can understand your frustration but you need to work with AP to solve your issue, as it is specific to your set up and there is not enough information to reproduce your problem. File a bug ticket and work with the developers to address your issue. I would also advise that you not work in ProPhotoRGB in 8bit color (use 16bit). I have attempted to reproduce your issue and cannot on my MacBook Pro - i do not run it with a second display. I can produce an 8bit ProPhotoRGB image from a raw file in the Develop persona, save it as an 8bit ProPhotoRGB TIFF and open it in AP (left image in attached shot), PS (bottom right) and Photoline (top right) and the images look, for all intents and purposes, identical I am going to guess that your issue is a Colorsync issue maybe involving your second display, maybe due to a larger display gamut? - Adobe/Photoshop's internal color management handles your images and AP/Colorsync does not. There may be a slight change in the shadow tones when I view my above image on my MacPro/Eizo combination, but it is not nearly as drastic as your example. That is my best guess. Good luck. kirk