

Nita Reed
-
Posts
194 -
Joined
-
Last visited
Posts posted by Nita Reed
-
-
3 minutes ago, carl123 said:
Can you point us to one of the pixelated profile pics that folk are mentioning to you?

-
I appreciate the input. It's just extremely frustrating. I understand that you will see pixelization when zoomed. That is not my issue. My issue is the finished product. I have never had folks comment on pixelization of Facebook banners and profile pics. Never. Now they do. Heck, folks make them in CANVA with no effort. I used to make them in Affinity with no effort.
Again...it's not the zoomed look...it's the finished product.
-
I have so many folks notice the issue (at profile pic size. Why are they seeing pixelated thumbnails too (if pixelization is only at zoom)?
-
3 minutes ago, GarryP said:
Photo always shows the image in Pixels, and you can’t change that accidentally or otherwise, so anything you were working on in Photo would have looked pixelated if you zoom in.
See my attached image of your previously ‘non-pixelated’ image as seen zoomed-in.
In your second screenshot image I can’t tell which document you are editing, is it the “KAT -black” or “Pumpkin shades” one?
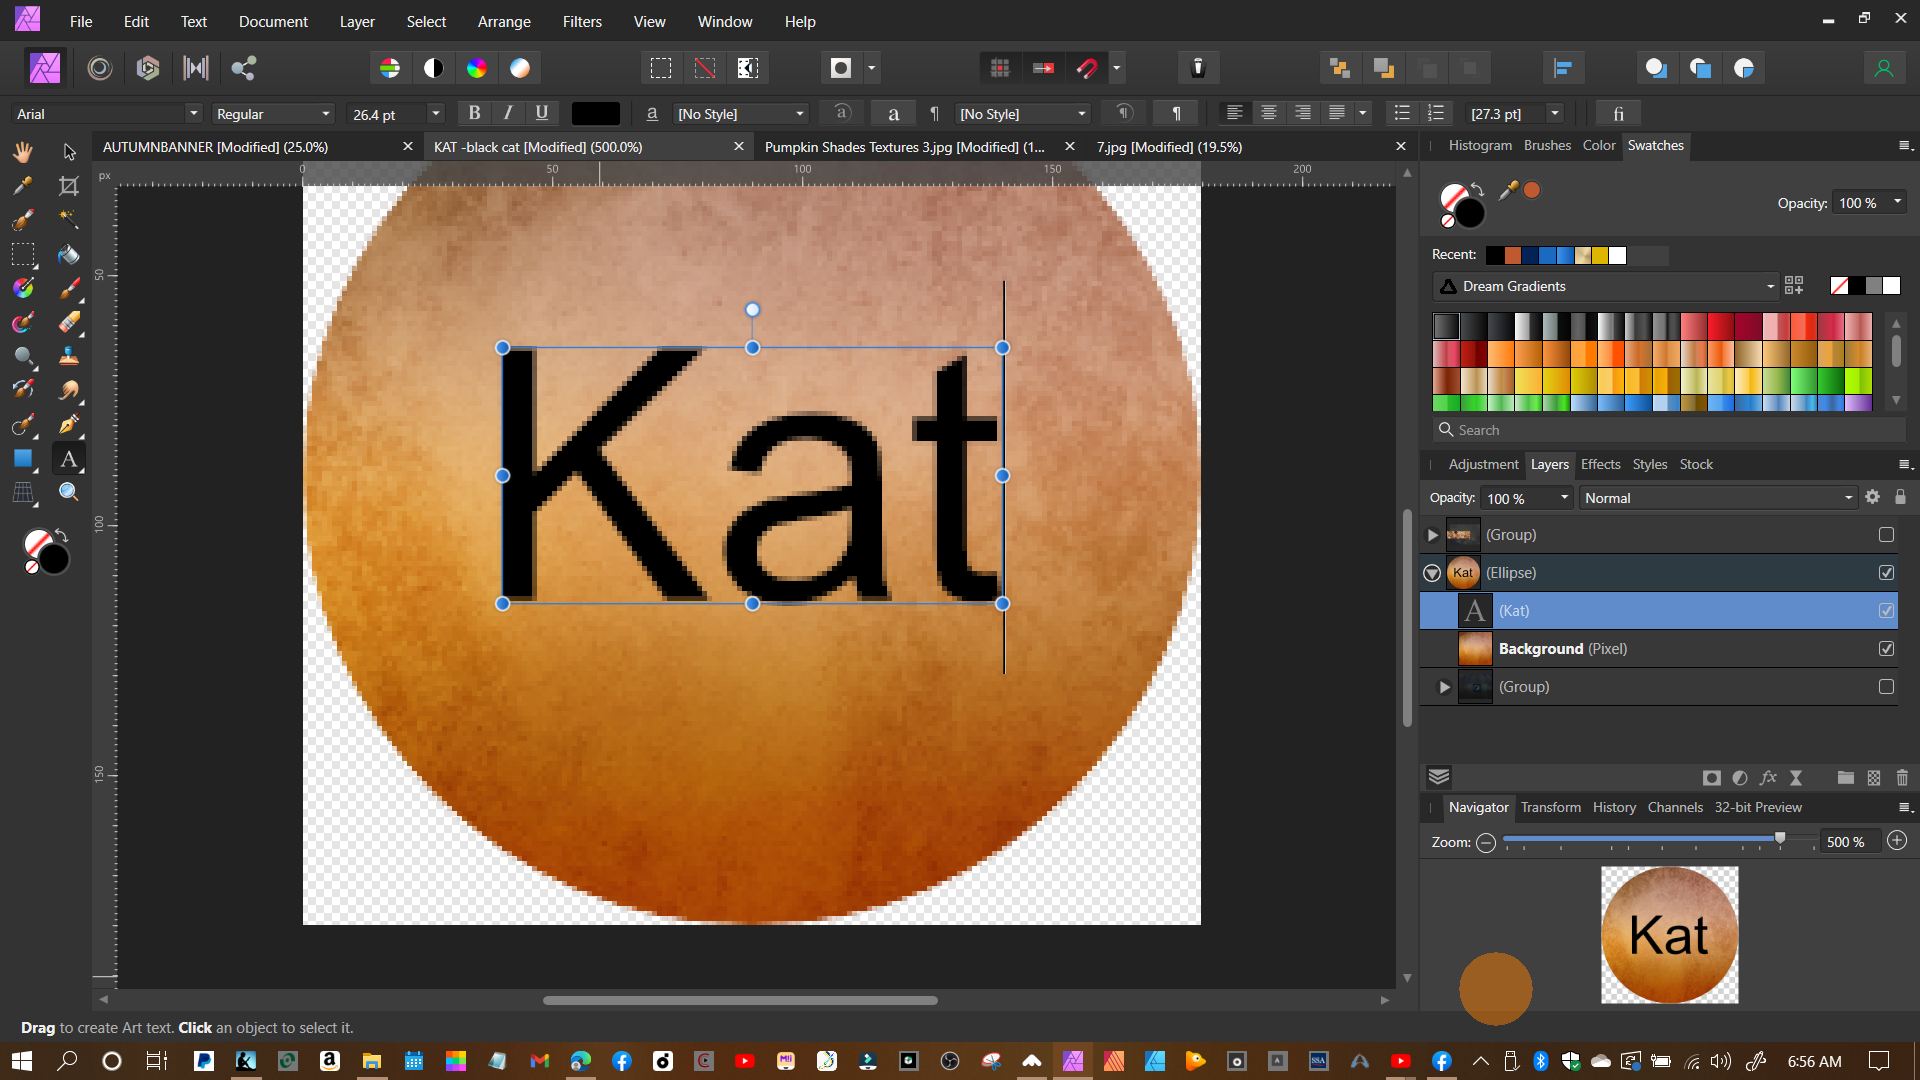
All of the Halloween images (banner and profile pics) came out pixelated when returned to 100%. Look above. "Kat" versus "LOVE" (look at "Kat" at 100%)...the Kat is still pixelated. LOVE is not.
-
Just now, GarryP said:
Are you sure you weren’t using Designer previously?
In Photo the document is always shown as it would look in pixels – a bit like Designer’s Pixel View Mode.Nope...haven't used Designer in a week or so.
-
Look at the "LOVE" profile pic above...done a year ago...same size 180 x 180. NO PIXELIZATION.
-
21 minutes ago, BofG said:
Because the text is only ~50px tall?
I've seen text in the smallest of locations in an image. Heck, I've done it myself...it's never been an issue before recently.
-
17 minutes ago, Alfred said:
Your zoom level is 500%. Change it to 100% for a representative view of the end result.
Still pixelated.
It's odd that folks keep talking about the pixel size and zoom but that was never an issue before. when I uploaded the profile pic it was fine... Now? Nope.
-
I'm still running into this issue.
I'm making profile pics.
The el
lipse is 180px x 180px
I am using the artistic text tool to place a name inside.
Whyyyyyy?
THIS HAPPENS WITH EVERYTHING I PUT IN A PROFILE PIC.
I used to make profile pics with no issue. Now?
Help with this would be appreciated.
-
I would love an Android tablet filled with my Affinity...sigh.
I just don't do Apple products.
-
On 10/22/2021 at 1:26 AM, kirkt said:
Try this - perhaps it will improve the end result.
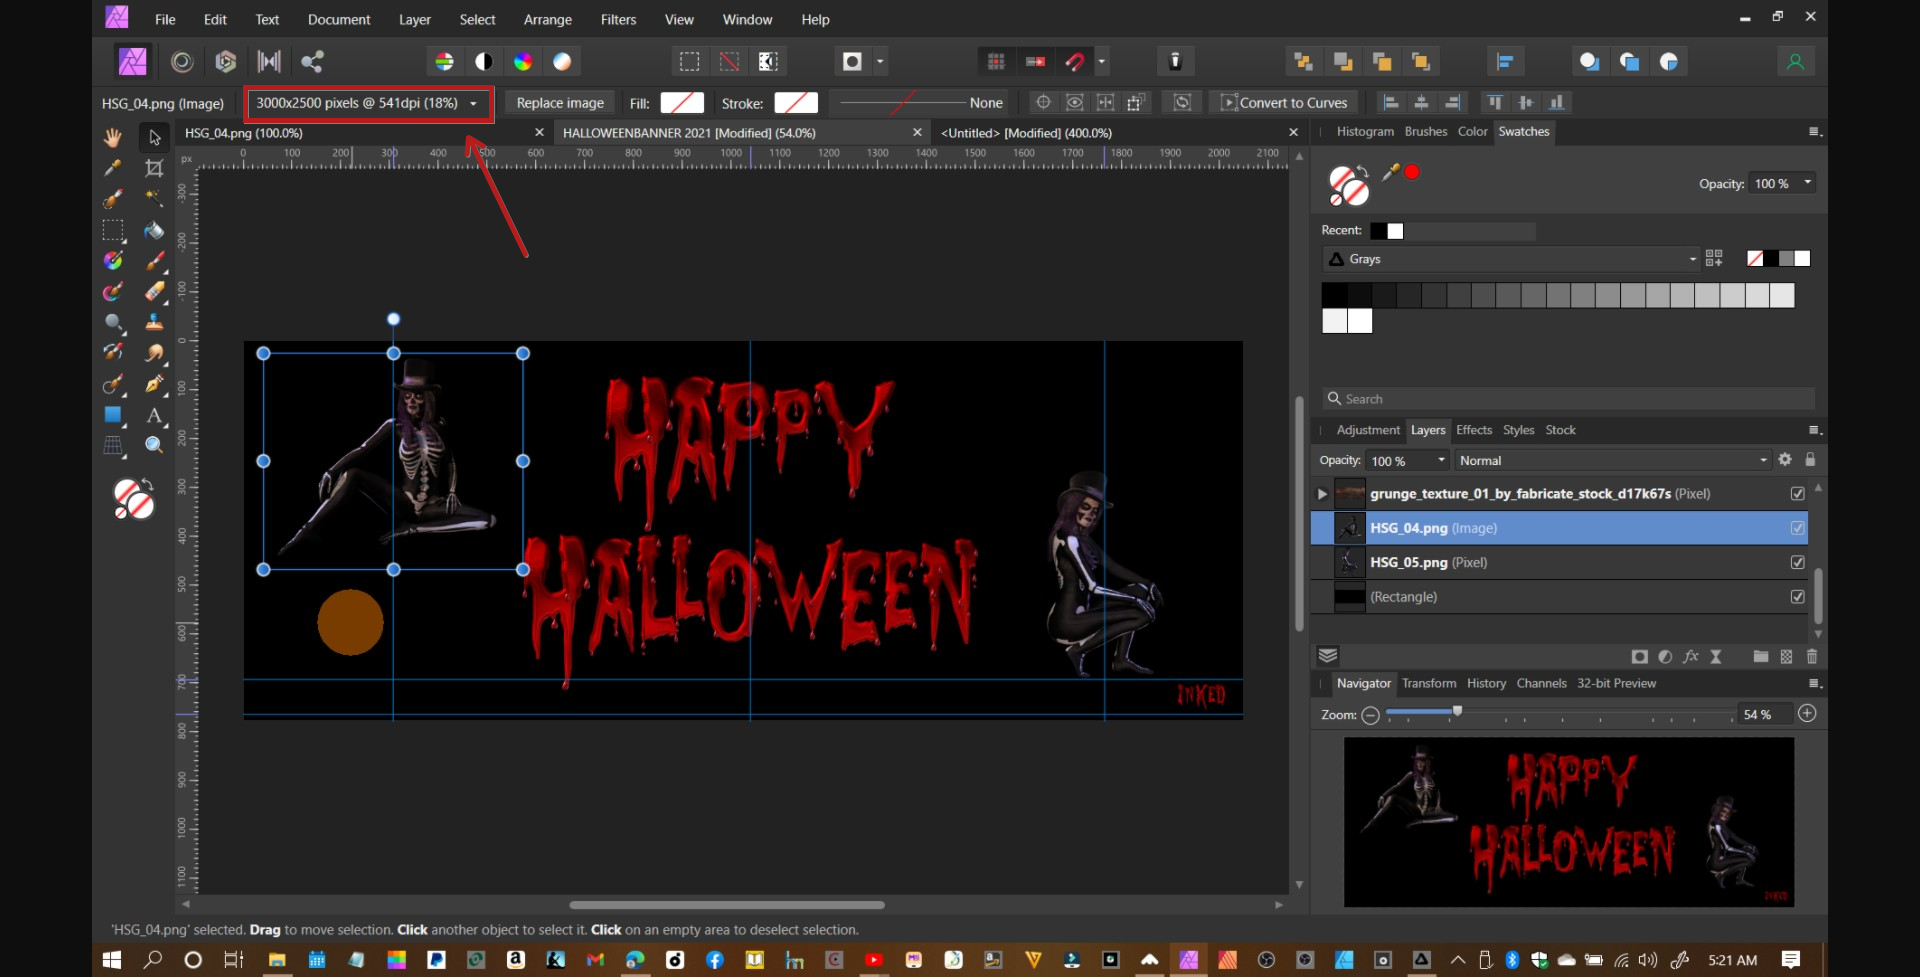
1) Use "Place" as you have been to bring your external image (the Source image at the source resolution) into your banner layout (the Destination image at the destination resolution) and set its position and size within the banner's composition.
2) Once that is set, note the percentage reduction (i.e., the percentage of the original, full-sized image) that the context toolbar is displaying for your placed image. In your screenshot, this data reads "3000x2500 pixels @ 541 dpi (18%)" - so note that the working image size that you ultimately want from your full-res image is 18% of the original. This data will be displayed when you select the Placed image layer with the MOVE TOOL active.
3) Open the original artwork and resize the document to 18% of the original size. AP makes this easy - you can enter "18%" into the width or height field in the Resize Document dialog box. ALSO - choose a more accurate resampling algorithm, like Lanczos 3, or a smoother algorithm, like bicubic. Experiment to see what works best for your images. Now export this resized image as a PNG or whatever - name it something useful like <imagename>_18.PNG or whatever.
4) Back in the banner document, WITH THE MOVE TOOL ACTIVE click on the low-quality image you placed there originally and click on the "Replace image" button in the context toolbar. Navigate to the newly resized image you created in Step 3 and select it. If the MOVE tool is not active when you do this, the Placed image data and the accompanying Replace image button will not appear in the context tool bar.
Note the increase in image quality compared to the image you placed in Step 1.
***
A couple of things are happening here, but the major culprit is that the Place operation appears to use Bilinear interpolation to resample the source artwork to its new size and resolution within the destination document. This may be sufficient to work with a large Placed source document for proxy purposes, but it is not acceptable for the final render. In Step 3 of the above process, you resized the source image using a better interpolation algorithm and got better quality results when inserting the resized image into the destination document, using the Replace image button. Also, because your artwork is CG, the edges are somewhat inartfully anti-aliased (versus a more subtle digital photograph, for example) and this gets amplified by the bilinear interpolation.
So, try resampling your 3000x2500 pixel 3D render of the person in the skeleton costume to 18% of its original size by opening it within AP and choosing Document > Resize Document - enter "18%" into the width field and choose "Lanczos 3 (non-separable)" or "Bicubic" for example - export this as a PNG. Then go to your banner document, click on the low-quality artwork of the character and hit the "Replace image" button and swap in the new, resized image. Using the Replace image command is a convenience because you can swap in the high-quality resized/resampled artwork without disturbing the layout (in the layer stack, for example) and positioning of the proxy artwork in your composition.
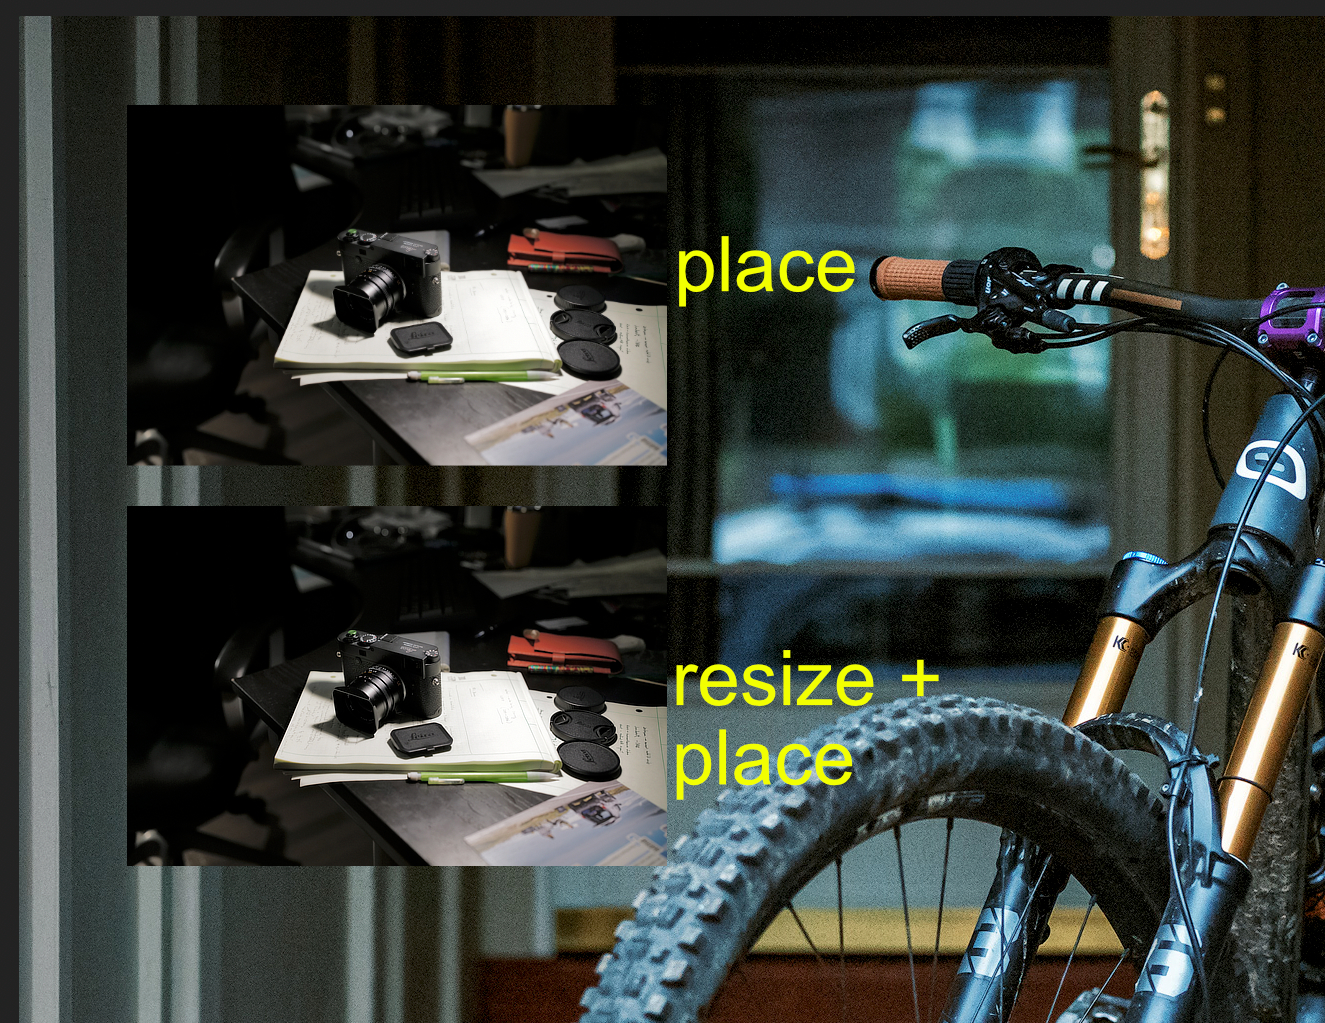
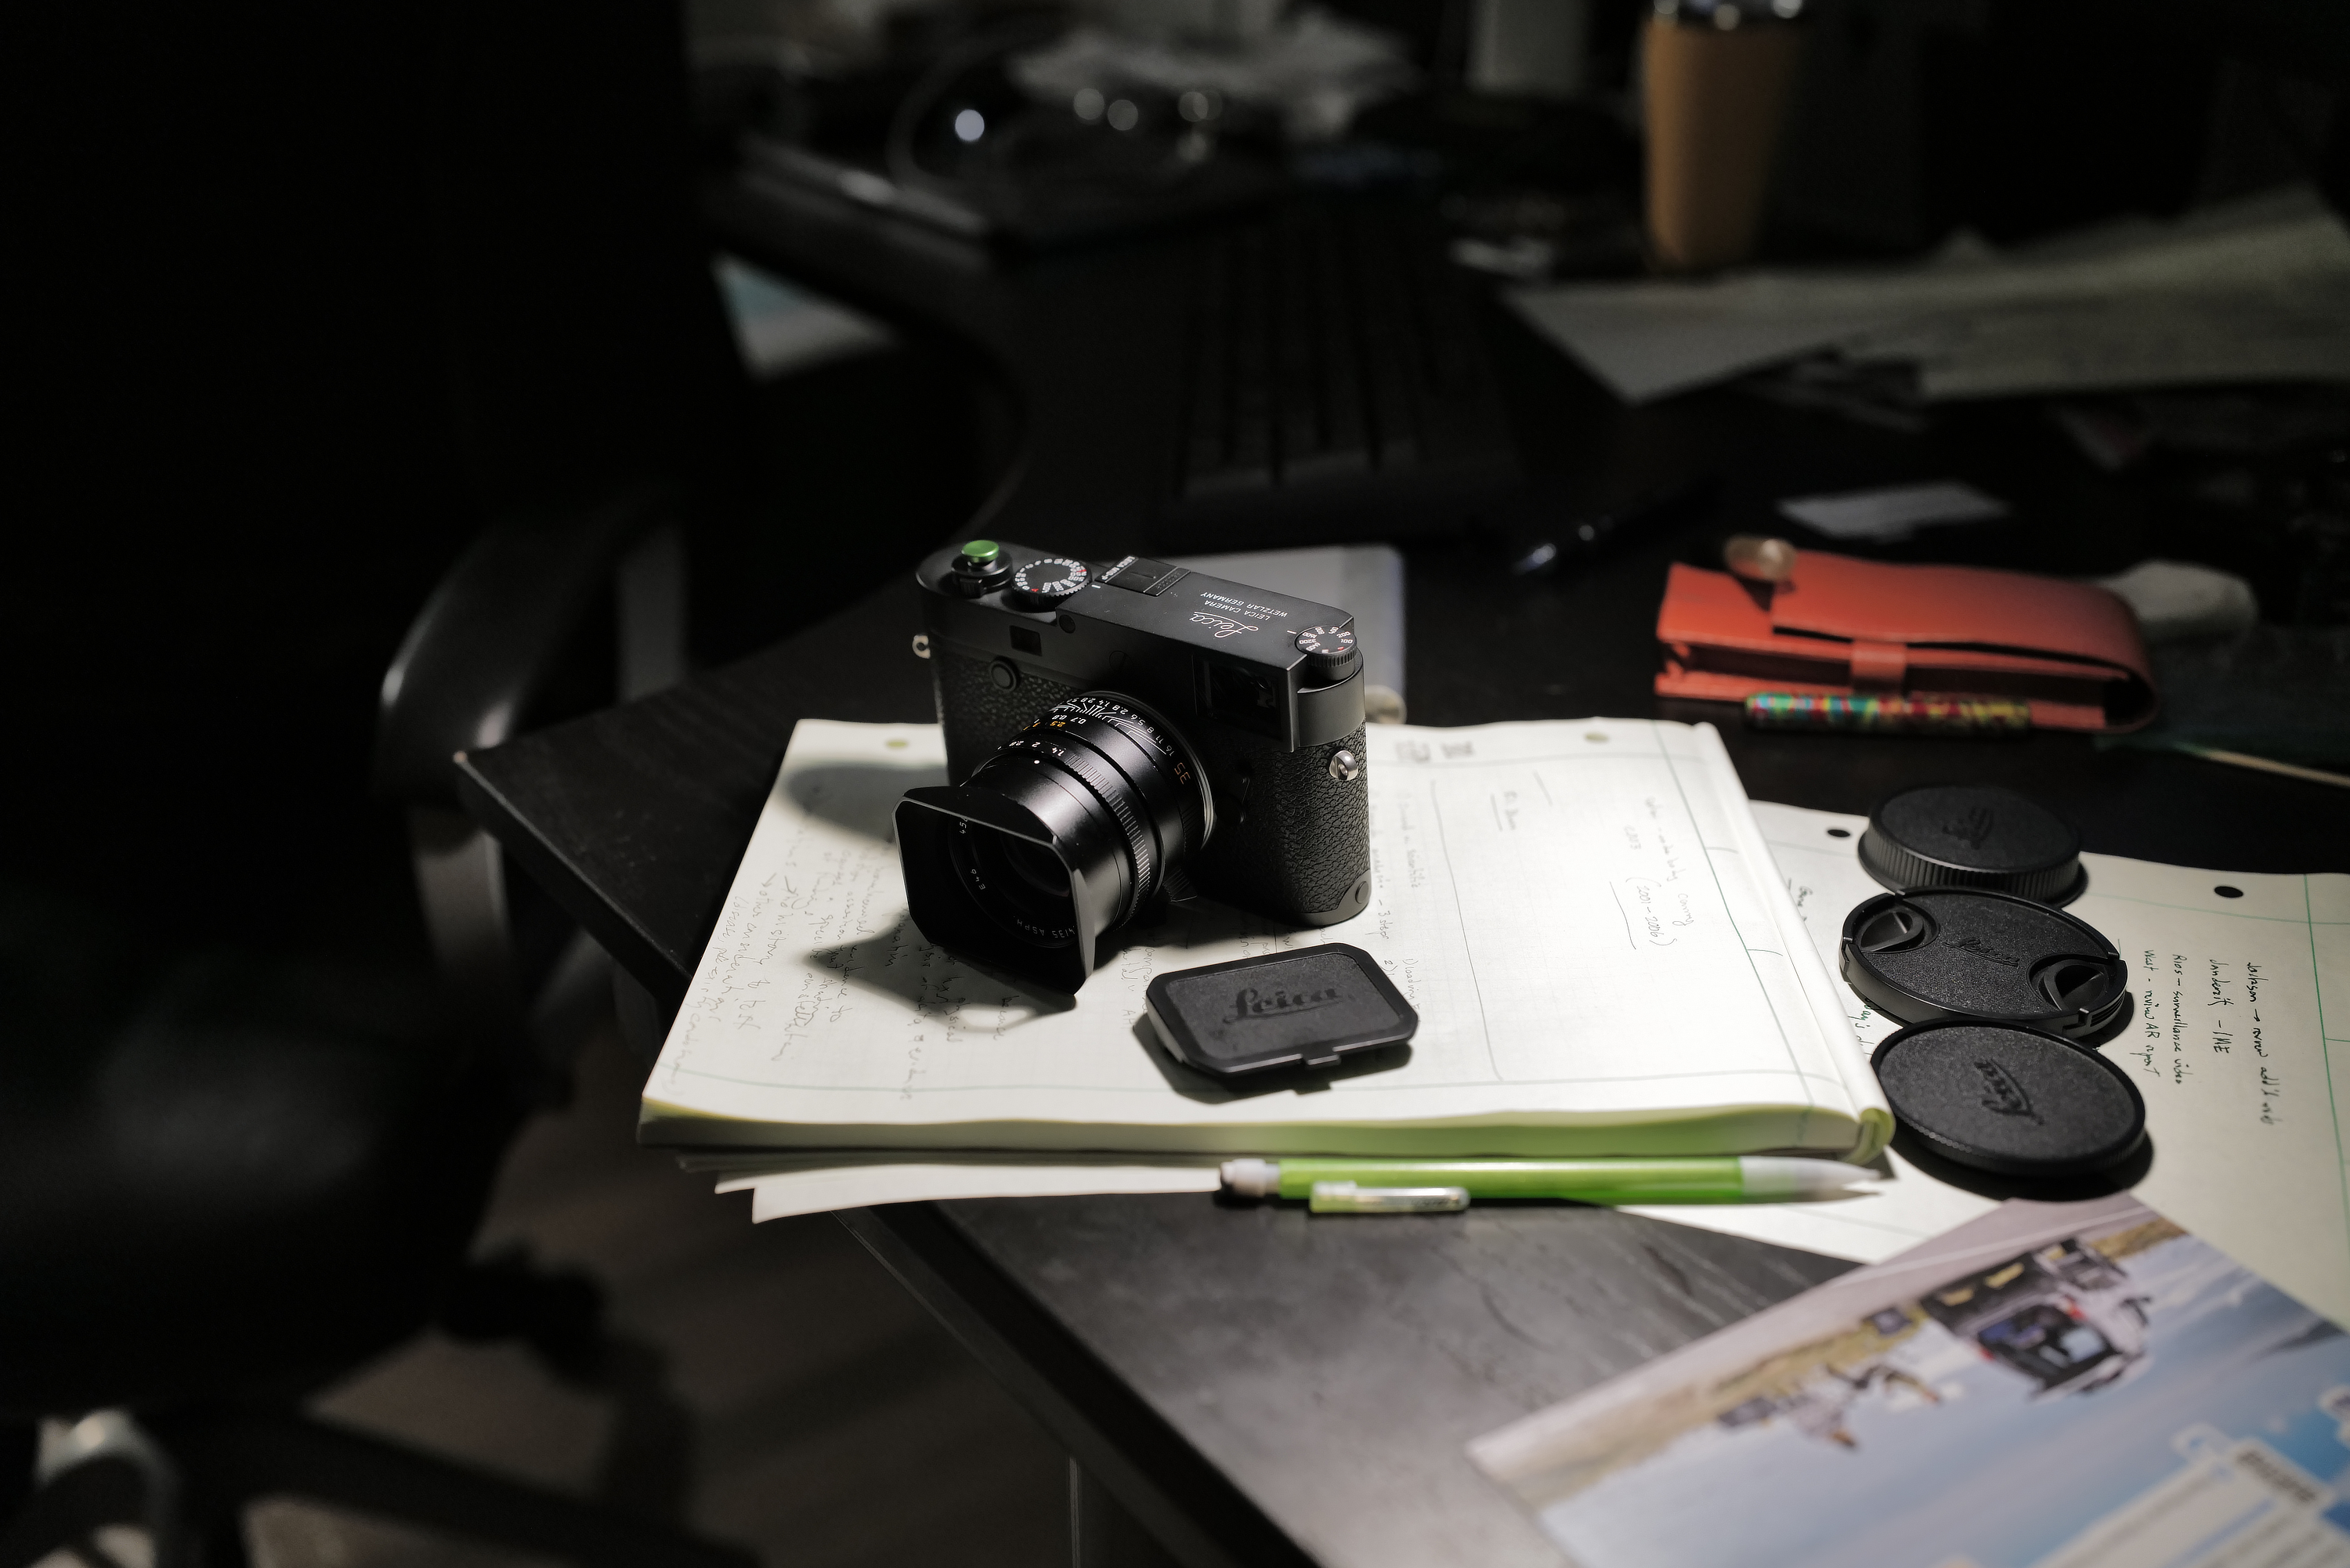
Attached is a screenshot I contrived to demonstrate the results of the above process. The Destination document (analogous to your banner doc) is a 2048 x 2048 pixel image at 72 dpi (a photograph of a bicycle). The two inset images of the camera on the desk are from a 47Mpx camera that makes a JPEG image over 8000 pixels wide. To make things similar to your image data, I resampled the 8000 pixel wide image of the camera down to 3000 pixels wide @ 300 dpi as a starting point. Then I placed that 3000 px wide image as the Source Image into my 72 dpi Destination document of the bicycle image and dragged the corner of the Placed image frame to scale it to 18% of its original size, as displayed in the context toolbar. Then I went back to the 3000 pixel wide original and resized it to 18% using Lanczos 3 (non-separable) resampling and exported that image as a PNG. I then Placed that Source image into the Destination document at 100%. I then took a screenshot of the part of the document that contains the two placed images, viewing the document at 100% zoom. The difference in quality is obvious (make sure to view it at full size).
I have attached the AP file with the comparison placed images in it, as well as the original 3000 pixel wide image of the camera on the desk so you can follow along and do the experiment yourself.
TL/DR version - AP should implement a choice of resizing algorithms for the Place operation. Or a "rasterize" option for the Place operation that permits the choice of resampling algorithm.
Hope this helps - LOL.
Kirk
Wow...that was AWESOME! What a great solution...
THANK YOU!
-
9 hours ago, walt.farrell said:
If you select the Placed Image layer, then the Context Toolbar will have both the DPI and the pixel dimensions when you use the Move Tool.
For that Background layer, look at the document info in Resize Document.
-
9 minutes ago, Old Bruce said:
DPI is PPI or Resolution.
If you want the overall size in pixels then look at the Transform panel when the layer is selected with the Move tool.
I was looking for the pixels...not DPI.
-
54 minutes ago, walt.farrell said:
Which layer do you want the resolution for?
If you want it for the document, then use Document > Resize Document and you'll see the size and the resolution. If you want it for the Placed Image layer, use the Move Tool and look in the Context Toolbar, as shown above.
WHERE IN THE CONTEXT TOOLBAR? I DON'T SEE ANYTHING BUT DPI?
-
35 minutes ago, Lagarto said:
It can be seen from the screenshot that you have 2050 x 780px in the document where you paste the image in focus, so in this context the placed image would have around 500 px width when the document is flattened no matter how it is placed (via Clipboard or File > Place). Affinity Photo shows any raster element using the document DPI so even if a hires image is reduced in size and has a high PPI value, it would look pixelated when zoomed in close (e.g. if an image that has a 1500 px width would need to be shown in 1 in width in a document that can show only 72px per inch).
If it is an image layer that you have, you can see the PPI value on the context toolbar while you have the layer selected (with the Move tool), but if it s pixel layer, you cannot. PPI value would tell whether you can afford enlarging an image considering the document PPI value.
So I was looking at the correct information before?
-
5 minutes ago, GarryP said:
I believe the Pan (View) Tool – which you are using in your latest screenshot – always shows you the document dimensions.
You need to select the Pixel Layer - with the Move Tool, for example - to see the dimensions and DPI of that layer.Where is that information?
-
58 minutes ago, Lagarto said:
It depends on how you place it (and whether you place an "image" image or a "pixel" image).
Here the source from a 300dpi document is saved on disk as a PNG image, resulting in 2016 x 1962px size bitmap.
Then this file is placed in a 72dpi and 300dpi Affinity Photo A4-size documents, showing that the pixel dimension is retained (the image just looks much bigger in the low resolution 72dpi document).
Additionally, the same image is also copied via Clipboard from the source document (where it is 300dpi and has 2016 x 1962px when rasterized to a pixel layer) to the destination documents, and here it can be seen that Affinity apps resize (by design) the image placed on the Clipboard according to the DPI of the destination document. So when pasting the same image to a 300dpi document, the pixel dimensions are retained, but when to a 72dpi image, this resuls in reduced size of 484x 471px.
When copy pasting via Clipboard across Affinity apps, whether the resizing happens depends on whether an image or pixel layer is copied. If a rasterized layer is converted in Publisher to an image object, the source DPI is retained in image meta data, and the original pixel dimensions would be retained, even when pasting to a document with different document DPI. In this case this would result in having the same size of image pasted in a 72dpi document as the image file placed by using File > Place.
This sounded plausible...not sure I've got it right, though.
In the attached screenshot, I placed the rasterized 3D Render into the banner doc. Did the same as before...assumed the resolution of the document it was placed in.
-
12 minutes ago, Dan C said:
Hi @Nita Reed,
There are a few things at play here -
-
Your image is placed at '18%' of it's full resolution, which can be seen on the context toolbar -
This means the image is actually (roughly) 540 x 450px on your canvas, which is why the quality looks significantly reduced compared to the full size image.
-
When copying this image and using File > New From Clipboard, it will be pasted using the above scaling, hence the size of the document created in your screenshot.
- File > New From Clipboard in Affinity always uses 72 DPI (this is logged with our developers as an Improvement), so not only will the lower physical resolution be used in the new document, it may also have a lower DPI.
I hope this clears things up
")
Thank you for the information. I'll need to process this to figure out how I feel about it all.
There are two things I come away with lately... I'm always told, "oh, you're not using photoshop" and if you want to have smaller images (such as in a banner or flyer), it's not actually best to have a higher resolution item.
Keeping my head straight about what I'm looking at (resolution, etc) and WHERE is a bit difficult...
-
Your image is placed at '18%' of it's full resolution, which can be seen on the context toolbar -
-
1 hour ago, GarryP said:
Since I can’t see which layer in your second image is selected (if any) it’s a little difficult to know what’s happened but the 3000x2500 dimensions shown in your first image are the dimensions of the image itself and the 2050x780 dimensions shown in your second image look like the dimensions of the document into which you have placed the original image, rather than the placed image layer.
Try selecting the placed image layer and then look at the dimensions shown for that.Note: The ‘whites’ of the image of the woman look ‘washed out’ and ‘rough’ to me. Did you do any processing to it – adding a filter or something – after placing the image in your document?
Not sure how to explain any differently but here goes...
This is a 3D Render... I've done no processing to it. I can only surmise that the "washed out" you are seeing is the low resolution. There IS a grunge texture overlay in the banner pic.
In the banner pic you can see that the 3D Render is highlighted. I've taken 2 screenshots...hopefully this helps. Resolution is 2050x780. The render was file>placed into the banner document.
3rd image is of the 3D Render file>opened. Resolution is 3000x2500. It's clear to see the difference in image quality from the other two images.
4th image is from the banner document (the 3D Render from the banner placed in a new document)...the 3D Render copy>file>new from clipboard. Resolution is 532x443.

-
Please see attached images...
This is an ongoing problem for me...
When I place or copy/paste an image into Affinity Photo, the image resolution is decreased. As you see in the one image (that I opened), the resolution is 3000x2500...when I put the same image into an existing document, it reduces the resolution.
Shouldn't the image I place into an existing document retain its high resolution?
Help appreciated.
-
3 minutes ago, walt.farrell said:
You might want to read the error message again
For criminy sake LOL!
-
I thought it was... Downloaded but hadn't opened it yet.
Nice catch! Didn't say that Publisher needed updating. I would not have thought of it.
-
So, I'm in Publisher. Click on Photo/Designer persona icons...and this happens (see image).
Problem is...both are updated to 1.10.
-
Thanks...can't say I'm not disappointed though


.png.36a8e56bc207a75b2e9d19654254405d.png)


.png.128186bb5735590411517a611d69a23b.png)

.png.309e5dacc037e7e20d9d3307eb59ae94.png)


.png.61994a244ed8b5fde28e7f6ed48f66e2.png)
.png.1bc13fb2a174cacd4d774607d3bfe296.png)
.png.df07c3393d96b8855c8fae7ee0133b81.png)
.png.c60555bb0e8d1dd0add9e3df23ea5719.png)
.png.7df94d594bc39607e34c83e8c6199798.png)
.png.58571eaee2eaaa7ac25fc858cd138d8e.png)
.png.83bfe923917662d902b83eb6ec41fe2c.png)

.png.af3f562eddfd6afc834655aebb302107.png)
.png.43b3070f140259ca31c2ef1a2b79ed9b.png)
Still Pixelizing
in Pre-V2 Archive of Affinity on Desktop Questions (macOS and Windows)
Posted
Thank you!!!
I'll try that...