David in Яuislip
-
Posts
1,380 -
Joined
-
Last visited
Everything posted by David in Яuislip
-
 My go
My go
-
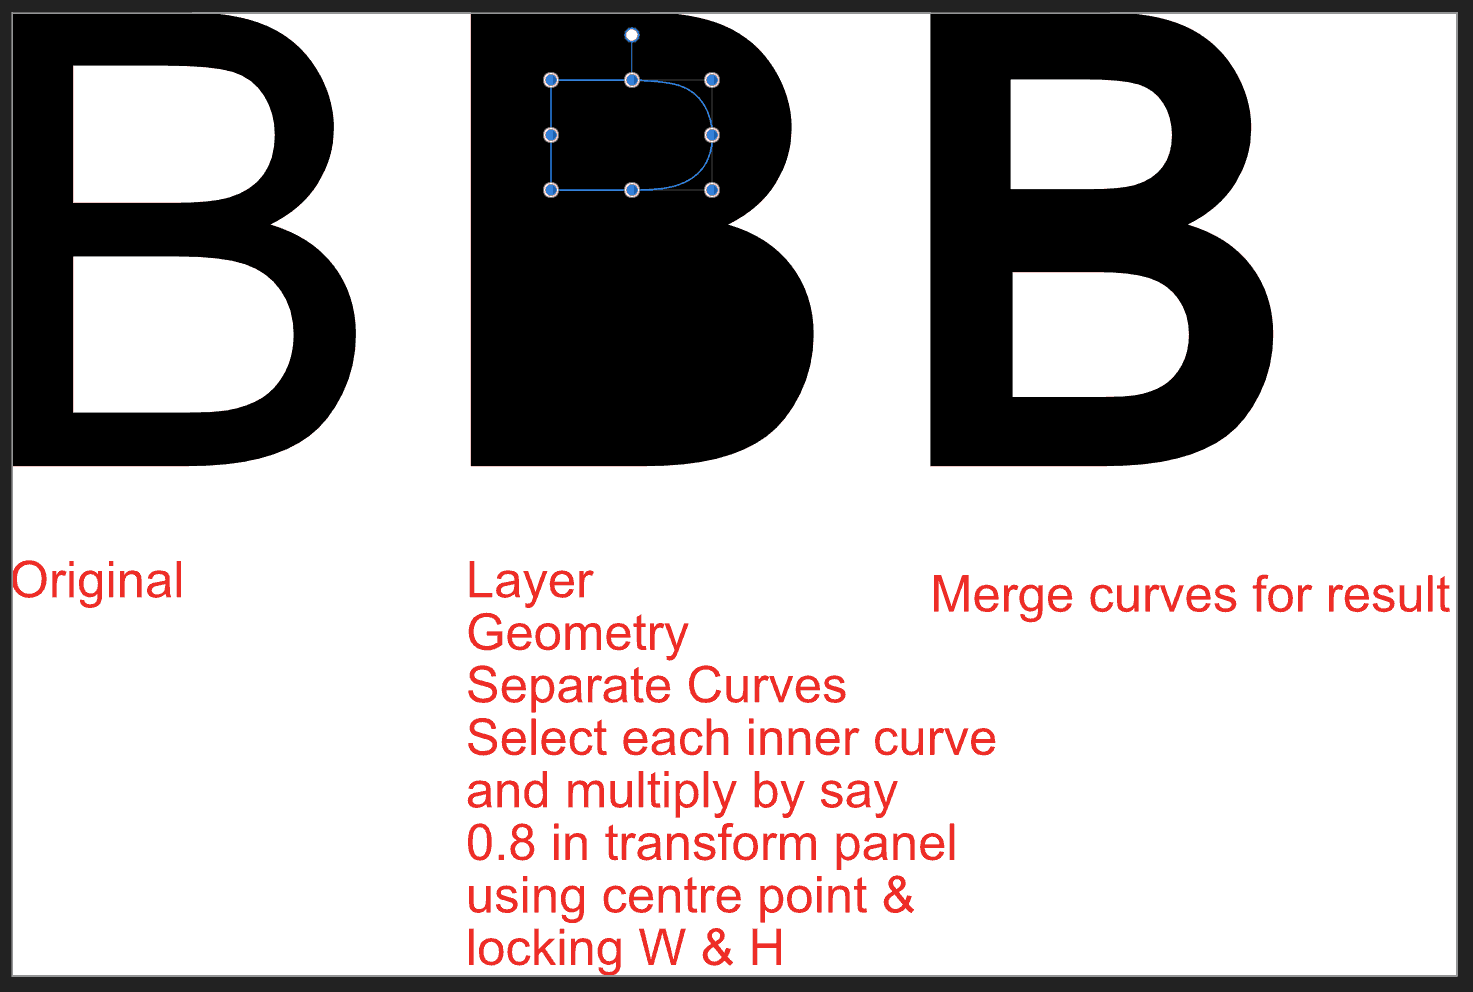
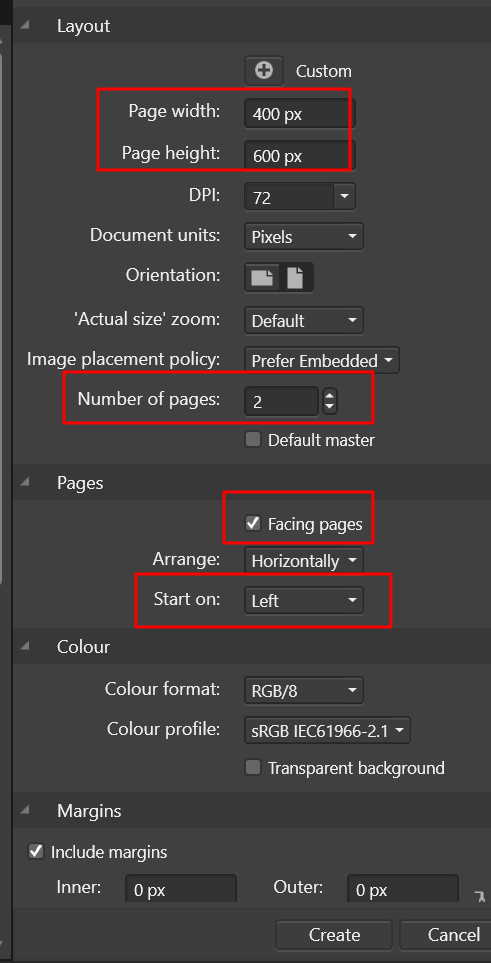
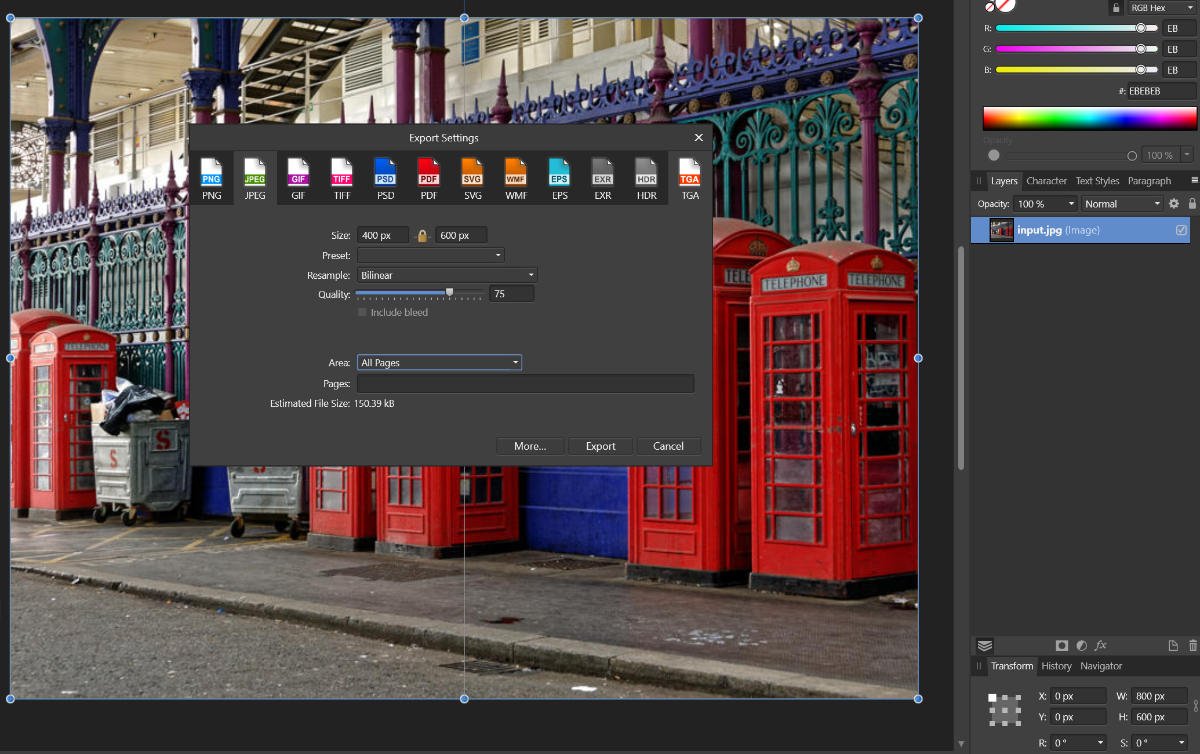
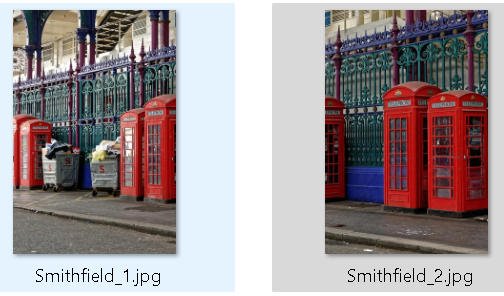
Here I have an image 800x600 Create a Publisher document 400x600, 2pages, facing pages, start on left Place image at x=0 y=0 Export using Area = All pages This will produce two files, left & right Apologies if this is anto's method, I don't watch videos
-
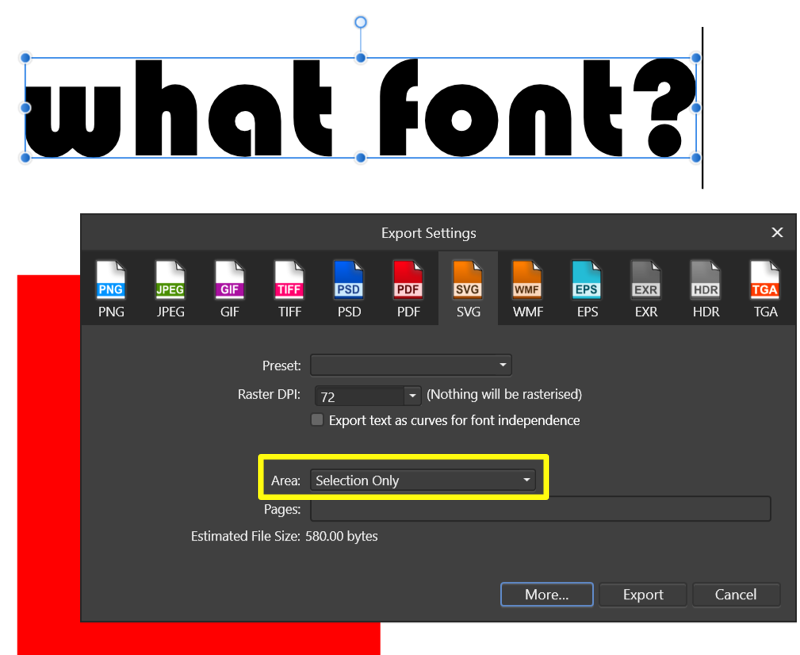
If you don't have Publisher Highlight the text and export to svg using Selection Only The svg will show this: <text x="-4.904px" y="62.941px" style="font-family:'Bauhaus93', 'Bauhaus 93', fantasy;font-size:92.139px;">what font?</text>
-
With Snapping Candidates turned on there are some nasties shown, now to find them
-
SVG import looks terrible (unreadable)
David in Яuislip replied to Jens Petter's topic in V2 Bugs found on Windows
Affinity can't cope with % dimensions, save it as a pdf from Inkscape, it looks ok safeguarding flowchart_1.pdf -
Place the attached xml into the lens profile folder, restart Photo and it should work XiaoyiYIM1.xml
-
I don't get along with the white balance adjustment layer using the picker so I placed an Info Sampler on some snow in the foreground then used a Curves layer and adjusted the blue and green values to match the red which produced a #dedede grey at that point. It's not bad, it brings out the vegetation but nowhere near as good as using a raw.
-
Windows 11 using Chrome, no idea about Acrobat or Macs A pdf size on screen will depend upon the scale setting under Settings/System/Display I Windows set to 2560x1600 with scale=150% Display is 96ppi devicePixelRatio = 1.50 96*1.5=144 If I create a pdf of 1280x720 with 144dpi in Publisher Document Setup then the Chrome view is the same as a png of the same dimensions II Windows set to 1920x1080 with scale=125% 96*1.25=120 If I create another pdf of 1280x720 with 120dpi in Document Setup then the Chrome view is the same as a png of the same dimensions Note that this applies to pdf's opened locally in Chrome so they will only appear 1:1 if used on a pc with the same scale settings it was created with. If they are served as part of a webpage you can use Javascript to evaluate the devicePixelRatio and adjust the zoom of the pdf so that any pc can display them 1:1. In the screenshot, the top doc was produced at 144dpi so works. The lower doc was produced at 120dpi so the javascript has calculated a zoom of 83.33% and applied it to the pdf. Both are produced by the same html page with the pc scale @150%
-
You can see the data using the Detail dropdown of the metadata tab, if you need to copy values dropdown to Raw data or use the hamburger and Export to XMP <exif:GPSAltitude>267/1</exif:GPSAltitude> <exif:GPSAltitudeRef>0</exif:GPSAltitudeRef> <exif:GPSLatitude>32,42.991833N</exif:GPSLatitude> <exif:GPSLongitude>16,45.864667W</exif:GPSLongitude> <exif:GPSMapDatum>WGS84</exif:GPSMapDatum> <exif:GPSProcessingMethod>CELLID</exif:GPSProcessingMethod> <exif:GPSSatellites>00</exif:GPSSatellites> <exif:GPSTimeStamp>2023-11-21T13:24:21Z</exif:GPSTimeStamp> <exif:GPSVersionID>2.3.0.0</exif:GPSVersionID> Data embeds to jpeg & tiff exports ok
-
Loading an SVG-file is not successful
David in Яuislip replied to Johannes Grimm's topic in V2 Bugs found on Windows
Open in Chrome Print to pdf Open in Photo Clip canvas Export You can get a smaller file out of Inkscape but it takes more work. Is it possible to export a pdf from Typora ? exampleInk.svg -
Glad it worked. Regarding the GPS data, there is none in the exiftool report DSCN1600.NRW.txt
-
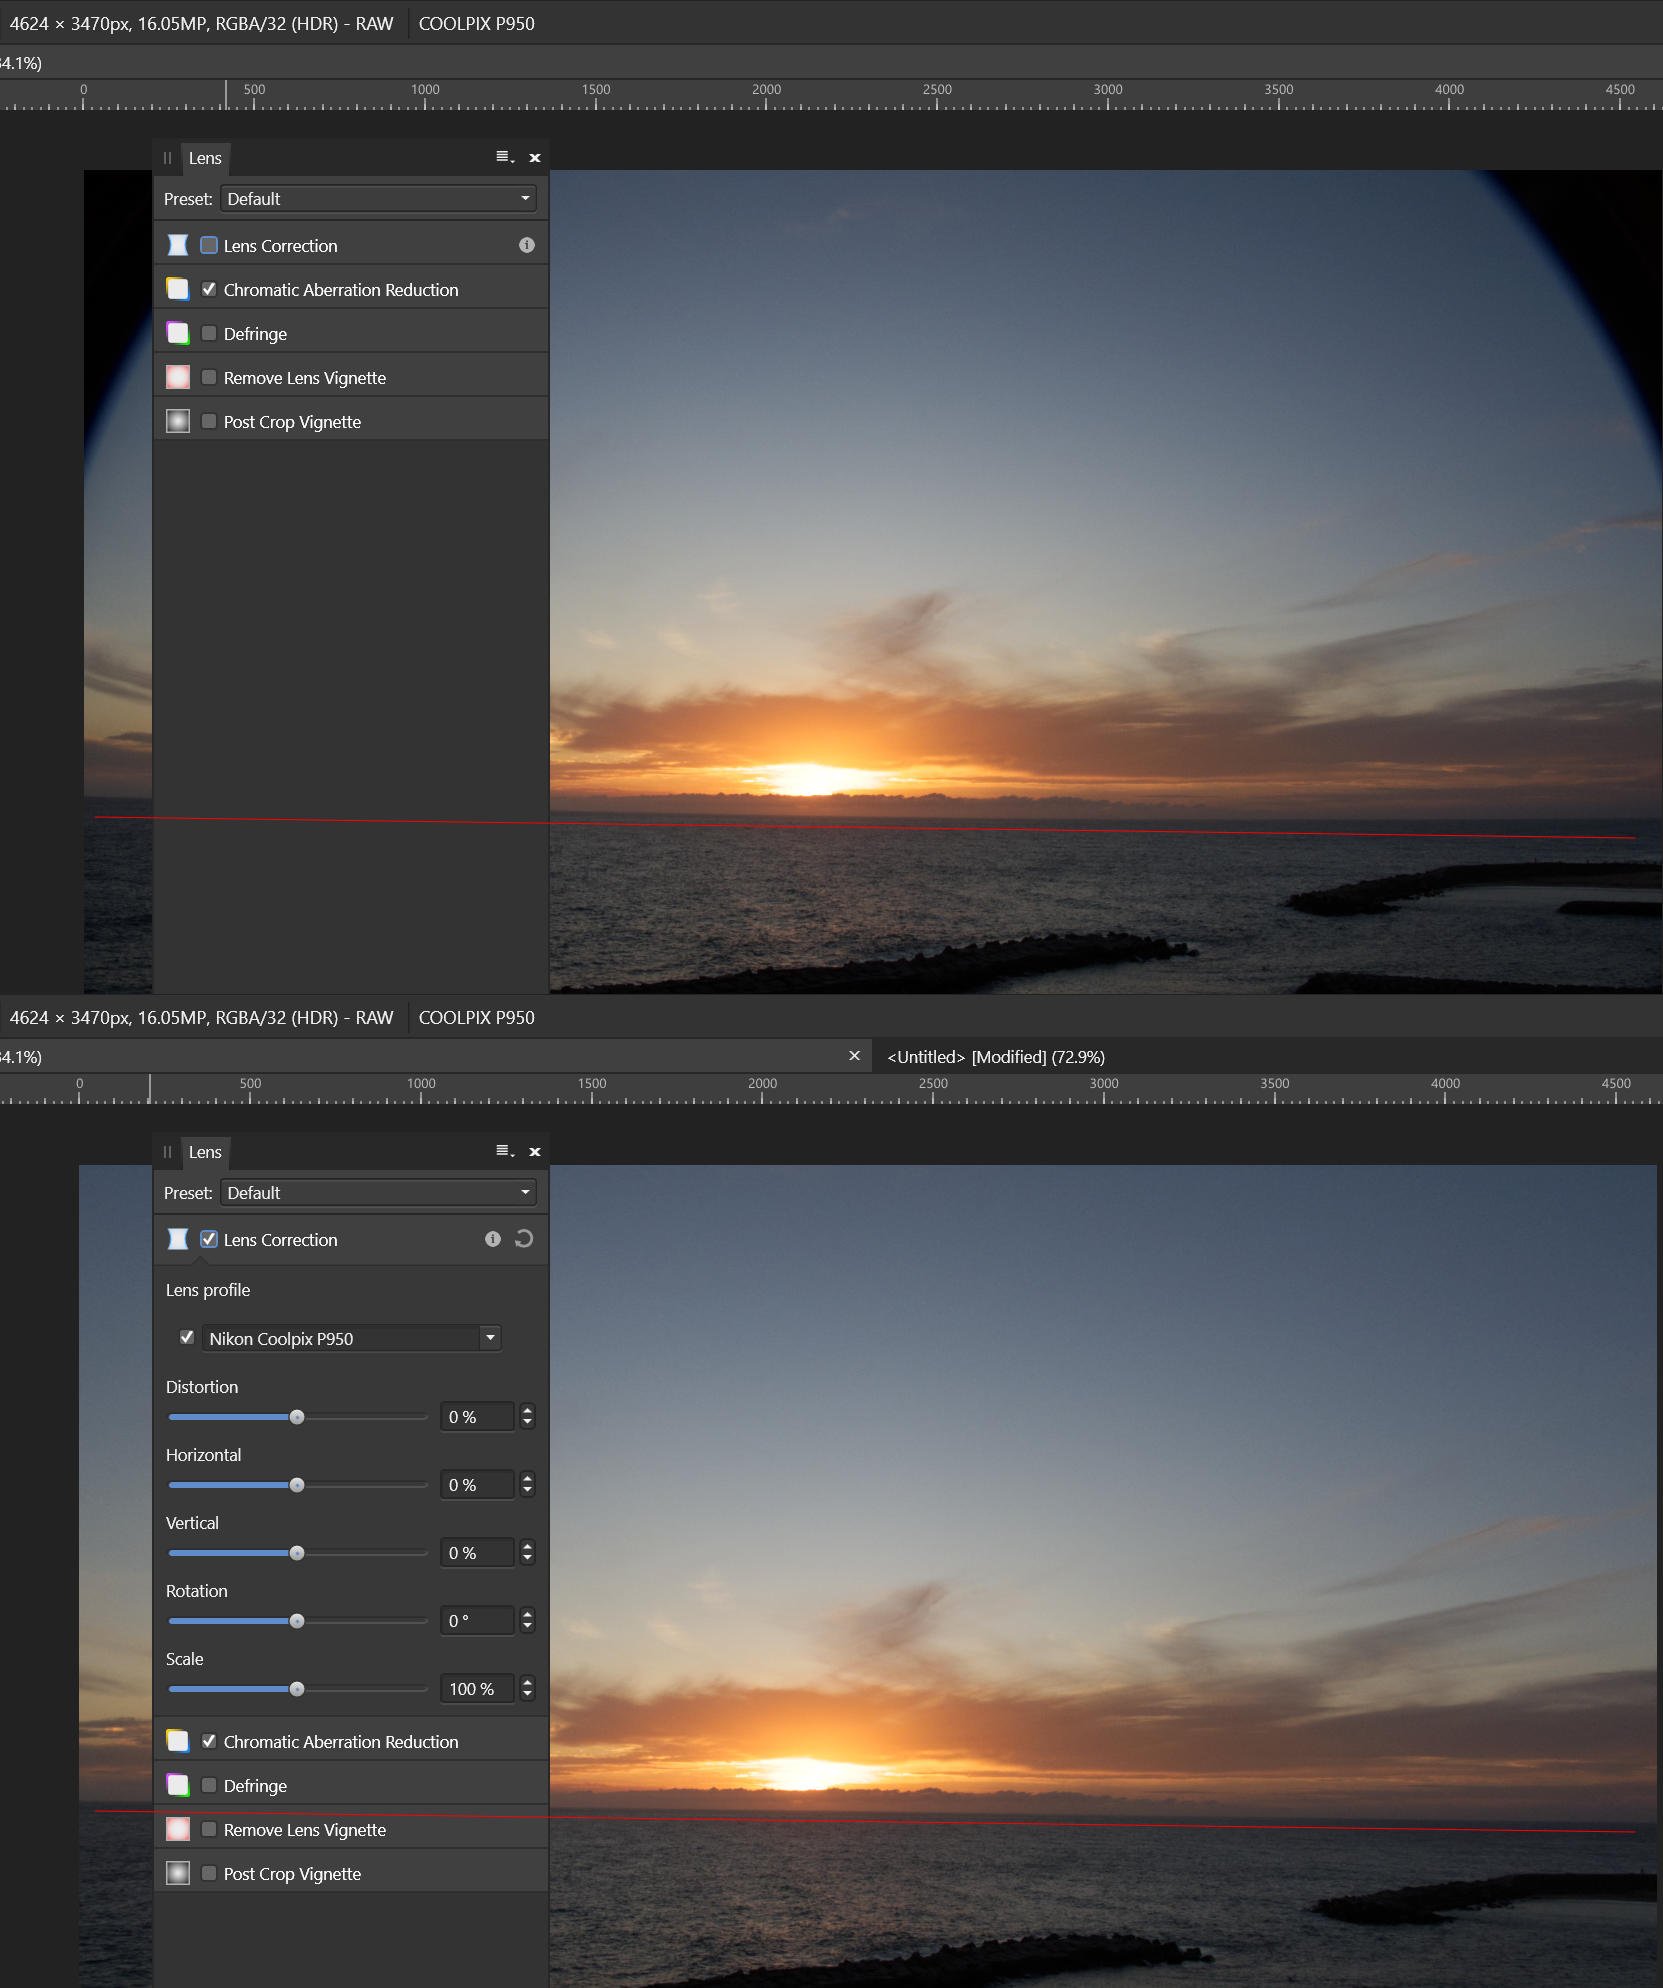
This camera is not in the lensfun database at https://github.com/lensfun/lensfun/blob/master/data/db/compact-nikon.xml so I have made a profile using P1000 with distortion and tca data greater than f=359 (2000 35mm equiv) deleted. It autoselects the camera and gives a good result for the sample image but whether it's useful for other focal lengths is unknown. You could experiment by taking a few photos of a brick wall or similar at different focal lengths Place the attached xml in the lens profile folder and restart Photo. To find folder go to Edit/Preferences/General where there is a button near the bottom which opens the folder in explorer Haha, good but no cigar. I still have a 995 which was marvellous in its day but probably hasn't been switched on for nearly 20 years NikonP950.xml
-
LUT folder import
David in Яuislip replied to Mike1158's topic in Affinity on Desktop Questions (macOS and Windows)
You need a document open, a blank will do In the Adjustment studio, click LUT Click the cog and create a new category Click the cog again and rename as required Click the cog again and select Import Navigate to your LUT folder, select the files and OK -
You can use a vector shape with gradient to mimic the built-in raster mask, just remember to adjust opacity instead of colour Here I have applied an HSL layer to reduce saturation to 0 but then modified that with a rectangle over the entire canvas which has a radial gradient applied - this remains editable. Colour of the gradient does not matter, the initial opacity is 100, the final opacity is 0 Hope that helps
-
Exporting Slices
David in Яuislip replied to guyp's topic in Affinity on Desktop Questions (macOS and Windows)
Funny that, I assumed the original post to request that slices be exported at the same size as the main image but just containing the sliced bit, probably the old ass, you and me scenario but I digress Here's a macro that works for vector shapes, text and images within and without groups If it doesn't work you can have your money back p.s. it only works for up to 50 layers, but that's another story Slices-FullSize.afmacro -
Saving multiples files at once?
David in Яuislip replied to Tari's topic in Affinity on Desktop Questions (macOS and Windows)
Try this macro, if it works you can use it in a New Batch Job for many files Recolour0-100-0.afmacro -
Select the layers in the group and use GarryP's handle
-
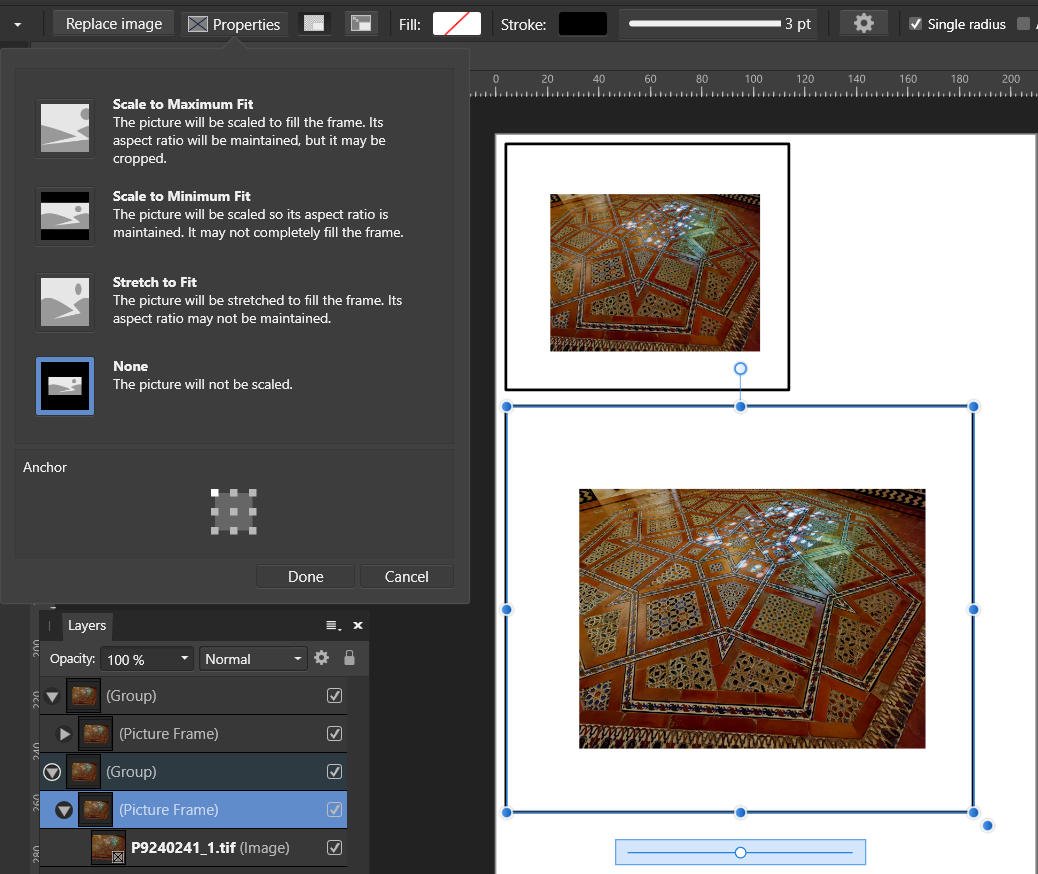
Select the Picture frame, <ctrl>G to group it, resize the group with the handles
-
Lens correction profiles
David in Яuislip replied to pvandck's topic in Affinity on Desktop Questions (macOS and Windows)
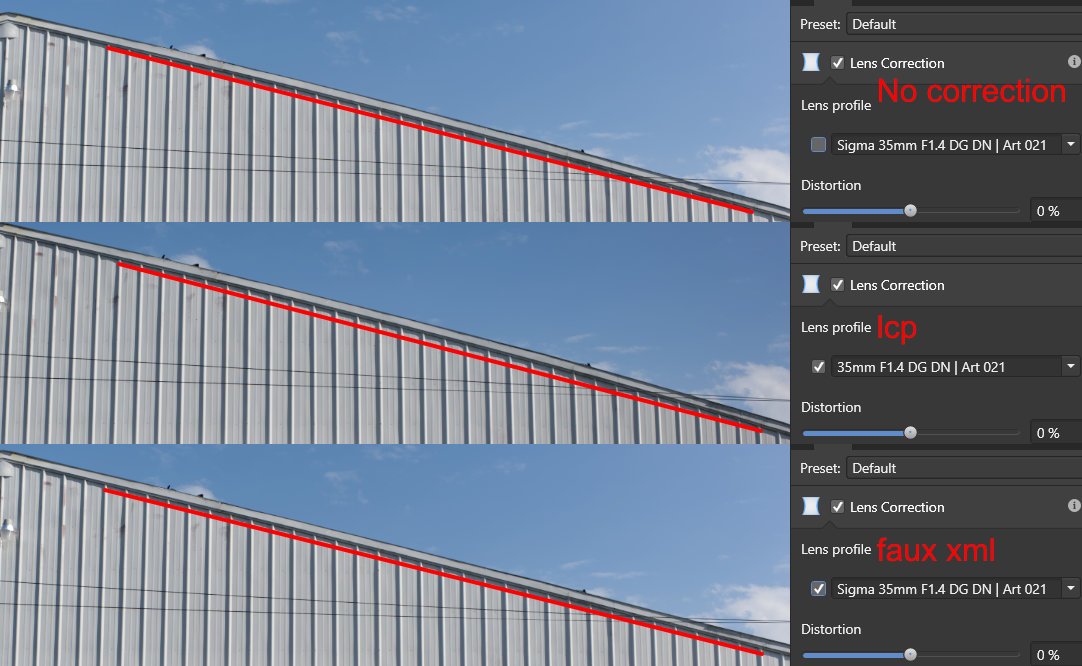
No it's from a different lens, the 35mm F1.2 DG DN | Art 019, I just took a flyer to see what would happen. I think it's better than no correction and in some cases may be ok but it isn't suitable for architectural shots. What you need doesn't yet exist in lensfun -
Lens correction profiles
David in Яuislip replied to pvandck's topic in Affinity on Desktop Questions (macOS and Windows)
Yes, that's my conclusion. This is one for the folk in Nottingham to fix -
Lens correction profiles
David in Яuislip replied to pvandck's topic in Affinity on Desktop Questions (macOS and Windows)
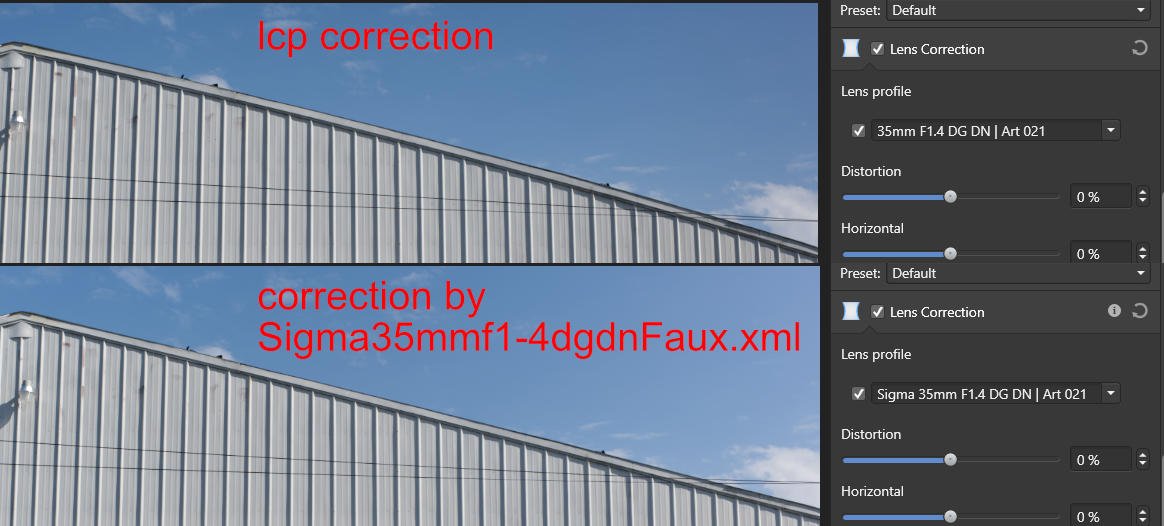
Life's too short for that, I use Photolab which has superb lens distortion corrections plus Viewpoint which allows additional perspective correction. Anyone interested in such corrections would be advised to try the trials. The lcp comes from Adobe and was installed with the DNG converter. I think it's likely that Photo doesn't implement the lcp correction properly. I don't have any software that uses lcp's other than Photo but I would be amazed that Adobe would produce something that makes the issue worse eg in the image below the lcp version looks more barrelled than the uncorrected one to my eyes
-
Lens correction profiles
David in Яuislip replied to pvandck's topic in Affinity on Desktop Questions (macOS and Windows)
Looking at the lcp and lensfun corrections the former still shows a fair bit of barrelling and is basically useless
-
Lens correction profiles
David in Яuislip replied to pvandck's topic in Affinity on Desktop Questions (macOS and Windows)
If you open the lcp file in a text editor you will see this a few lines down from the top stCamera:LensPrettyName="SIGMA 35mm F1.4 DG DN A021" Replace all instances of SIGMA 35mm F1.4 DG DN A021 with 35mm F1.4 DG DN | Art 021 so they read stCamera:LensPrettyName="35mm F1.4 DG DN | Art 021" the lens will then be automagically recognised by Photo. I'd post the lcp but think they may be subject to Adobe copyright -
I never liked XP1/2, much preferred FP3/4, HPS, Tri X generally developed in ID11. I dumped all of my darkroom stuff except the enlarger which is a pre-war Focomat and a thing of beauty Anyway, back to the scan, as a confirmed Luddite I check the channels on scans and choose the one with best contrast, in this case the red Then create a greyscale layer and apply a curve adjustment
-
Lens correction profiles
David in Яuislip replied to pvandck's topic in Affinity on Desktop Questions (macOS and Windows)
From Help "Preferences Preferences comprise a series of miscellaneous options that are applied across your application. They can be used to set up your own way of working. General options <snip> For automatic RAW lens correction, include lens profile updates for new cameras. Place the downloaded Lensfun XML file or Adobe Lens Correction Profile (LCP) in the opened folder."