David in Яuislip
-
Posts
1,397 -
Joined
-
Last visited
Everything posted by David in Яuislip
-
 I believe that's the final piece of the jigsaw, expect the issue to be fixed in the next β
 -
Stroke?
David in Яuislip replied to Ralph Tomaccio's topic in Affinity on Desktop Questions (macOS and Windows)
Nah, it's not that clever
-
Stroke?
David in Яuislip replied to Ralph Tomaccio's topic in Affinity on Desktop Questions (macOS and Windows)
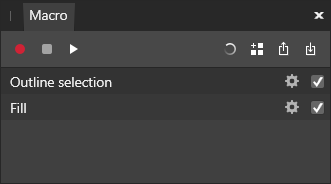
Start with the Help. It might be a bit cryptic on first read but keep at it The Macro panel handles .afmacro files containing a single macro The Library panel handles .afmacros files containing multiple macros I keep the Library panel available next to the Histogram/Colour/Brushes. If I need a Macro panel, I click on the Library then right click on any macro and choose Edit You need a Macro panel open, click the Import icon on the right. Once it's imported click the Add to Library icon As stated above, you can't choose inside/centre/outside, to achieve that you'd need three macros
-
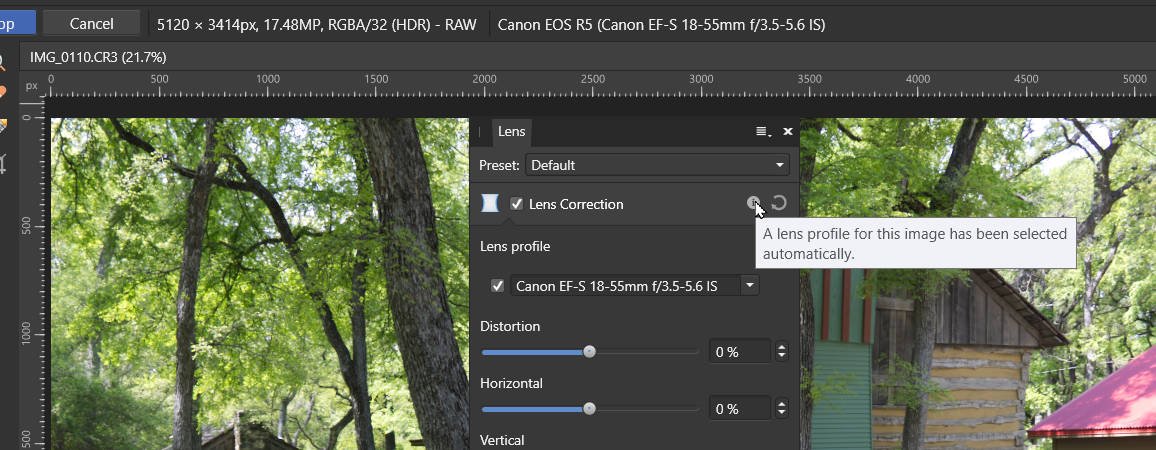
Same fix as for the earlier one. I've used the lensfun data but changed the crop factor to 1. The vignette no longer occurs. Something weird about EF-S lenses in lensfun, they're APS-C lenses but need the crop=1 not 1.6. Hope it's of use CanonEF-S18-55.xml
-
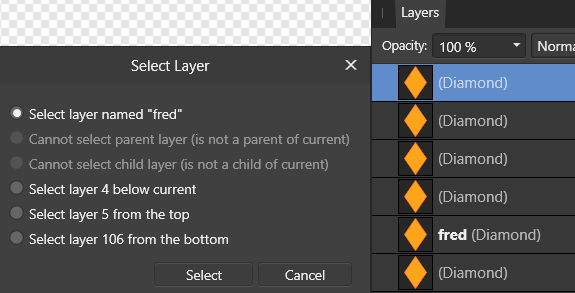
I know nothing about symbols but linked layers in Photo are pretty limited. You can change colours and dimensions but if you need to change a square into a circle or replace it with text you're goosed What does work is to use a macro to duplicate the top layer, create groups of the layers below and place the duplicate in the groups Macros with lots of layers have been a pain to get going but I think I know the secret which I shall divulge for a small fee When you select another layer when recording a macro you get various options but whatever you choose the macro records the position from the bottom So if you record a macro using 110 layers and select 5th from the top, the macro will store 106 even if it's called fred If you now run the macro using 25 layers it will look for the 106th from the bottom but settle on 25 Then run the macro using 130 layers it will look for the 106th from the bottom and you won't get higher The top layer can also be a group which can contain a full sized rectangle with opacity set to zero, this is useful if you want all the slices to be the same size as the canvas What I did was Create 110 layers Start recording Select top Go down 1 Group Go up 1 Duplicate Go down 1 Arrange/Move inside Select group parent layer Move to back Select top layer Stop recording Then run the macro as many times as necessary, even 110 doesn't take long, and you can finally delete the first layer, go into the export persona, select all layers, create slices and go for a pint
-
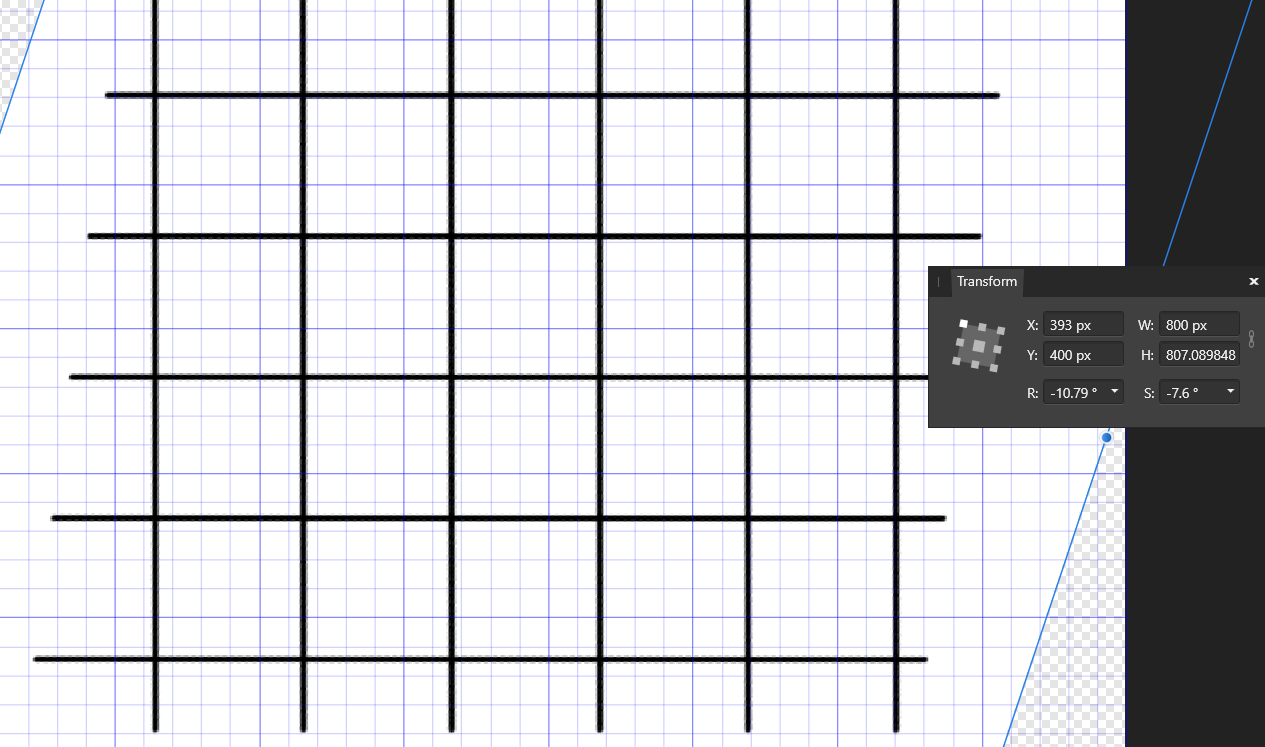
Original mesh, skewed and rotated Fix the rotation with the crop tool as GarryP says Switch the grid on and unskew the vertical lines with S in the transform panel
-
Cor, there's no pleasing some people CalibriUlineItalic18ptBlue-FrameText72dpi.afmacro
-
Not a thing I've ever noticed before, the default font data must be held in the afphoto file You can use an asset of dummy text but this will scale depending on the document resolutions so 16pt text asset created in a 300dpi document will increase to 300/72x16=66.7pt if used in a 72dpi document Or record a macro although this is still subject to the scaling as above Select art text tool --Don't click in the document or type any text Start recording Set font colour font bold/italic/size/font family --in that order, if you do colour last it won't stick Stop recording Save to library Open a new document with the same dpi used to create the macro Run the macro Use art text tool and it should have reset the default Example attached CourierBold24ptGreen-72dpi.afmacro
-
Stroke?
David in Яuislip replied to Ralph Tomaccio's topic in Affinity on Desktop Questions (macOS and Windows)
I prefer idiosyncratic to odd. My next reply in the bugs section is indeed odd though 🙂 -
Stroke?
David in Яuislip replied to Ralph Tomaccio's topic in Affinity on Desktop Questions (macOS and Windows)
You need to use Select/Outline then fill the gap. Far too tedious so I wrote a macro It's not as versatile as Photoshop, you can't choose inside/centre/outside as that is frozen during macro recording and was set to outside but it does what I need StrokeSelection.afmacro -
You may well be correct but could you post a raw file that is giving you a problem
-
Export PNG 24-bit
David in Яuislip replied to JAC_Havoc's topic in Affinity on Desktop Questions (macOS and Windows)
Additional to Walt's advice, ensure that transparency is off otherwise you'll get a 32bit file including the alpha channel -
You can't Boolean Add the two horizontal lines but you can do Layer/Geometry/Merge Curves to combine them. Note this is Publisher speak, Designer may be slightly different. To combine all the blacks, select all of the layers within UpperBlack then drag them into LowerBlack Repeat for greens including the two horizontal lines, there is no need to merge the lines I have deleted all layer names within the groups, if you leave them they will create millions of serif ids in an svg which is just bloat, no idea what happens with a pdf Going forward you first need to find out what was wrong with the previous version. I would do a practice run from scratch with a few basic shapes, text and lines. If you are using ellipses or rectangles you can either use a Boolean Compound Add or Layer/Geometry/Merge Curves to get the shapes into a common grouping. My earlier concern about the combined paths was probably unfounded, I ran some tests in Inkscape getting it to produce GCode which is what controls the laser. The program split all of the sub paths into separate entities and wrote the correct laser on/off codes so I would expect LightBurn to do the same even if your laser uses something other than GCode All text must be converted to curves Avoid colour fill with zero opacity just set the fill to none If you're still stuck I would ask on the Lightburn forum where you'll likely get some expert advice HelloSpringTestFile2.afpub
-
ajuliea, I assume your second post shows an Affinity generated pdf opened in Illustrator then a screenshot of the same file opened in LightBurn 1.0.04 presumably on your daughter's pc? I don't understand why Illustrator is being used apart from viewing the pdf however it looks like LightBurn is doing the mangling I can't follow your ungroup then select all black objects as I don't have Designer but I did similar using Inkscape and have reformatted the file into different groups, all objects are now curves. The black circles had a #EBEBEB fill with zero opacity style="fill:#ebebeb;fill-opacity:0;stroke:#000;stroke-width:4.17px;" which is valid xml but may be upsetting LightBurn so I've changed them to style="fill:none;stroke:#000;stroke-width:4.17px;" The attached file produces a proper svg and all objects are paths or curves in Affinity speak, it's an afpub but will open ok in Designer. If it doesn't work I am out of ideas LightBurn can accept pdf's or svg's, the advantage of using svg is that you can inspect the file with a text editor to troubleshoot if something goes wrong Affinity is a pain to generate curves from ellipses and rectangles as I mentioned before, probably the best way is to select the relevant layers then do <alt>Add which will produce a compound thus retaining the ellipses inside it but will generate paths on svg export. Also tick Export text as curves. If you're using pdf then convert the text before export Example And this is what the svg contains <g id="Ellipses2Curves"> <circle cx="390.096" cy="88.386" r="35.105" style="fill:none;stroke:#000;stroke-width:7px;"/> <circle cx="390.096" cy="202.136" r="35.105" style="fill:none;stroke:#000;stroke-width:7px;"/> <circle cx="390.096" cy="317.455" r="35.105" style="fill:none;stroke:#000;stroke-width:7px;"/> </g> <g id="EllipsesInCompoundAdd"> <path d="M70.813,282.35c19.375,-0 35.105,15.73 35.105,35.105c0,19.375 -15.73,35.105 -35.105,35.105c-19.375,-0 -35.105,-15.73 -35.105,-35.105c0,-19.375 15.73,-35.105 35.105,-35.105Zm0,-115.319c19.375,0 35.105,15.73 35.105,35.105c0,19.375 -15.73,35.105 -35.105,35.105c-19.375,-0 -35.105,-15.73 -35.105,-35.105c0,-19.375 15.73,-35.105 35.105,-35.105Zm0,-113.75c19.375,-0 35.105,15.73 35.105,35.105c0,19.375 -15.73,35.105 -35.105,35.105c-19.375,-0 -35.105,-15.73 -35.105,-35.105c0,-19.375 15.73,-35.105 35.105,-35.105Z" style="fill:none;stroke:#000;stroke-width:7px;"/> </g> Good luck Edit: there's a mistake in the text layer, the fill of the letters should be none and the strokes expanded to say 2pt HelloSpringTestFile.afpub
-
I don't see why your black circles have gone but I would be careful about using Add or Merge curves on shapes, certainly ellipses and rectangles Here I have a simple example of four strokes with an ellipse at the end If I just export an svg, for the ellipses I get <ellipse cx="187.353" cy="154.51" rx="19.216" ry="18.431" style="fill:none;stroke:#000;stroke-width:4px;"/> <ellipse cx="178.725" cy="388.235" rx="19.216" ry="18.431" style="fill:none;stroke:#000;stroke-width:4px;"/> <ellipse cx="363.039" cy="399.216" rx="19.216" ry="18.431" style="fill:none;stroke:#000;stroke-width:4px;"/> <ellipse cx="382.255" cy="154.51" rx="19.216" ry="18.431" style="fill:none;stroke:#000;stroke-width:4px;"/> I doubt if the laser software is bright enough, pun intended, to handle that as it probably wants a path for each object If you convert the ellipses to curves the output is the same, not one of Affinity's finest achievements If you Add or Merge curves you'll get <path d="M363.039,380.784C373.645,380.784 382.255,389.043 382.255,399.216C382.255,409.388 373.645,417.647 363.039,417.647C352.434,417.647 343.824,409.388 343.824,399.216C343.824,389.043 352.434,380.784 363.039,380.784ZM178.725,369.804C189.331,369.804 197.941,378.063 197.941,388.235C197.941,398.408 189.331,406.667 178.725,406.667C168.12,406.667 159.51,398.408 159.51,388.235C159.51,378.063 168.12,369.804 178.725,369.804ZM187.353,136.078C197.958,136.078 206.569,144.337 206.569,154.51C206.569,164.682 197.958,172.941 187.353,172.941C176.748,172.941 168.137,164.682 168.137,154.51C168.137,144.337 176.748,136.078 187.353,136.078ZM382.255,136.078C392.86,136.078 401.471,144.337 401.471,154.51C401.471,164.682 392.86,172.941 382.255,172.941C371.649,172.941 363.039,164.682 363.039,154.51C363.039,144.337 371.649,136.078 382.255,136.078Z" style="fill:none;stroke:#000;stroke-width:4px;"/> which contains the four paths, each one ends with a Z. Is the laser software capable of turning off the laser at each Z then back on when it has moved or does it not matter if it's quick enough? I think you need four individual paths for this and Affinity can't produce these if you're using ellipses However, if you open your svg in Inkscape, select the lot and do Path/Object to path then the output will be <path d="M363.039,380.784C373.645,380.784 382.255,389.043 382.255,399.216C382.255,409.388 373.645,417.647 363.039,417.647C352.434,417.647 343.824,409.388 343.824,399.216C343.824,389.043 352.434,380.784 363.039,380.784Z" style="fill:none;stroke:#000;stroke-width:4px;"/> <path d="M178.725,369.804C189.331,369.804 197.941,378.063 197.941,388.235C197.941,398.408 189.331,406.667 178.725,406.667C168.12,406.667 159.51,398.408 159.51,388.235C159.51,378.063 168.12,369.804 178.725,369.804Z" style="fill:none;stroke:#000;stroke-width:4px;"/> <path d="M187.353,136.078C197.958,136.078 206.569,144.337 206.569,154.51C206.569,164.682 197.958,172.941 187.353,172.941C176.748,172.941 168.137,164.682 168.137,154.51C168.137,144.337 176.748,136.078 187.353,136.078Z" style="fill:none;stroke:#000;stroke-width:4px;"/> <path d="M382.255,136.078C392.86,136.078 401.471,144.337 401.471,154.51C401.471,164.682 392.86,172.941 382.255,172.941C371.649,172.941 363.039,164.682 363.039,154.51C363.039,144.337 371.649,136.078 382.255,136.078Z" style="fill:none;stroke:#000;stroke-width:4px;"/> which looks pretty good to me
-
If you're processing a raw file then the White Balance adjustment is under the Basic tag otherwise you can't
-
If you don't have Publisher use exiftool D:\NewDownloads>exiftool -title out999.pdf Title : Untitled D:\NewDownloads>exiftool -title="My nice new title" out999.pdf 1 image files updated D:\NewDownloads>exiftool -title out999.pdf Title : My nice new title
-
If you install Adobe DNG converter then many lens profiles will be available including Canon (Canon RF-S 18-45mm F4.5-6.3 IS STM) - RAW.lcp They are in C:\ProgramData\Adobe\CameraRaw\LensProfiles\1.0 on Windows, no idea about Macs To get Photo to autoselect the lens, open the profile in a text editor and change all occurrences of stCamera:ProfileName="Adobe (Canon RF-S 18-45mm F4.5-6.3 IS STM)" to stCamera:ProfileName="Adobe (Canon RF-S 18-45mm F4.5-6.3 IS STM 282)" That's the good bit, the less than good bit is that the crop is pretty severe The weird bit is that the output image is 6024x4020 for both corrected and uncorrected cases Zip contains corrected, uncorrected and a PL7 version for comparison IMG_1081.zip
-
What I did: Select base layer <ctrl>J and do +2 on the transform panel width with center point selected and aspect ratio locked <ctrl>J 20 times Select all the layers above the base layer and <ctrl>G Select all the layers within the group Arrange/Move outside - this reverses the order, well it does on V1 <ctrl>G Now we have an effect similar to what NotMyFault achieved in far fewer clicks but I prefer the owl who's called Daisy
-
magick identify -verbose test.bmp reports 3 colors so I used 4 but yeah 16 won't do any harm it also shows uncompressed so I left that alone. If you add say -compress RLE then the file size reduces dramatically but maybe the OP's program won't handle it, Photo can't although Photoshop, Photos, Irfanview and Chrome can test16RLE.bmp
-
If you have imagemagick available you can open the file in Photo make the edit copy to clipboard in a cmd or Ps window do magick clipboard: -colors 4 bmp3:test2.bmp test2.bmp
-
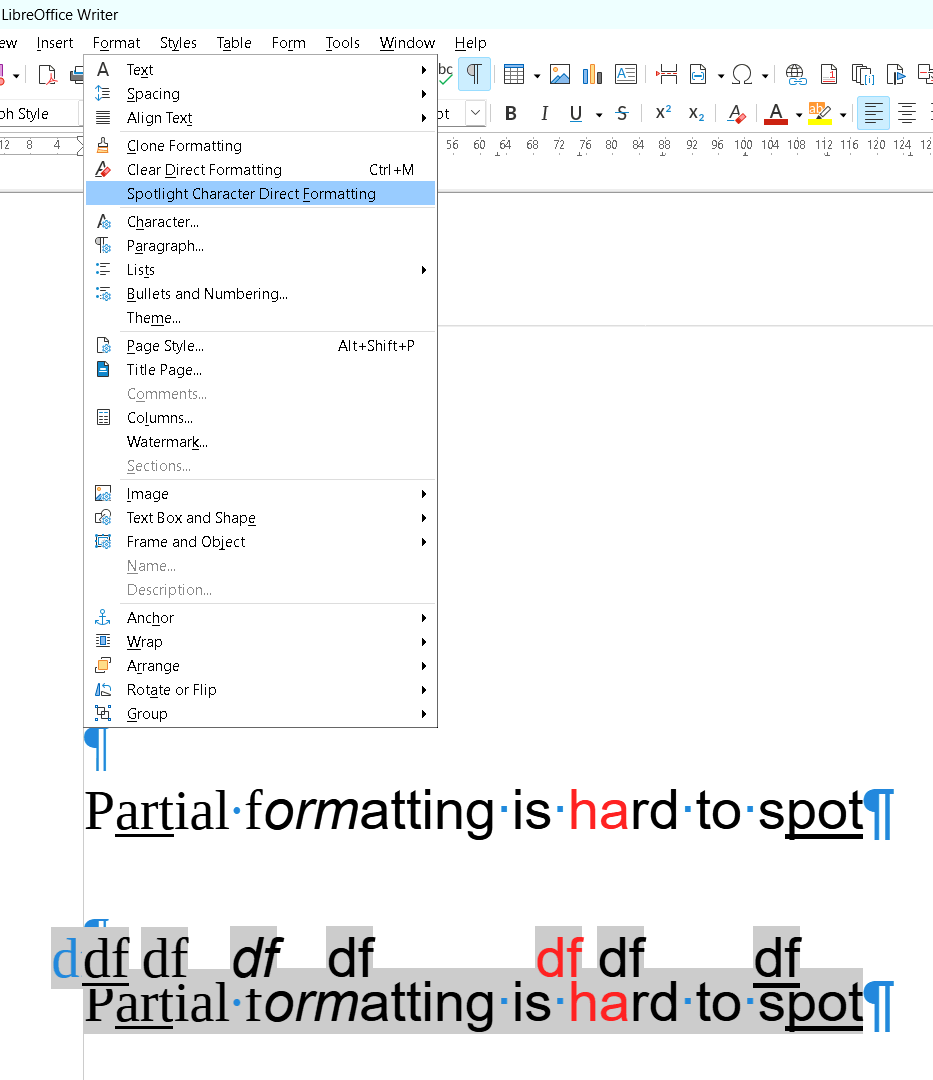
Ok my very last idea, write to svg and look for oddities <text x="258.744px" y="481.227px" style="font-family:'ArialMT', 'Arial', sans-serif;font-size:100px;fill:#231f20;">P</text> <text x="325.443px" y="481.227px" style="font-family:'ArialMT', 'Arial', sans-serif;font-size:100px;fill:#231f20;">art</text> <text x="442.143px" y="481.227px" style="font-family:'ArialMT', 'Arial', sans-serif;font-size:100px;fill:#231f20;">ial f</text> <text x="597.758px" y="481.227px" style="font-family:'Arial-ItalicMT', 'Arial', sans-serif;font-style:italic;font-size:100px;fill:#231f20;">orm</text> <text x="769.975px" y="481.227px" style="font-family:'ArialMT', 'Arial', sans-serif;font-size:100px;fill:#231f20;">atting is</text> <text x="1142.39px" y="481.227px" style="font-family:'ArialMT', 'Arial', sans-serif;font-size:100px;fill:#f04a34;">ha</text> <text x="1253.62px" y="481.227px" style="font-family:'ArialMT', 'Arial', sans-serif;font-size:100px;fill:#231f20;">rd to s</text> <text x="1531.5px" y="481.227px" style="font-family:'ArialMT', 'Arial', sans-serif;font-size:100px;fill:#231f20;">pot</text>
-
LibreOffice might help Copy text from Publisher Paste into LibreOffice Writer Do Format/Spotlight Character Direct Formatting
-
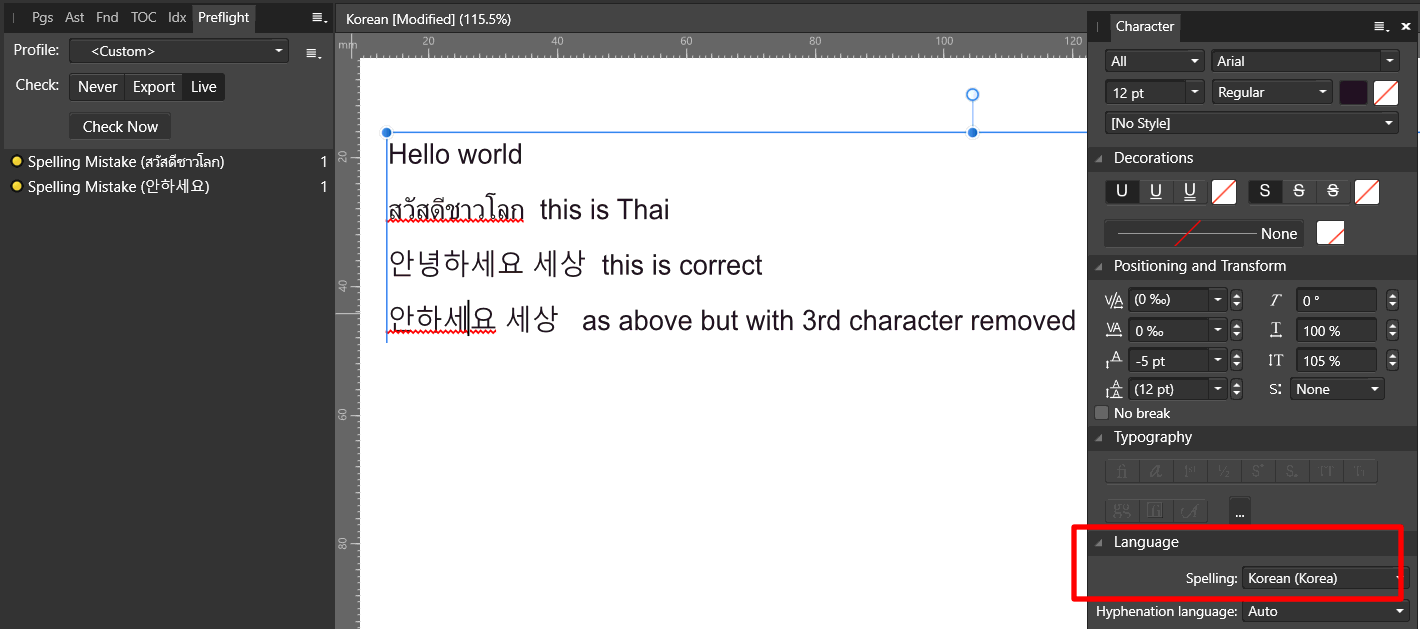
I've used dic & aff files 0.7.94 from https://github.com/spellcheck-ko/hunspell-dict-ko sizes are same as in first post directory name can be either ko-KR or ko_KR, they both work dic & aff filenames are not critical provided they are the same, I have ko.dic & ko.aff Korean.afpub
-
The guillemet (‘»’) indicates that there are more options that can be displayed on the toolbar Let me think about that l&k An Apprentice Pedant