

GaryLearnTech
-
Posts
298 -
Joined
-
Last visited
Everything posted by GaryLearnTech
-
 I wonder… Font files can be stored in various locations. I have come across PDF export issues in the past when there have been multiple versions installed in other locations (Montserrat in my case). Probably not because there were multiple copies, but because they were not all at the same version. This can arise with these popular free fonts when some apps decide to install their own version for your convenience - over and above a version you have carefully installed manually yourself. If you're not familiar with the different locations to check manually, take a look in Font Book. Select an individual weight and check the properties - that lists the install location. It should be clear if you have multiple versions installed. Hope this helps!
 -
Hi @Jiri Skryja and welcome to the forums. I've just compared your list with the entries in my own firewall (Little Snitch). I'd suggest that you try creating an entry for "seriflabs.com" – in addition to the three you've listed. If that doesn't do the trick, there must be something else - and I'm sure one of the more experienced regulars will be along soon and put us right if that's the case. 😀
-
M1 Mac mini (2020) • 16GB RAM, 2TB drive with approx 1TB free space • Ventura 13.4.1 • Designers v1.10.6 and v2.1.1 Over several passes, file open time ranged from about 16s to about 18s in both Designer 1 and Designer 2. That was with "instantly" clicking Open on the initial PDF Options dialog box (like @R C-R, to substitute Lucida Grande) and would go some way to account for minor variations. Opening the file in Preview took about 10s. Selecting objects on the canvas was almost instant (when I could click straight), with the object being highlighted and the layer located almost immediately (layers auto-scroll was on). Pressing the Delete key (or clicking the Layers panel trash icon) would take about four seconds to complete deletion. Not snappy, but probably understandable for the complexity of the document. Certainly nothing like the 90s of beach-balling you are seeing! Changing the stroke width, colour or fill of a selected curve was immediate. Hope this helps?
-
On what are probably very rare occasions, we do get an early heads up. Such as this fairly recent post from one of Serif's moderators: But to paraphrase what @R C-R said, don't hold your breath until you see it listed in the latest beta version. And nobody is likely to announce that ahead of the developers deciding that their work is sufficiently advanced to be exposed to public scrutiny.
-
Deleting my forum attachments (split)
GaryLearnTech replied to dmtp14's topic in Customer Service, Accounts and Purchasing
That's it functioning as described. Thanks for clarifying the behaviour. -
Deleting my forum attachments (split)
GaryLearnTech replied to dmtp14's topic in Customer Service, Accounts and Purchasing
Thanks for clarifying that @walt.farrell - this had been bugging me too (not that I'm going to delete anything - I was just curious). Some other setting is in play then. On my Mac, there are no checkboxes to allow selecting an attachment. Clicking the thumbnail opens it at full size as an overlay in the same browser window; clicking the filename downloads a copy of the file; clicking the associated post title takes you to the post. I've tried Safari, Firefox and Edge - all the latest versions.
-
The 2FA option is separate from the password. Look at the "Security and Privacy" option immediately below the Password option in the Settings sidebar menu. It (currently) only mentions Google Authenticator. I don't use Google Authenticator but I do use 1Password (though I'm still using the v7 app and haven't updated to their v8, which has been out for a while now). I decided to take a gamble and try it here anyway - I was presented with a QR code and 1Password scanned it and it worked fine. I've tested in in a private browser window in a different browser from the one I normally use and was prompted for what 1Password calls the one-time password and it worked as expected. Since it also works in 1Password, it will probably also work in the equivalent Microsoft Authenticator app or any other similar 2FA apps that you might already be using - you may not have to change explicitly to Google Authenticator to get 2FA running, despite that being the only one listed.
-
A classic! Followed up by this recent 'sort of' reference: https://xkcd.com/2736/
-
Indeed, it was great value while it lasted - and it may come up again at some point in the future. In the meantime, a new Content Sale has just kicked off: "Unleash Your Creativity With 50% Off All Add-Ons" https://affinity.serif.com/en-gb/store/
-
Squeezing image width
GaryLearnTech replied to brucet's topic in Affinity on Desktop Questions (macOS and Windows)
Hi @brucet You have options… In the Layers panel, right-click on the Background layer and select Duplicate; or single-click the Background layer to select it and, using your menu bar, choose Layer > Duplicate; or single-click the Background layer to select it and on a Mac use the keyboard shortcuts cmd-A, cmd-J (presumably ctrl-A, ctrl-J under Windows) to Select All followed by Duplicate Selection. There's quite possibly other options beyond those… Once you have duplicated your background layer, and with the new layer still selected in the Layers panel, press V to select the Move tool (or click Move in the Tools). That then allows you to click and drag either the mid-points on the sides or the corner points to change the size of the duplicated layer. Alternatively, you could enter numeric values in the Transform panel. Hope this helps? -
Just installed Mac Ventrua
GaryLearnTech replied to BillR's topic in Affinity on Desktop Questions (macOS and Windows)
That's encouraging news, thanks. -
I think I have seen this discarded-first-numeral problem several times recently, but can't be certain. It almost certainly wasn't on the New Document dialog box though. I've tended to put it down to sloppy tipyng but will definitely watch more closely from now on…
-
Possibly of interest to you, @globesessions, would be the new tearable document windows. It does not seem to be getting 'promoted' as a replacement, but might be interesting to explore as an alternative. For myself, I never much liked the old separated mode and never used it. This looks like it might be at least occasionally useful… Application and document windows https://affinity.help/photo2/English.lproj/pages/Workspace/workspaceModes.html Scroll about halfway down the page to get to "About 'tearable' document windows". Here's an excerpt: While there is only one app window, you can have one or more document windows per open document. By default, documents are docked to the workspace (viewed as tabs under the context toolbar) but these can be 'torn' away from the tab bar to make them independent undocked, floating windows. This feature is available in all three apps.
-
I had spotted these and was also curious. Then I came across the "official" answer to this question in the Help, under the "Add-Ons" section. Here are the first two pages (of four) from that section in the Designers 2 guide: About add-ons https://affinity.help/designer2/English.lproj/index.html?page=pages/Addons/aboutAddons.html?title=About add-ons Linking custom content across apps https://affinity.help/designer2/English.lproj/index.html?page=pages/Addons/linkingContent.html?title=Linking custom content across apps
-
Colour picker not working on M1 Mac
GaryLearnTech replied to James Mcilwraith's topic in V2 Bugs found on macOS
Hi @James Mcilwraith It sounds a bit like you skipped the system prompt to allow each app to "record" the screen. Maybe you accidentally clicked Deny? Go to System Preferences > Security & Privacy > Privacy > Screen Recording and scroll down until you find the entry for each v2 app. I'm guessing that if you tick the check box for each app then you'll be in business.
-
Save RE Searches as Presets
GaryLearnTech replied to Seneca's topic in Feedback for Affinity Publisher V1 on Desktop
That sounds like a really good candidate for scripting. We were told - informally - that this was being worked on a year or two back. Obviously, scripting isn't there in v2.0, but I'm hopeful that it will become available "shortly". Possibly in v2.1? Well, some time before v3 is launched anyway. 😀 -
Hi @Johnnyyyy I don't think it's quite as bad as you currently perceive. Single-click that red eye icon and your footnote text will reappear. Your text is overflowing the footnote text frame and is currently set to be hidden. I've not played with the new feature yet, but I've got a couple of possible explanations. You mentioned experimenting with paragraph styles - perhaps your most recent experiment made the text too large for the default frame, forcing it to be hidden. This might be getting influenced by the text frame coming from a master page? So, not a full explanation or solution, but hopefully that will allow you to make some progress…
-
Hi @Jim_A Reproduced as described in Big Sur. In fact, I'll, er, see your two bugs and raise you a variation. #ahem. Double-click a word at the end of a sentence - ie followed immediately by a period (though other punctuation will probably do the same) - and the extra unwanted space appears at the front of the copied characters. (I was checking this by pasting into BBEdit with invisible characters shown). Ahh - also using keyboard shortcuts (cmd-shift-left/right) to select whole words results in the same trailing space. And so does the simpler shift-left/right to select just a character at a time. I think that apparent end-of-story character is actually an end-of-paragraph pilcrow - ie ¶ (Copy it back out of the Find/Replace field and paste into BBEdit again…)
-
Hi @pck1980 I've got a different workaround for you that doesn't require detaching master pages or changing the paragraph style to "None". However, I realise it may just be of academic interest if it's not practical in real life. Select the text frame Go to the Text Frame panel Turn off the Columns > "Balance text in columns" checkbox Change to the text tool Place your insertion point into the paragraph that you want to go to the top of the second column Go to the Paragraph panel Change the Flow > Start: anywhere to Start: In Next Column Once you do that, you can drag the picture frame over the text frame and the text behaves as I think you'd expect.
-
My apologies, @Old Bruce, for questioning you. I had not properly read your description and was looking at the regular Paragraph panel's Tab Stop position field. It was only after having looked at the similar Cannot type text into the hex field for text colour when creating a text style post that I twigged you were talking about the Tab Stop setting in the context of Text Styles … where I do get the same problem that you described.
-
Can't Batch Place with Alt+Click
GaryLearnTech replied to Cealcrest's topic in V2 Bugs found on macOS
Hi @Cealcrest I just tried this and it worked as described in the linked video: I'm currently on macOS Big Sur. But I think I just replicated the problem you described. When you drag the files into Publisher's Document View and hold down the option key, ensure you're anywhere over one of the pages of your document. Anywhere. Do that and the Place Images panel will magically appear and be filled with your images. However, if you drop the files in the background outside one of the pages (I believe the correct term for this area is the pasteboard), then you'll get them opening in tabs as you described. It doesn't matter when you option-drop the files onto the page if they're over a picture frame or not. That frame will not be populated at that stage. That will only happen when the Place Images panel has loaded up and you click a frame to place the first image - or click a blank space on the page to place the next image without requiring a frame. Hope this helps? if that doesn't resolve it for you, then a screen recording would help shed more light on exactly how that's not working for you.- 9 replies
-
- 1
-

-
- placing
- place images
- (and 2 more)
-
Paragraph Style dialog box labels truncated
GaryLearnTech replied to GaryLearnTech's topic in V2 Bugs found on macOS
I've got this feeling I saw something similar last week - but I think it must have been on the main forum which is still going flat out. It might have been the same underlying cause (I can see this being a little bit of a problem child) manifesting itself in a different dialog box. 🤷♂️ -
Hopefully this isn't a duplicate report. The Create Paragraph Style dialog box truncates three category labels if Preferences > User Interface > Font UI Size is changed from Default (below left) to Large (below right). Currently (still) on macOS 11.7.1 (Big Sur).
-
If you're talking about the Position field, it's working okay for me with macOS 11.7.1. I'm using a standard Bluetooth "Magic Keyboard with Numeric Keypad". Both sets of numbers (the ones across the top of the keyboard as well as the numeric keypad at the right) are okay. Is your keyboard a non-Apple one, perhaps with extra driver software?
-
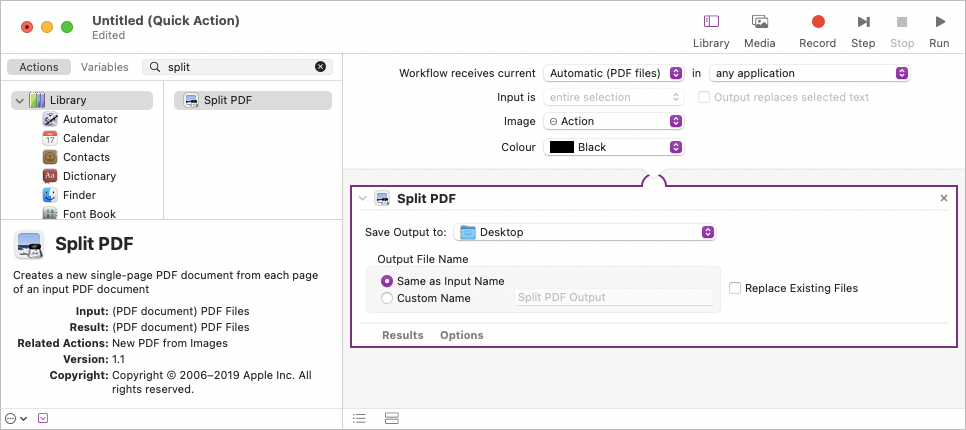
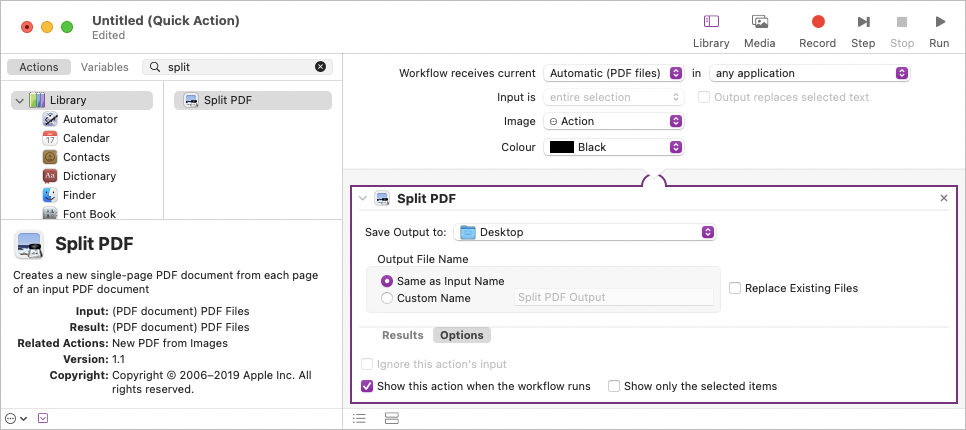
Hi @brunoczech Splitting your PDF into individual files is definitely not difficult - and as a Mac user you can set it up in less than a minute. Once you've done that, it's available any time you need it. It takes longer to describe how to set this up than it actually takes to do, so please don't be put off by the apparent complexity of it. Start by launching Automator (which you'll find in your Applications folder) Select Quick Action and click the Choose button. Locate the Split PDF action in the Library. You may find it easiest to type "split" into the search field at the top left - search results appear below the search field. Drag the Split PDF action into the workflow canvas on the right. Click the Options button at the bottom of the action. Tick the "Show this action when the workflow runs" check box. (This is important as it allows you to select any folder you want when it runs. If you skipped this step, it would only save the files in the Desktop folder.) Save your new Quick Action (File > Save…) and give it a sensible name. Quit Automator - that's the hard work done! Your new utility should be saved into the Services folder in the Library folder for your login. If you ever want to delete it, the location will look something like this: / Users / bruno / Library / Services / File split PDF.workflow Now, to use this, all you have to do is to locate your exported multi-page PDF, right-click (or ctrl-click) on it and select Services > File Split PDF. You'll be prompted to select an output location. If you're happy with the Desktop, great. Otherwise click that dropdown menu and select one of the other standard locations - or Other… to allow you to choose a location of your own. You can also change the Output File name options on this screen if you want. Hope you find that useful?


.png.3b3938a6bde087f434c20dd97720ef18.png)


.png.d2a04ab35f25621d2bd7c70444e9d537.png)
.png.24ab0569d03acea1e0ac086686f684b5.png)