Sven_M
-
Posts
6 -
Joined
-
Last visited
-
Oh Sorry, I guess this belongs to the Bugs section - I had missed that section, and now I can't delete this post .... Update: interesting, in the resource manager the missing images are not described as "linked" but as "remote". Maybe the problem is, that the publisher file was created on Macintosh but opened on Windows.
-
Just observed with Publisher 1.9.1 on Windows. I don't know if also happened with earlier versions: I opened a Publisher file where linked images are not available at their original location. So a dialog pops up: "Missing resource(s)", with the option to locate them by pressing "Yes". This opens a file dialog, where I can select an image file. In my understanding and reading through other posts here in the forum, Publisher should then check in that directory for all missing linked images, and repair the links. Instead, Publisher replaces every missing image in the document with the one selected image! That is not only useless, but actually destroys the document. Regards, Sven
-
 Fixx reacted to a post in a topic:
PDF passthrough: wrap setting based on box, not PDF content
Fixx reacted to a post in a topic:
PDF passthrough: wrap setting based on box, not PDF content
-
I am not sure if this is a bug or a wanted behaviour: When placing a PDF in pass-through mode, the wrap setting is adjusted to the content / objects of the PDF, even if these are not visible. Please see the attached image for an explanation. There is a placed PDF on top, composed of a blue rectangle and a red circle. However, the red circle is only shown in half (because of the PDF document size). The PDF pass-through is "TrimBox" and correctly displays the PDF. There is also a text frame with text wrapping around the placed PDF. Note that the text does not align to the edge of the visible PDF, but to the edge of the invisible content. This is nicely seen when "edit wrap outline" is used. I doubt that this is wanted, so maybe this is a bug? Please provide a feature that the text wraps around the box applied to the PDF (like trim box), regardless of the PDF objects.

-
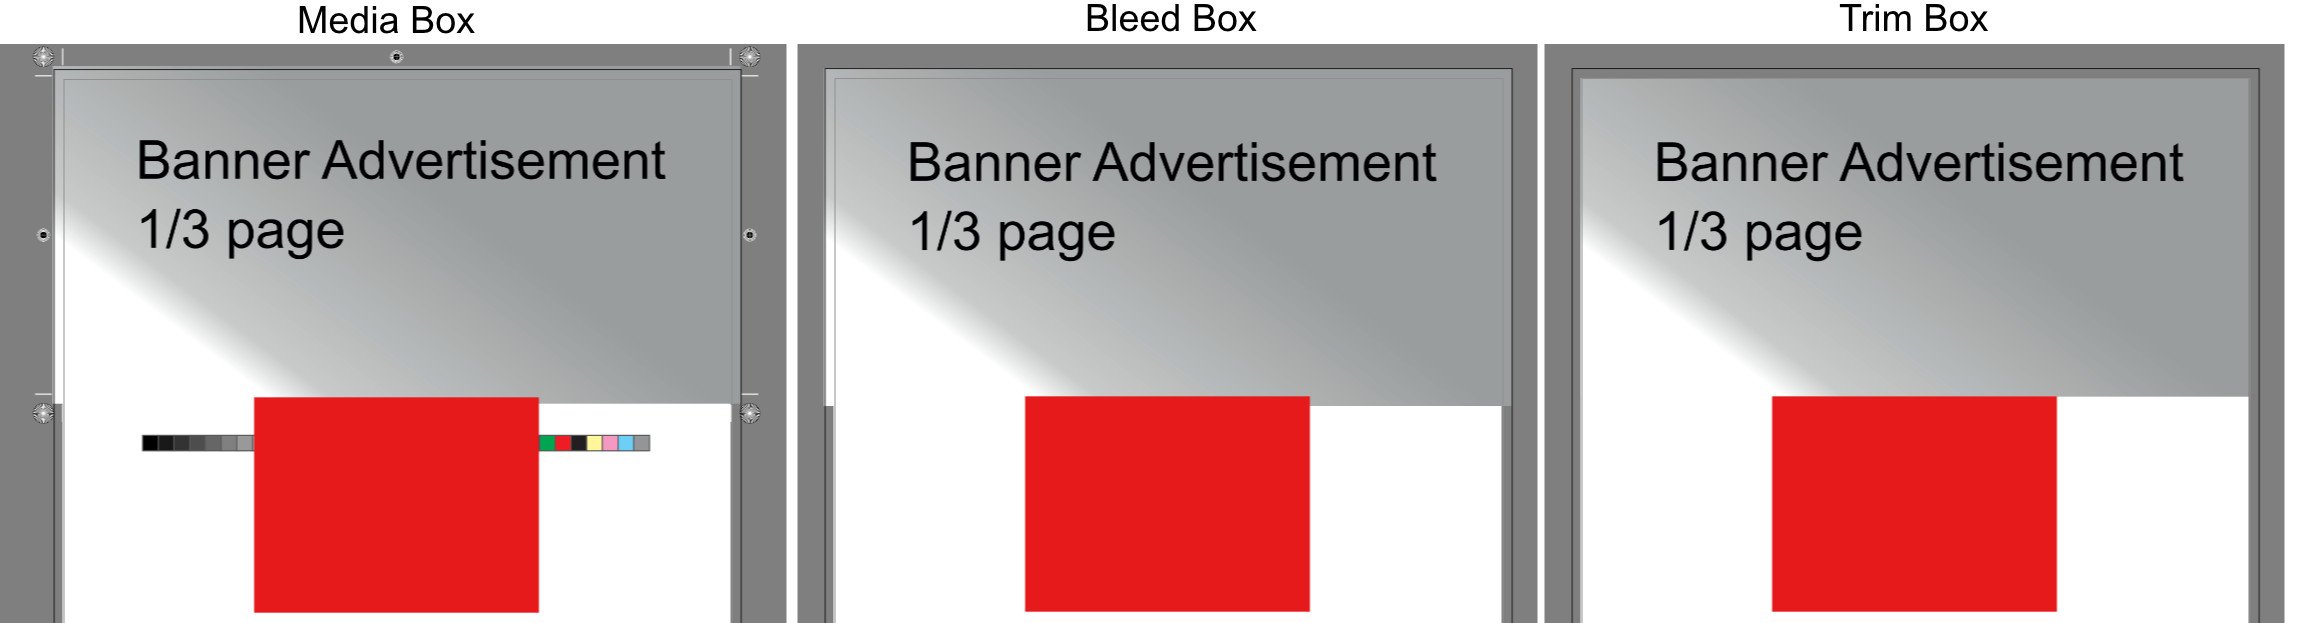
Dear Affinity Team, as I already wrote in the thread that announced version 1.9, the new PDF passthrough is fantastic for me. I prepare a printed magazine with ads from third parties, and the PDF passthrough finally permits me to simply place the PDF without worrying about the fonts used in the ads. But now comes the next thing: I can select the various PDF boxes when placing the PDF. However, usually I need different boxes on different edges: The trim-box on the edges of the placed PDF that are inside the page of my magazine, but the bleed-box on the outer edge, where the bleed section of the magazone page is. Keep in mind that ads rarely cover the full page, but are often banners or half-pages. But as ads are usually places at the edge of a magazine, I need to include a bleed in the PDF prepared for the printer. Please see the attached image as an example of the three different boxes and their effects. It contains a passthrough PDF as a banner advertisement, and a red rectangle that shall be aligned directly at the edge of that PDF. The document page has a bleed area defined, visible as a black rectangle "outside" the document page. The media box-passthrough shows everything including printer marks of the placed PDF, which nobody wants. The bleed box-passthrough works well for the bleed area, but it increases the "inside" size of the placed PDF, so it overlaps the red rectange (note the grey area on the right side of the red rectangle). The trim box-passthrough gives the insde of the placed PDF exactly right, with the red rectangle is nicely aligned at its bottom but no overlapping area, but now the bleed area of the document page is empty (and exports as white). A work-around is to place the PDF with bleed box, and then use the trim-tool to adjust the internal edges. But this is time consuming and, much more important, not accurate as the trim tool does not snap to the trim-box edges. So my feature request is: let Affinity Publisher automatically realize that a PDF bleed area is overlapping the document bleed area, and use it when exporting the document with bleed. So I would place the PDF as trim-box, align it to the edge of the page, but when exporting the PDF with bleed for printing, the PDF's bleed is used. I hope that my description makes sense. Please ask if I should explain better. And please also let me know if there is already a way to achieve this, that I do not know about.
-
Patrick Connor reacted to a post in a topic:
Affinity Publisher for Windows - 1.9.0
-
Affinity Publisher for Windows - 1.9.0
Sven_M replied to Patrick Connor's topic in News and Information
The PDF pass-through is fantastic! This was one of my biggest problem - to get PDFs from third parties (advertisements) properly into Publisher. Finally this works without any problem! Thanks! -
I observed similar problems with large PDF exports and color spaces in Affinity Publisher Windows 1.8.5. I played around and it seems that there is an image compression problem when the "Document Colour Format" is set to RGB/16 AND the image has to be downsampled to different DPI. This is what I did: One Image was placed in a document and then exported using the preset "PDF (digital - high quality)". That preset by default downsamples images to 300 DPI, makes JPG with 98% quality and converts image color space, with a setting to Colour Space RGB and ICC profile "sRGB IEC61966-2.1". Setting 1) The image was placed onto the page and the image had 300 DPI - so no downsampling was required. Then I changed the Option "Colour Format" in "Document Setup - Color", and exported a PDF with the preset "PDF (digital - high quality)". This is the size of the PDF depending on the Colour Format: CMYK: 5924 KB RGB/8: 6461 KB RGB/16: 6461 KB --> the same size as with other Colour Formats RGB/32: 5924 KB. Setting 2): the same image made smaller on the document, so it had 600 DPI. Now the image had to be downsampled in the PDF exprort. This are the PDF sizes: CMYK: 1837 KB RGB/8: 1835 KB RGB/16: 8219 KB --> huge file, even larger than compared to when the image has 300 DPI in the document RGB/32: 1837 KB Setting 3) the same image made even smaller with a DPI of 900: CMYK: 870 KB RGB/8: 867 KB RGB/16: 4522 KB --> huge file compared to the other Colour Formats RGB/32: 870 KB Setting 4) the same image again at DPI of 600, like in Setting 2. But this time I changed the JPEG compression settings during the export: RGB/8: no compression - 4292 KB, 98% quality - 1835 KB, 40 % quality - 229 KB RGB/16: 8219 KB in all three JPEG compression settings (!) RGB/32: no compression - 4295 KB, 98 % quality - 1837 KB, 40 % quality - 231 KB Sorry for the long read. But it is rather obvious: compression of images does not work if the images are downsampled with a document Colour Format of RGB/16. Is there a chance for this bug to be repaired in an upcoming new version?