totjoss
-
Posts
34 -
Joined
-
Last visited
Everything posted by totjoss
-
 Sorry for the late reply, I've downloaded the version 2.1.1 and it is fixed ! 👍 Thanks again !
 -
Photo 2.1.0 gradient tool crashes
totjoss replied to totjoss's topic in Affinity on Desktop Questions (macOS and Windows)
This is really insane. 😅 @RichardMH I've reset everything, but unfortunately the issue is still there. @Ron P. I agree with you, it's pointless of course. But in any case it shouldn't crash. I could have loaded a picture and resized it. The crazy part is that it only occurs with 256×256 and after a resize, or maybe around this area. I tried bigger or smaller or even not squared and I have no issue. It looks like a floating equation makes it fail - I don't think it'd be an infinite loop as it would freeze the app and not crash instantly. I tried on other computers and I can't replicate the crash either. As it only occurs on my desktop, I tried to test again with most of my background apps killed, still the same. Thus it might be linked to my config which is very old now (13 yo, 1st gen i7 860 + GTX 780). Fortunately it seems isolated and I can use my laptop anyway. Thanks for having tested on your side, but now I don't think it's worth trying to debug it. Except if someone else get the issue someday. 😅 -
Photo 2.1.0 gradient tool crashes
totjoss replied to totjoss's topic in Affinity on Desktop Questions (macOS and Windows)
After testing a bit more, it has nothing to do with settings. Neither Retina Rendering nor dither gardients change anything. However, I think I know how to make it crash every single time. This is what I'm doing : - Create a new document (2048×2048 72ppp RVB/8 sRGB transparent) - Resize document to 256×256 (72dpi bilinear resample) - Add an empty pixel layer - Select the gradient tool - Mousedown on the left edge of the document - Dragging to the right edge perpendicularly until it snaps - Hold the dragging and wriggle the cursor slightly as if you were trying to unsnap - At some point it will crash. If it doesn't after 5-10 seconds, retry by making a new gradient again. Weirdly if I don't resize the document, it doesn't crash.
-
Photo 2.1.0 gradient tool crashes
totjoss replied to totjoss's topic in Affinity on Desktop Questions (macOS and Windows)
Hello ! Here is the dump for the crash. I'm not sure but it seems to be linked to Retina Rendering as Automatic, as this settings sometimes made my Photo app freeze at some point on the previous versions (with no GPU devices). cb79de49-80ba-4e54-9c5b-f8c44c740160-dump.dmp -
Hello ! I'm trying to make a simple gradient picture, but every time I try, Photo app crashes. Step to reproduce: - Launch Photo and create a transparent document; - Create an empty canvas; - Select gradient tool; - Make a gradient, and edit break points colors, then it will crash at some point (sudden app close, no error). Actual settings: - Display quality as "Nearest Neighbor" - Dither gradients checked - Retina Rendering as "Automatic (best)" - Hardware Acceleration (OpenCL) unchecked (as my GPU isn't compatible / GTX 780)
-
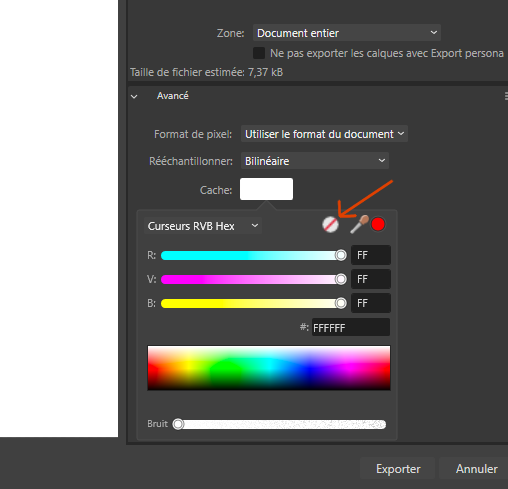
What you're showing is not the same and is not a bug. Of course a document has to be transparent in order to be exportable as transparent. 😉 In my case, you can see on the screenshots that my document is transparent from the beginning, but the matte option doesn't work properly.
-
That's what I meant by When I click the transparent option, nothing happens, the matte remains white.
-
Hello ! I've updated Affinity Photo to version 2.1.0 and since then I'm having trouble with exporting a transparent image in PNG. By default the settings will export transparency, but whenever I change any advanced settings (fi. disabling metadata), the transparency is gone. Here is a preview of the issue : And setting "Cache" option to transparent or assigning a profile doesn't do anything. We have to use the "PNG" preset to get transparency back, but every advanced settings will be reset. I didn't have this problem in previous version 2.0.4. Thanks in advance for your help !
-
OpenCL Hardware Acceleration unavailable
totjoss replied to totjoss's topic in V1 Bugs found on Windows
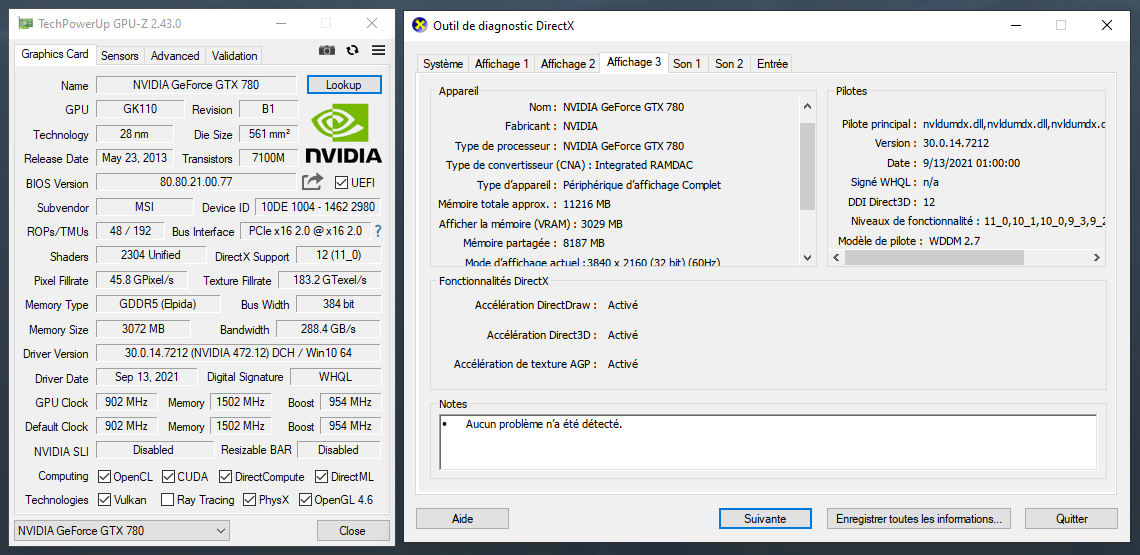
Ohh I see. Indeed, on my laptop it says 12 (12_1). -
OpenCL Hardware Acceleration unavailable
totjoss replied to totjoss's topic in V1 Bugs found on Windows
Thanks for your quick replies ! Actually it seems that DirectX 12 is on.
-
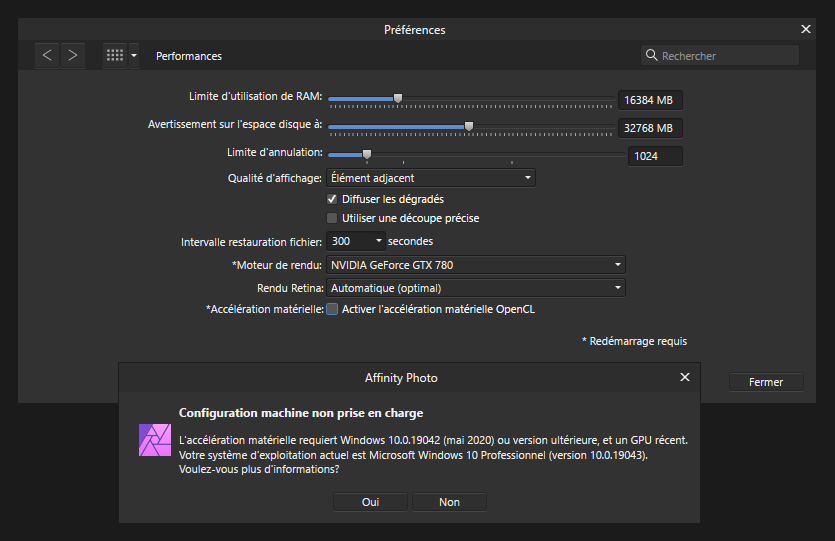
Hello, I've just realized that on my desktop I wasn't using my GPU in Affinity Photo. Unfortunately I can not set OpenCL acceleration because of incompatible hardware. My actual Windows version is higher than the required version. I've double checked and both Windows 10 and graphic card are up-to-date. My desktop is pretty old but is still powerful enough, especially for photo editing. Here is my config: CPU: i7 860 (4 cores ~3,6GHz) GPU: GeForce GTX 780 (3GB) Ram: 16GB DDR3 Even though the GPU is getting old too, I'm pretty sure it's quite enough for OpenCL feature, as it is equal to my laptop GTX 1660 Ti's performance (which is OpenCL compatible). Is there a way to enable OpenCL anyway ?
-
That is quite excellent ! ✨ Thank you very much for your help !
-
Hi everyone, I still wish there were destructive filters (instead of only live ones). But the reason to this post is to find an efficient way to alter a mask layer using filters. Indeed, a trick I often used to do on Photoshop (but also Krita) is to sharpen a mask layer using brightness/contrast or curve filters. As a mask layer is a greyscale pixel matrix, this should be totally possible. A sample of what a curve on a mask layer could produce : I tried to add a filter under a mask layer - it is possible but nothing happens. However, I've just been trying a dynamic filter (blur, sharpen) and it works on a mask layer ! But unfortunately we can't merge the filter it, so we couldn't re-edit the mask layer afterwards with a pencil. It looks like basic filters on mask layer is a feature not implemented, I wish it was ! Especially as it goes along with the dynamic filter working.
-
It works greatly. Thanks a lot !
-
This is really great Lagarto, thanks for the help ! However I have this error message when I try to execute your utility: The application to execute does not exist: 'C:\Users\[...]\text2ase\text2ase.dll'. Did you forget to put the library file ? Also when I first attempt to use it, Windows Defender recommended me to analyse it - maybe it blocked it somehow.
-
I tried it as well as it looks promising, however both Photoshop and Affinity say the file is invalid. How did you make it work ? In the script, function making the ASE content just returns it but doesn't output it to a file, so I've just added a echo before output it to a file : "php ase.php > test.ase".
-
The Pantone trick seems to be the solution, thanks a lot !
-
Hey there everyone, I'm generating color sets so I don't have to add colors in a new palette manually. However I just figured out that a Affinity color palette (.afpalette) is a binary file. Would there be a way to import/convert a palette from any kind of text file (xml, json, etc.) that can be generated ? In comparison Krita does save palette in a custom archive containing text files. Thanks in advance for your help.
-
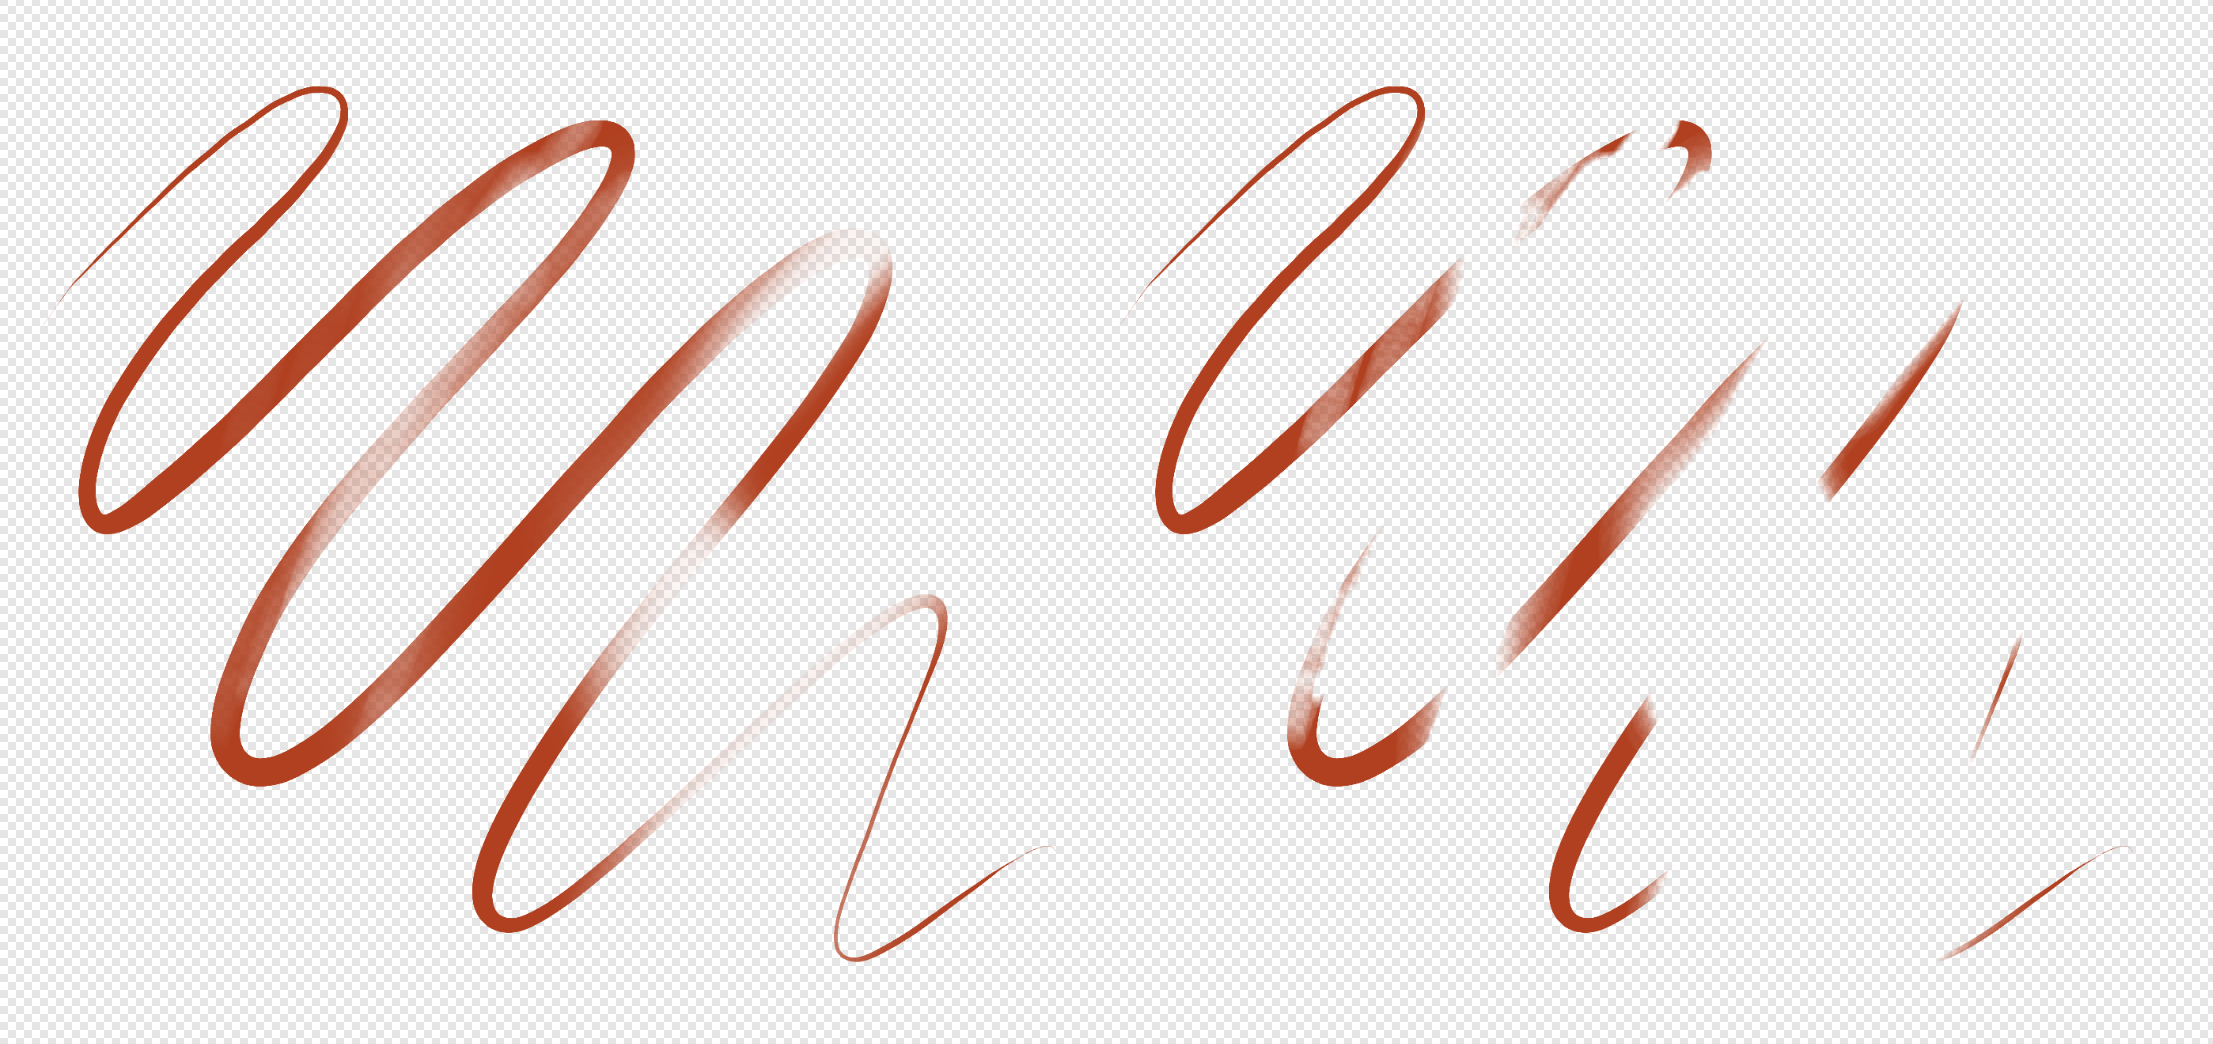
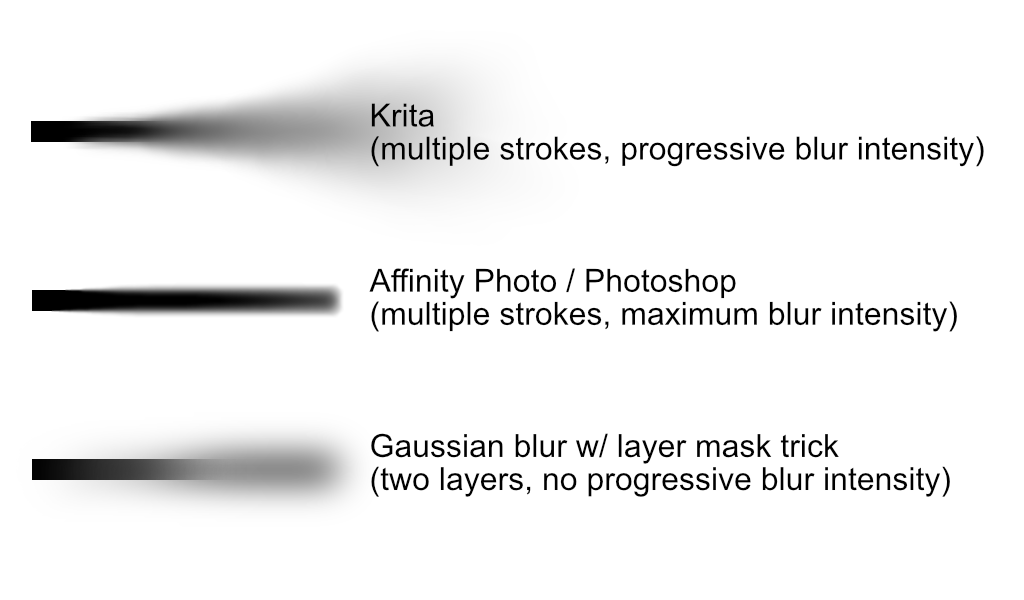
No this is not what I meant, and I'm using Windows. Well... no, attached to this message is a sample of what I mean and why your solution would not work : - In Krita, the blur brush somehow spread more and more and the blur intensity is relative to the brush size, thus you have a great blur transition. - I just realized that Photoshop is equal to Affinity in this situation : no matter how strong, how big and how often I use the brush, the blur intensity will remain the same. - Your gaussian blur trick with alpha transition results to a very amateurish blur transition... And no I won't make multiple layers with different gaussian blur sizes on each, it would be damn complicated for nothing - I'd rather open Krita just for that effect and copy-paste it back into Affinity. So it seems there isn't any solution to this ?
-
No because it won't be a progressive blur, there'd be a "sharp" and "fixed blur" with alpha transition.
-
Hello ! I'm using the blur brush tool but is there a way to increase/decrease it's strength (like increasing a gaussian blur size), because in 4K resolution it's too light. And of course I tried changing the brush size/flow/strength but even at 100% it's not enough. Thanks in advance for your help.
-
Alright, great news ! I finally found a way to alter the screen colors without using any profile. On Surface Book devices, it's not the graphic card nVidia which handle the colors, it's the integrated graphics from Intel. Thus you just have to install the Intel Graphics app from the Windows store : https://www.microsoft.com/store/productId/9PLFNLNT3G5G Thanks again for the help !
-
Hmm so this is an issue from the OS then. I do have the Surface Book 3, and it looks alike the link you've posted. Thanks for the share ! I should try to get back the color management from nVidia's control panel rather than using Windows color profiles.
-
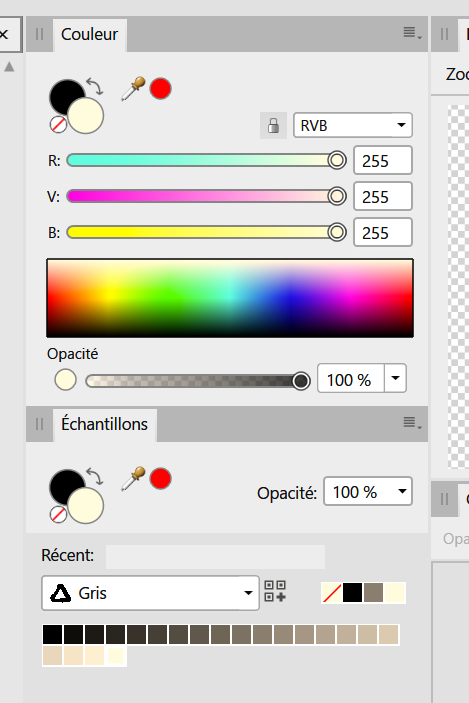
Hello ! I've bought a new laptop and created my own color profile so that screen looks more neutral than with the default sRGB profile. However I would like this profile to be applied only for the screen and not for any Affinity Photo documents. Unfortunately I tried all the options in the Colors preferences, I can't find a way for Affinity Photo to just ignore the screen profile and display the standard RVB colors. Attached to this post is a sample of the greyscale palette which doesn't look greyscale at all. If is set the color profile as "sRGB IEC61966-2.1" (relative render) I get this result. If I set the color profile matching Windows' color profile, it's even worse (as if the profile was applied twice). In order to get the correct colors back, I have to set both Windows and Photo as "sRGB IEC61966-2.1", but the screen looks blueish (as all other laptop screens). I general I don't use color profiles and change the color levels directly on the Graphic Card's configuration - but this time I can't and have to use a profile. I can eventually set Windows colors back to my custom profile while Affinity Photo is still opened - it does the trick but at any random time it switches to the wrong colors again. Would there be any way to prevent Affinity Photo from using any color space and just stick with the RVB defaults ? Thanks in advance for your help.
-
Ohhh I see. I'll have to check that. Thank you very much for your help, and I'm glad I could help you in return.