Graham L Furlonger
-
Posts
22 -
Joined
-
Last visited
Everything posted by Graham L Furlonger
-
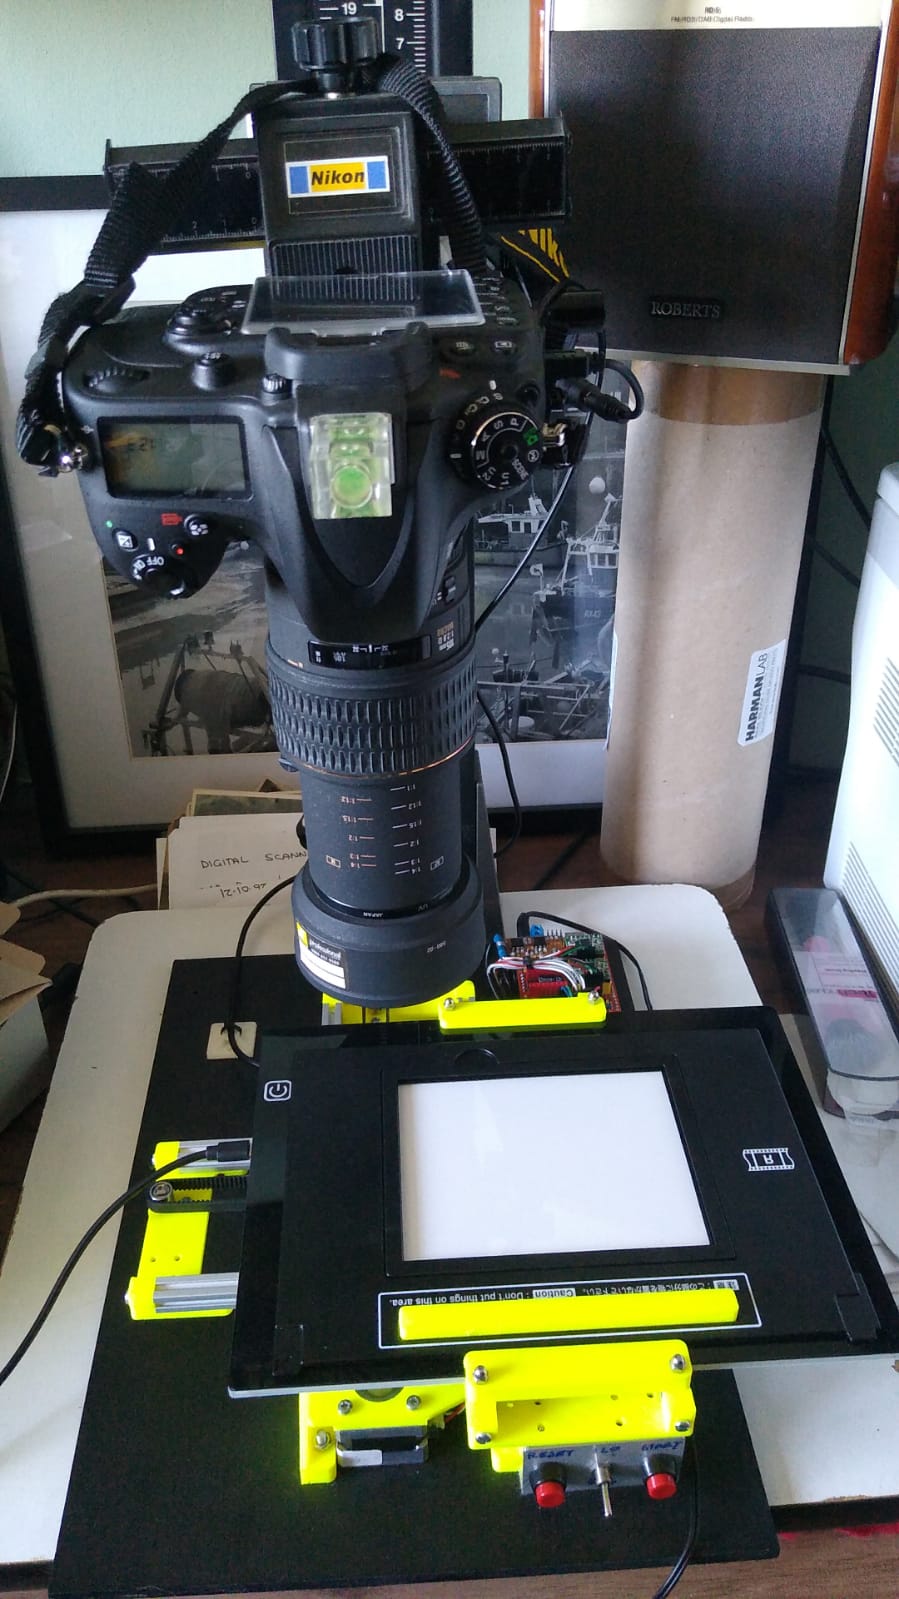
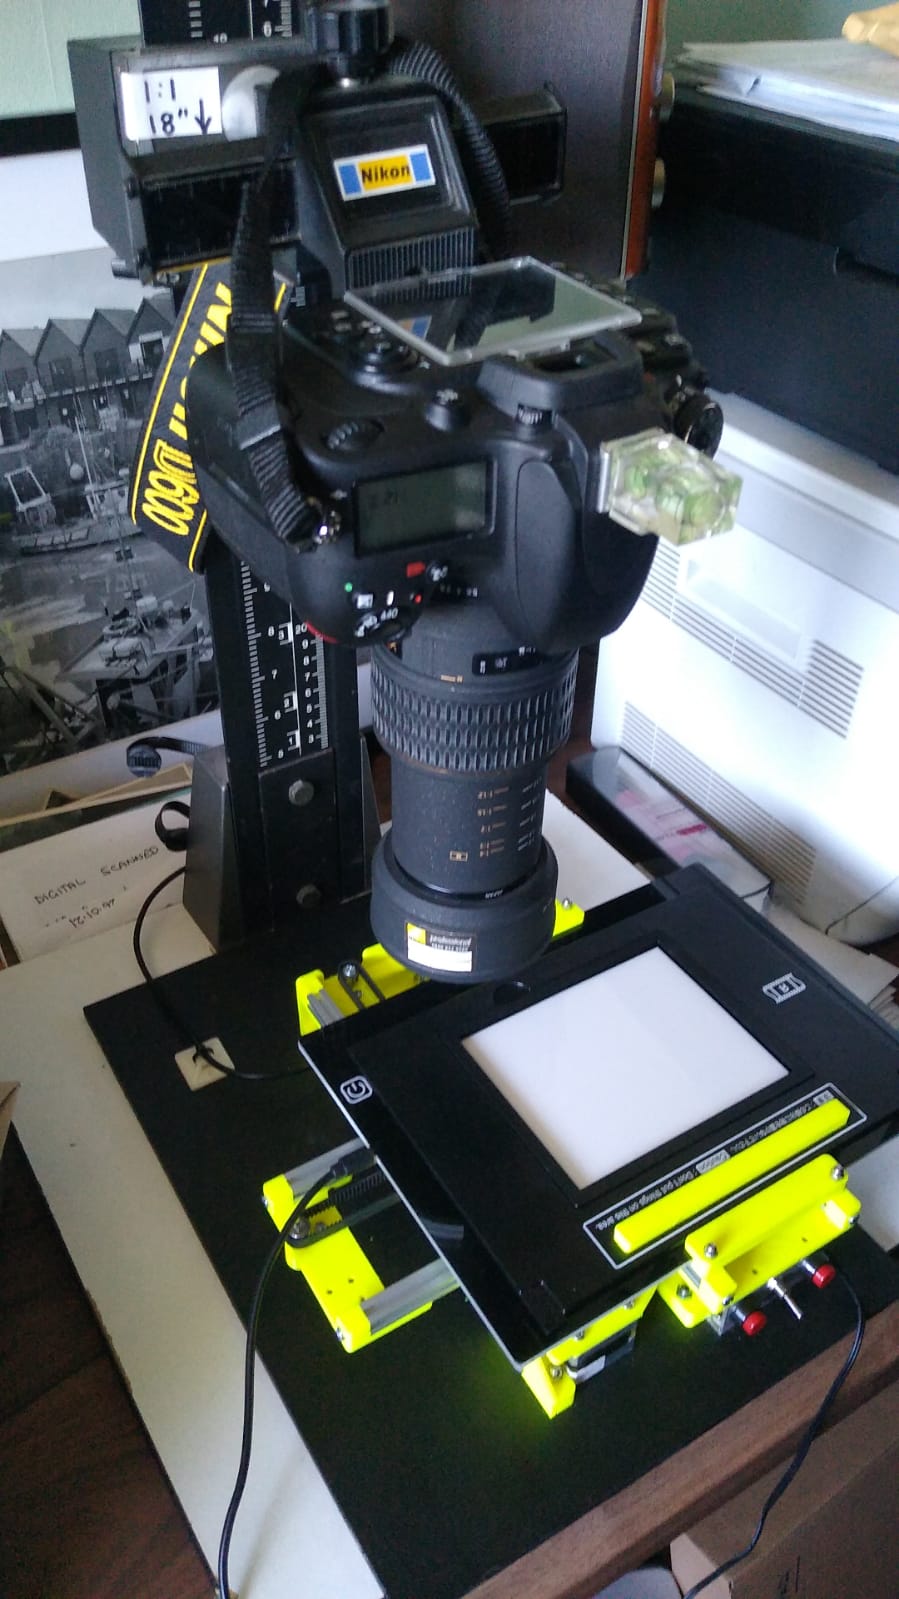
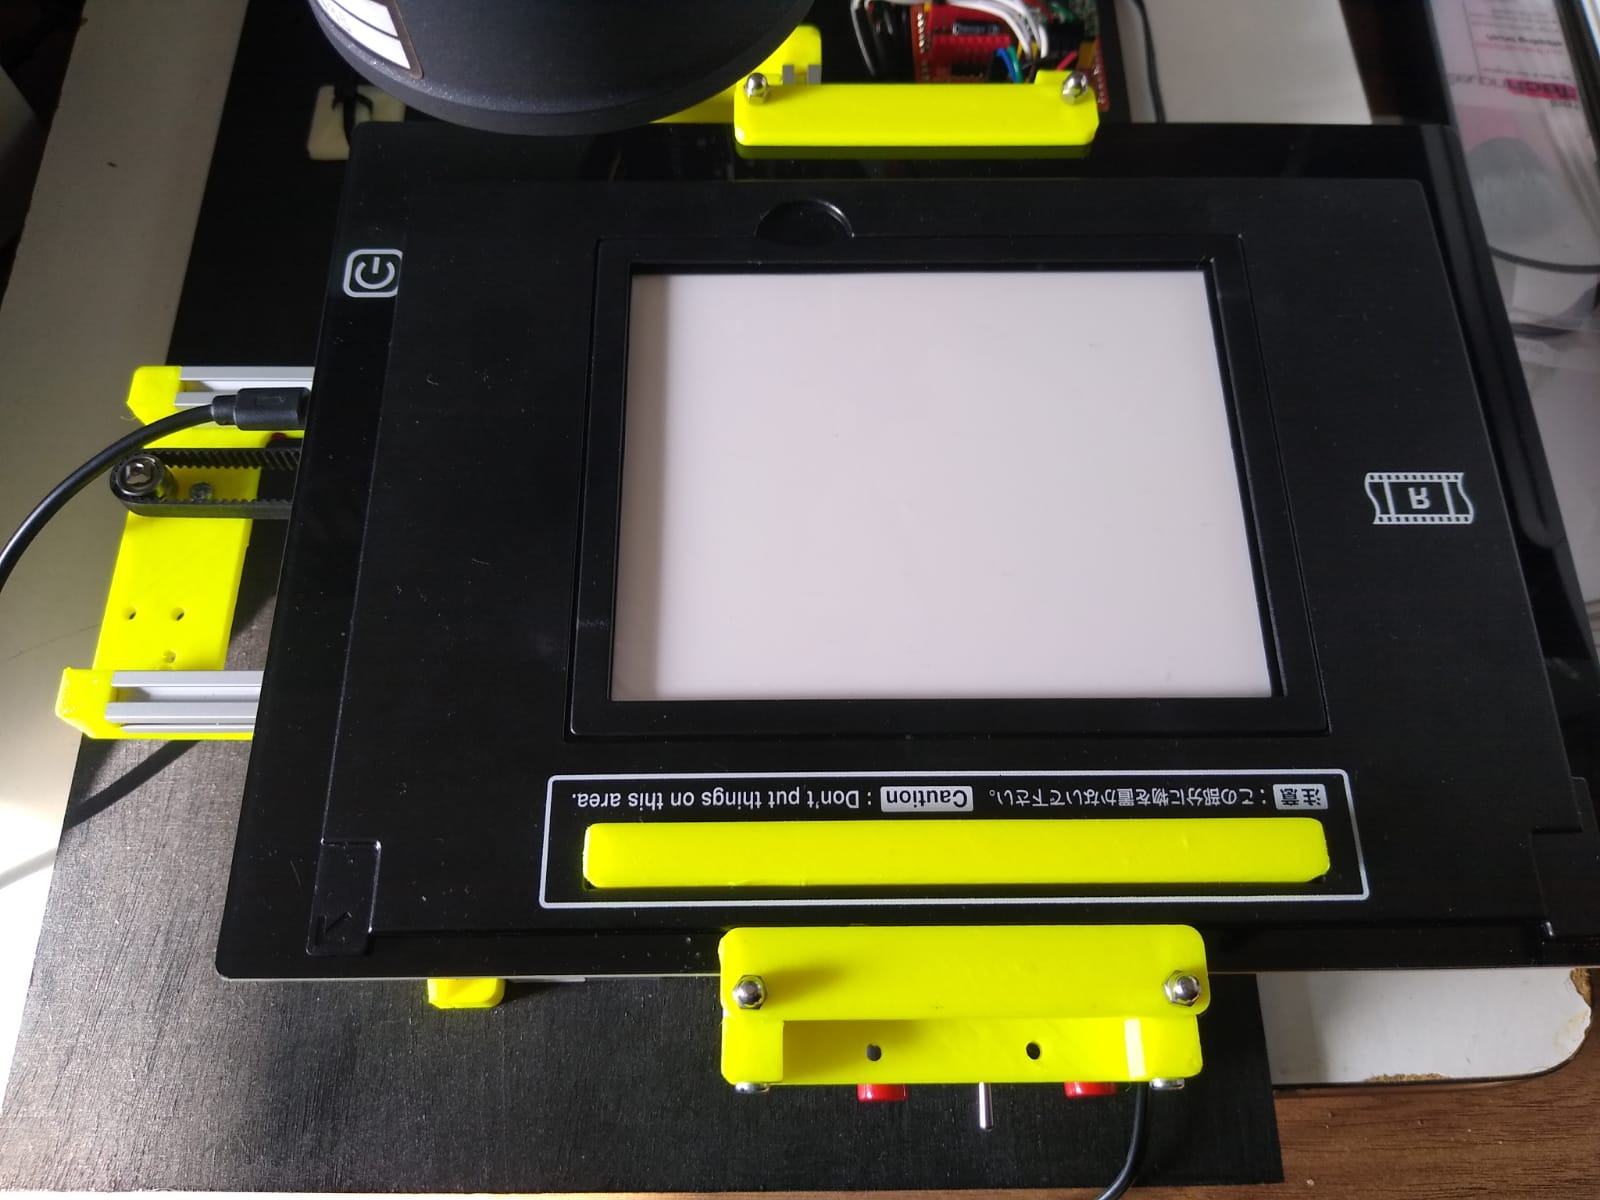
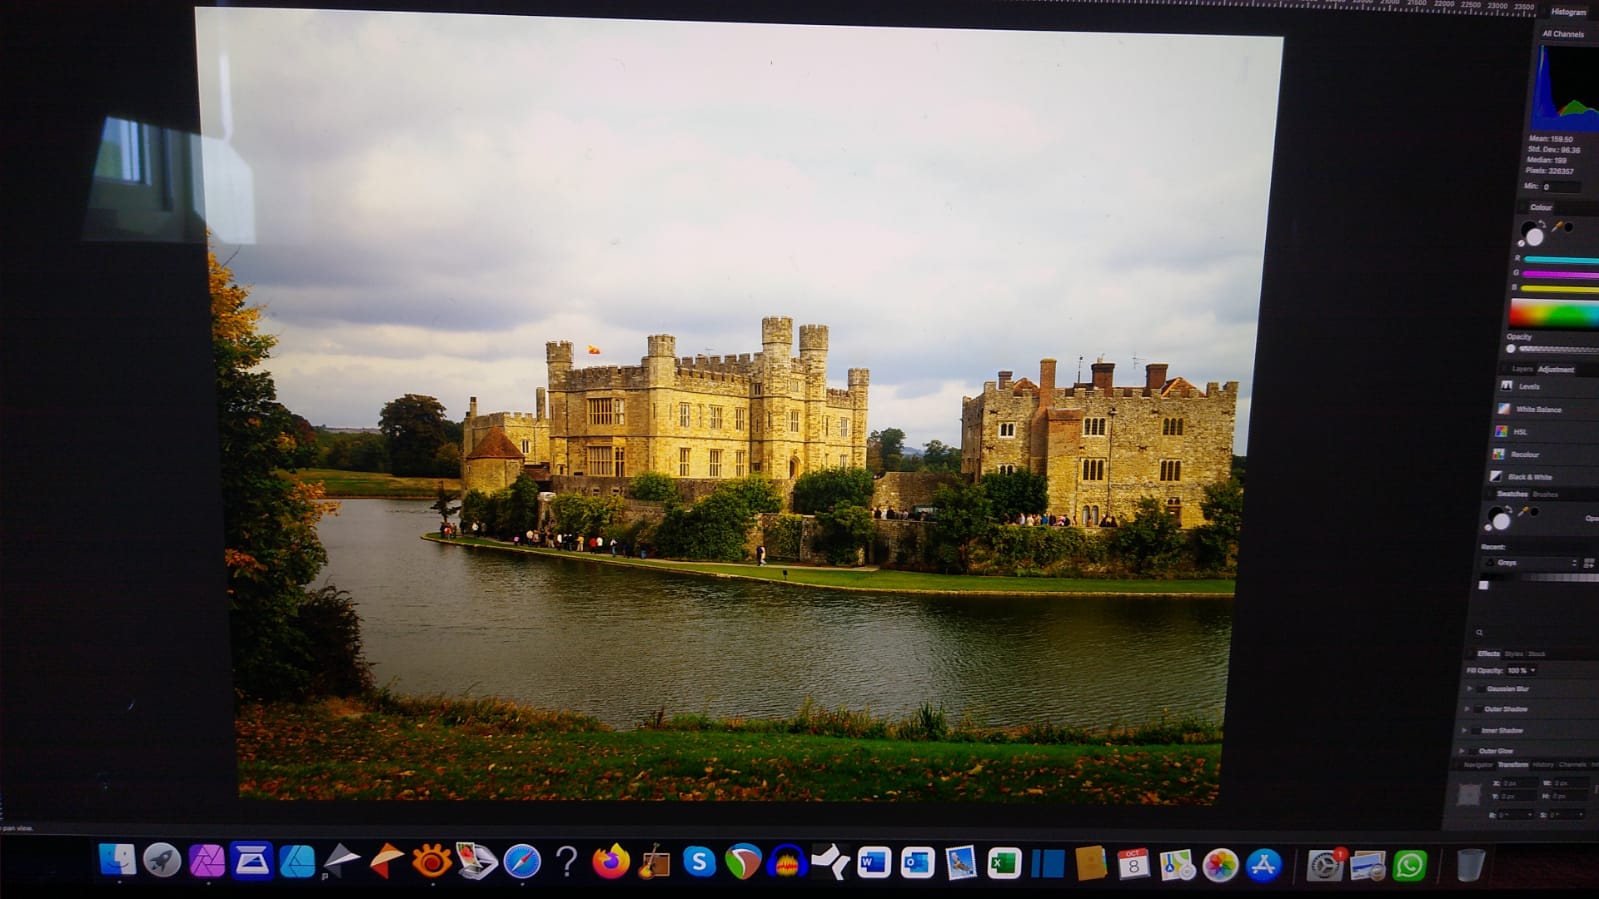
 This is my solution, Scanning 4x5 negatives with a Nikon D600 and a home designed / manufactured scanning plate using a commercially available A4 light table. produces huge files in excess of 240mb from RAW Nikon or Canon files The scanner produces 20 titles with appropriate overlap run from an Arduino and stepper motors. The accuracy is outstanding. A few observations that I found in improving the results; Always focus on the grain side (Matt side of the neg) At 1:1 ratio lens on FX Digital I use an aperture of f5.6 or f8, further than f8 causes aperture blade diffraction. Use the most stable tripod / support you have. Ensure that the plane of focus is parallel to the camera sensor. Focus using high magnification of Live view (on DSLR's this normally ensures mirror lock up which reduces vibration) I use Affinity Photo Panorama function to knit the 20 tiles together and generally this does a good job, but can get confused on areas of bland sky. I had to adjust the timer facility to ensure that any vibration has ceased prior to taking each shot and moving the light table. If you are interested I can send you via we-transfer a 240mb sized image. Good luck. Regards Graham L Furlonger VID_20211008_152927185.mp4
-
Ram settings
Graham L Furlonger replied to D23's topic in Pre-V2 Archive of Affinity on Desktop Questions (macOS and Windows)
Here is a quick vid of the Bobscan working..... VID_20211008_152927185.mp4 (continued from last post) -
Ram settings
Graham L Furlonger replied to D23's topic in Pre-V2 Archive of Affinity on Desktop Questions (macOS and Windows)
I have a 2019 i Mac with 3 GHz 6-core Intel Core i5, 48GB of RAM and Radeon Pro 570X 4GB vid card. I have built a custom scanning device using an Arduino, 3d printed parts with an A4 flat bed light table (Ebay) and an old Canonscan UF2400 neg holder for scanning 4x5 negatives with my Nikon D600, it shoots 20 RAW images; 4 horizontally by 5 vertically producing a finished cropped file of around 240mb. The finished image is exported to TIFF. I have no problems with this and the overall processing time for the panorama is approx 2 mins. The only issues I am experiencing is where the scanned image has section tiles of plain sky and then sometimes AF misses them on the finished image? Just trying to work out how to replace the missing tiles! The produced image from a 4x5 neg will print out just over 2.5m long x 2m high at 300 ppl
-
Thank you so much, that means alot. Kind regard, Graham.
- 33 replies
-
- 1
-

-
- c41
- negative film
- (and 4 more)
-
Thanks, I was encouraged from a really early age Jowday, When I first got the opportunity to see a black and white print develop infront of my eyes in a darkroom at the age of 11 I was amazed. I collected some basic stuff and was developing my own negatives and printing from them at the age of 12. I have done a full circle really, started on negative film B&W then C41, professed to E6 positives, then in the 80's went Medium format 6 x 4.5 and 6x6 ending up with a Mamiya RZ6x7. Then in the early 2000's purchased a used 4x5 monorail and then a 10x8 field camera (still have these and use them today) then in 2003 purchased a brand new Nikon D100 DSLR, sold loads of my film kit including my FM2n and Olympus OM4 (LOVED the OM) then progressed into D600, D800 and recently purchased a really nice Used FM2n and OM4 again. Currently have two ETRSi bodies too. Film is making a serious comeback although will never compete with the mobile phone snapper masses. lol Enjoy whatever you do, be lucky you started later... my kids will have approx 5000 combined negatives and E6 slides to sort through including:- 35mm, 645, 6x6, 6x7, 4x5 and 10x8! ha ha Regards G www.grahamfurlonger.co.uk
- 33 replies
-
- 1
-

-
- c41
- negative film
- (and 4 more)
-
Hi Firstdefence, answers to your questions... 1. Never seen a positive print from this neg. 2. Yes, lots on this roll of negs had a light leak problem. (It was taken with my Fathers very old Balda folding 6x6 camera Circa 1950 3. Nope scanning procedure is perfect and repeatable. works very well on E6 and B&W negs. (Post comment) I have now found a way to do this very easily and posted it. Thanks for your help.
-
I converted from PS and vowed never to return! Found a really quick way of doing it in Affinity Photo, and posted. Thanks Jowday for your input.
- 33 replies
-
- 1
-
-
- c41
- negative film
- (and 4 more)
-
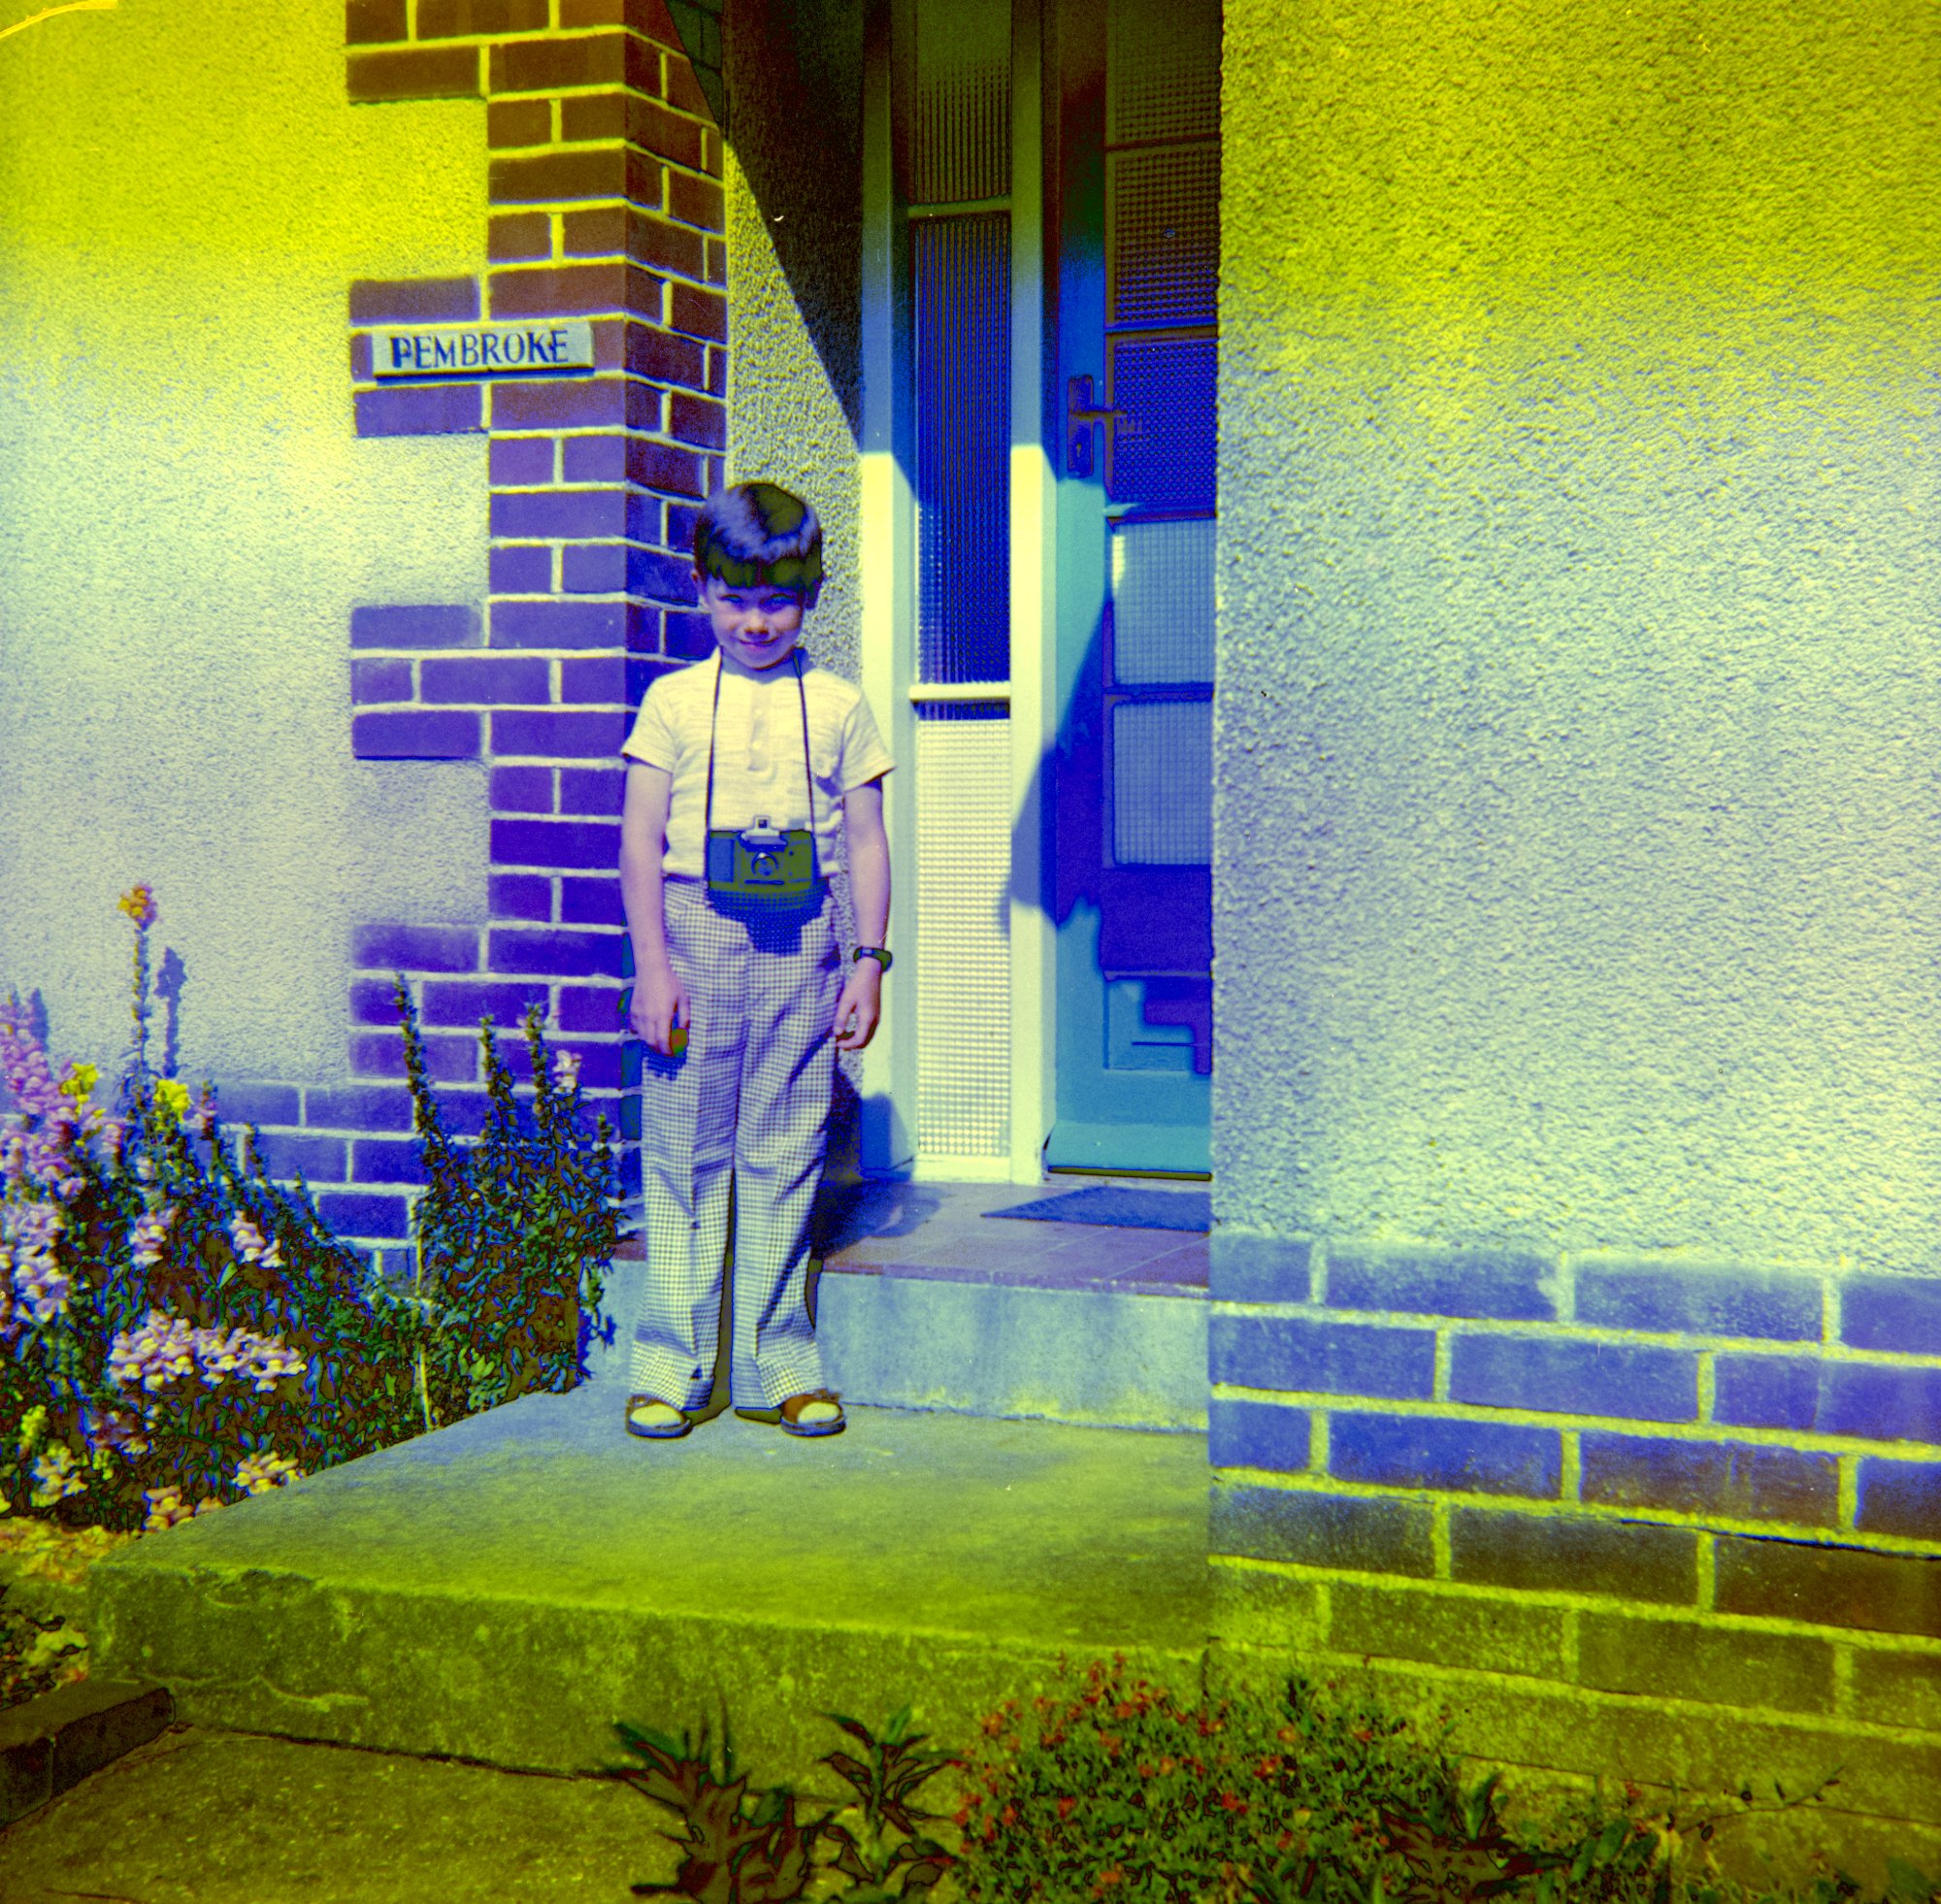
ok, thank you for all your help. by accident I found a real easy way to do this... might be helpful for anyone else? I am not sure if it is the "correct" way, but it works for what I need and its quick! Select "colour picker tool" onto the film rebate, Select from main menu "LAYER" then "NEW FILL LAYER" change the layer options of this new fill layer to "Difference" Done! Just needed to play with the colour sliders in "Adjustments' and "Colour Balance" Done! Thanks everyone. PS I started photography at a very young age (5) here with a Coronet Flashmaster 120! (Circa 1950's) which I bought from a second hand shop with many weeks pocket money, LOL And here's the scanning setup I use.
-
carl123, thank you so much for your time. I am still unsure how to do this myself? No one has come back and told me where the white balance can be found with the three eye droppers as explained in the photoshop tutorial, and although I very much appreciate your time Carl123, I still have no idea what you did to get to this photo. ....OK I give up. really cant believe its this much hard work getting a simple answer.
-
Thank you, but where do I get the menu that displays the three eye dropper tools for black grey and white from? thanks.
-
Thank you for all your help and posts BUT, no one has actually instructed me how to do this in Affinity Photo? please can I ask again, how do I do this (what would seem a simple task for photography software) in AF? thanks. Regards Graham. I cant believe its proving so illusive?
- 33 replies
-
- 1
-
-
- c41
- negative film
- (and 4 more)
-
Ive uploaded the Image which took considerable time, @DWright please can you tell me why that was necessary? Thanks. Regards G
-
OK, thank you. I am still looking for some instructions on how to do this is Affinity please?
-
I don't have that version, I only updated to V 1.8.6 yesterday?
-
Thank you for your advice but looking at all these posts they relate specifically to PS? I need some instructions please for Affinity Photo. Regards G
-
Hi DWright, thanks for the response. Here is the scanned neg. I have included some of the film rebate on the left hand edge for colour match purposes. In another application I would have sampled the rebate colour, made a new fill layer with this colour, set blend mode to DIVIDE flatten layers and then clipped RGB B&W points to get in ball park then fine colour and other adjustments. I cannot find any mode for layers in AF which equates to "Divide"?? Thanks again. (PS I know the neg has been light leaked damaged at the top) Regards Graham. _DSC1698.tiff
-
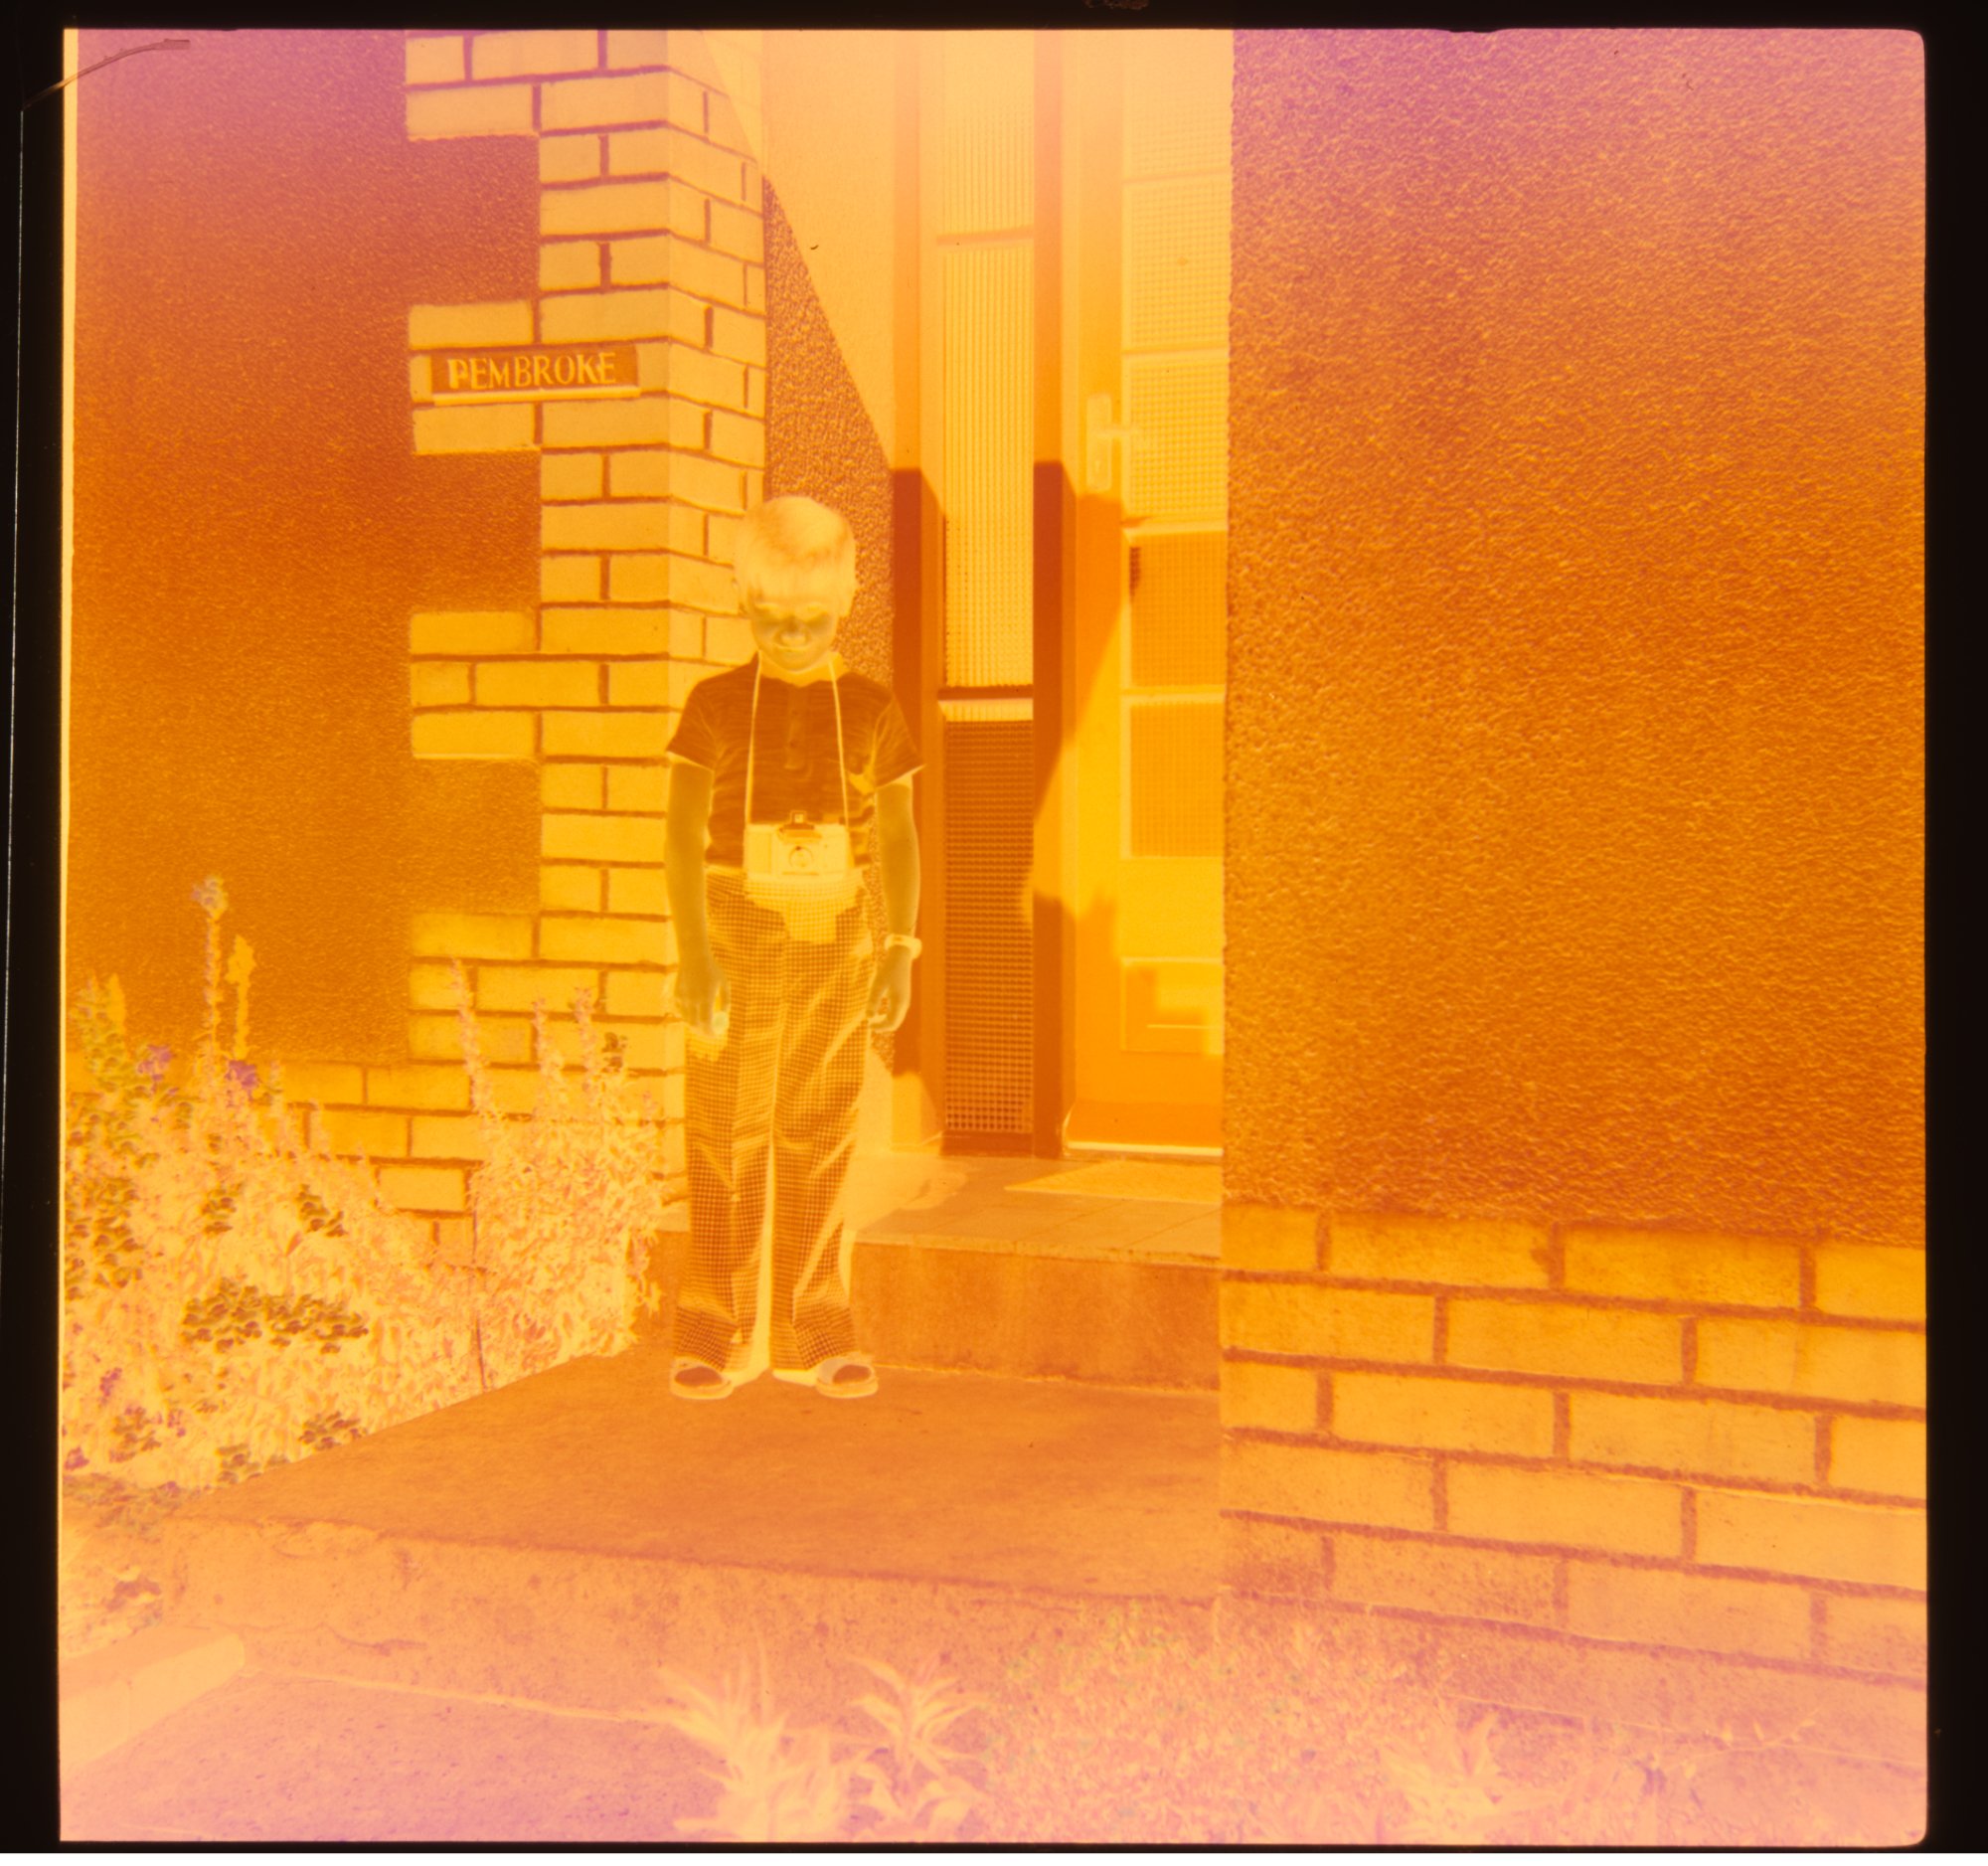
Need some help please and I will be specific. Scanning C41 Negatives using my Nikon D600/D800 with a Sigma 105 1:1 macro lens to produce 6 stitched images of 4x5 C41 negative. Scanning with fluid, AN glass and a sheet of optical mylar, the set up is as follows. light source, raised AN glass (frosted side up) layer of fluid, negative emulsion side up, fluid, optical mylar. DSLR shooting through the optical mylar and using live view highly magnified, focusing on the film grain. Lens at f8. file produced as RAW. The results are stunning and we have compared the results to an Epson V750 and I have sold the Epson. The questions is this; Using Affinity Photo (Mac) how do I convert the C41 to colour without the orange cast? I guess somewhere you need to sample the border strip and convert it from orange to blue as it is the base layer but other than this I have tried a few things and gone around in circles. Black and white and E6 positives are obviously easy and no problem but this Orange Cast..... Thank you very much for anyones time who replies. kind regard Graham.
-
affinity photo Focus Stacking / Microscopy
Graham L Furlonger replied to Graham L Furlonger's topic in Share your work
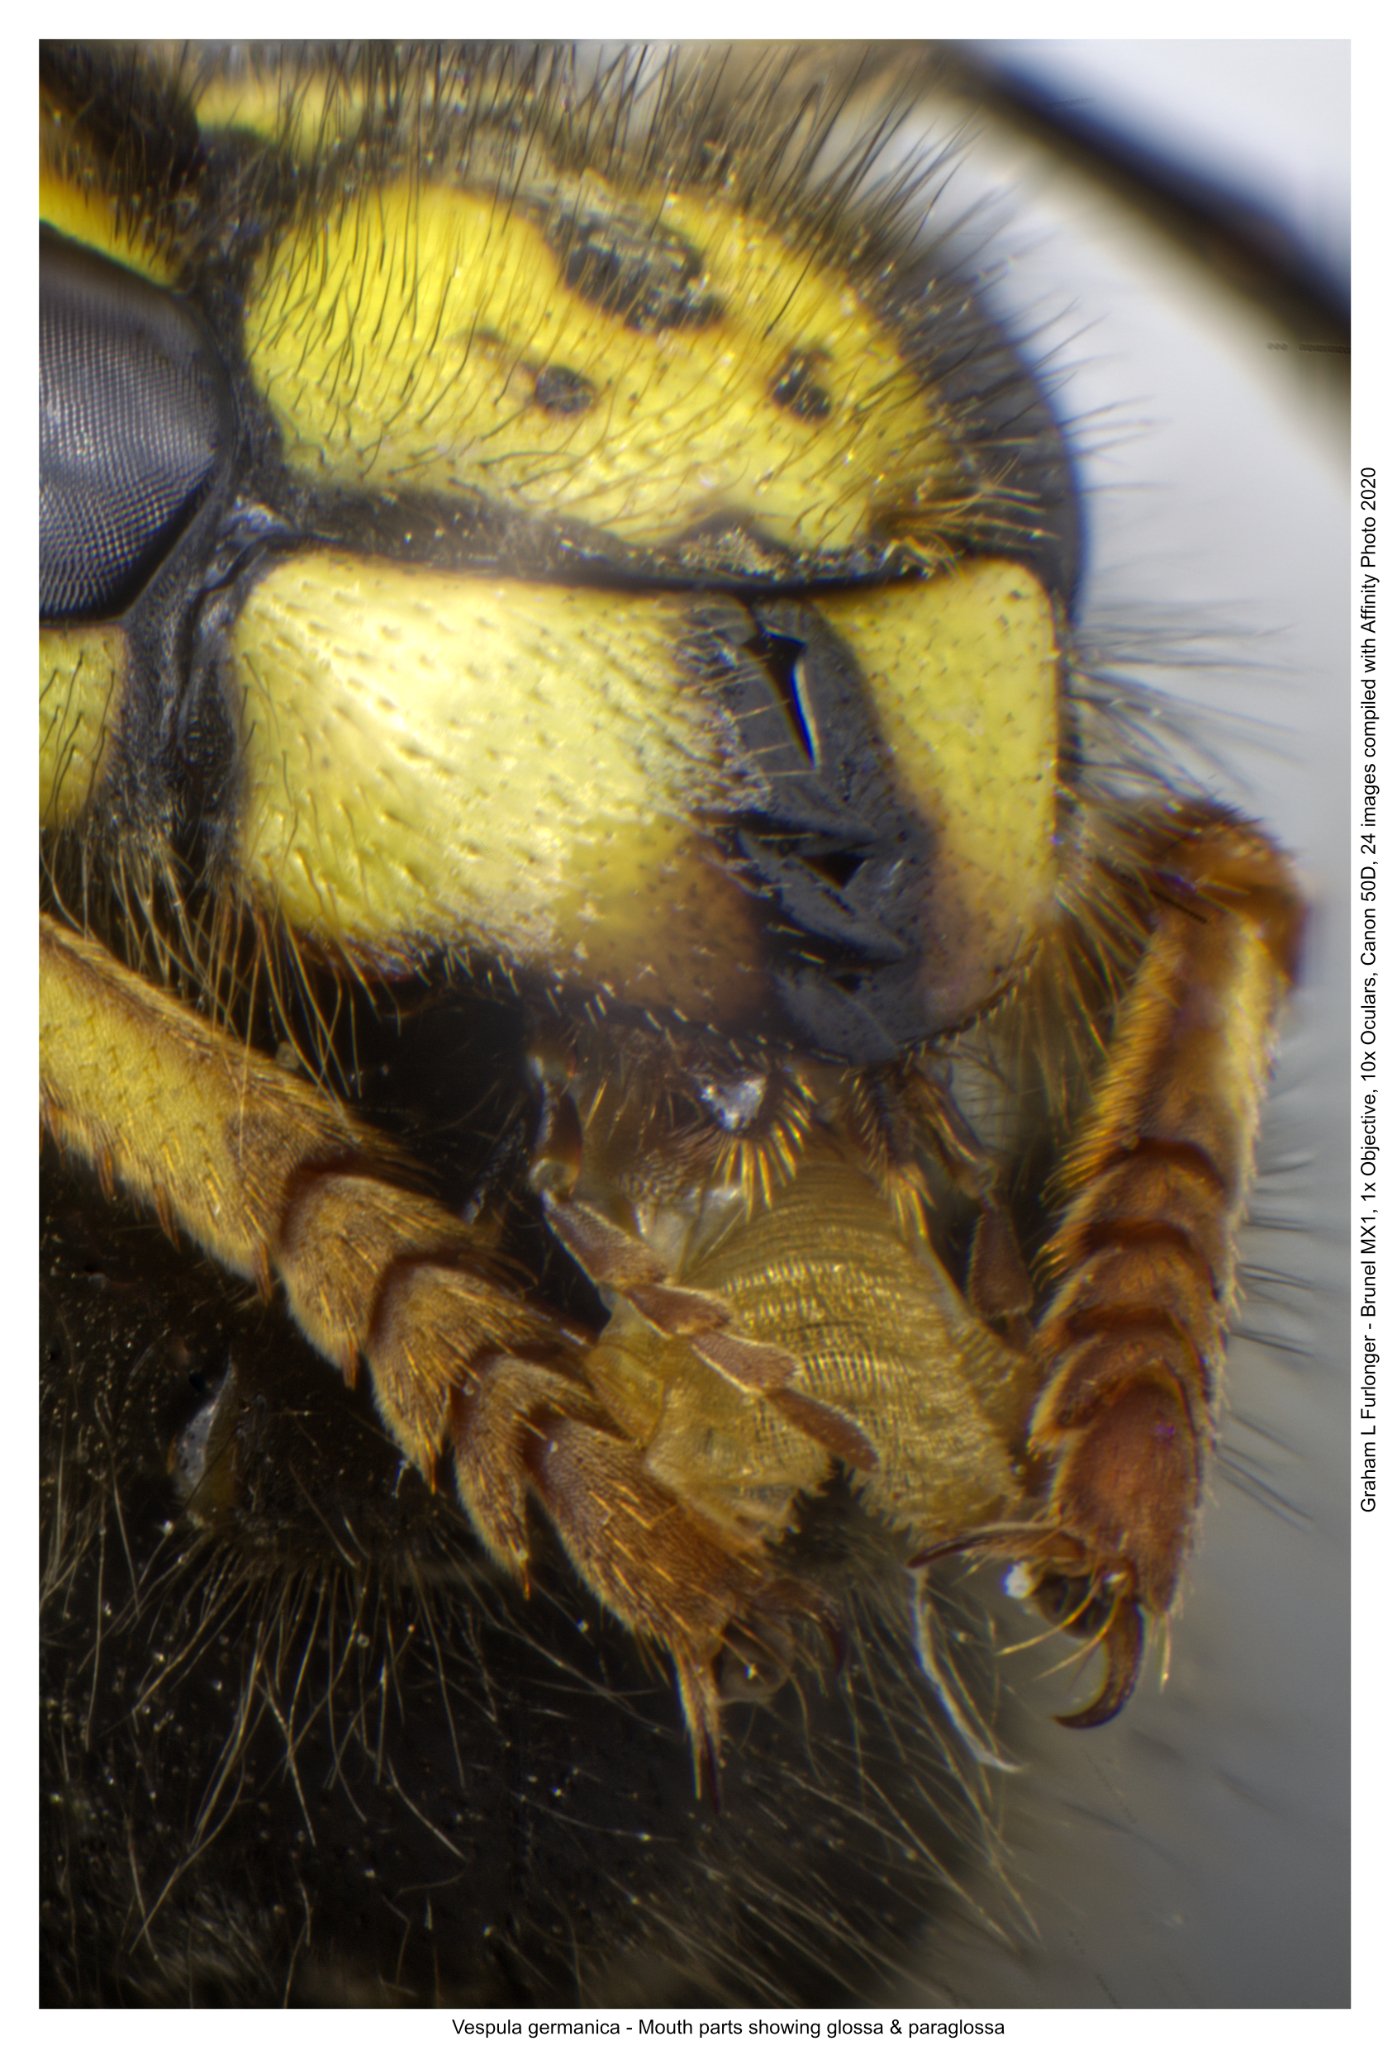
A few more images, hot off the press! Comments very welcome, construction criticism only please. Thank you. Details:- Microscope:- Leitz Laborlux K, Optics (Achromatic Leitz 4x, 10x, 40x, 100x Oil) plus Bresser Achromat 60x Shot using the 10x Eyepiece with Brunel Microscopes Adapter and either, Canon 50D APS C or Nikon D600 FX full frame. All images imported into Affinity as RAW files. Processed in Affinity Photo using Focus Stacking Method. Borders and text added in Affinity post processing. Note:- the Darkfield used for these images is a DIY home made patch stop mounted onto 1mm the Clear Optical Polycarbonate suspended under the condenser stage with a simple clothes peg! (you need some originality with these things!)
- 6 replies
-
- 2
-
-
- microscopy
- entomology
- (and 2 more)
-
Interesting debate John, I have always been led to believe that barrel focusing caused more image distortion but I have no substantial proof.
-
affinity photo Focus Stacking / Microscopy
Graham L Furlonger replied to Graham L Furlonger's topic in Share your work
So, I have been at it again! Ferdinandea Cuprea, Stereo Microscope 20x Magnification. 36 Individual images merged in focus stacking software. (Affinity Photo) i was curious to see how finicky AF was to sequential order, from my own experiments it doesn't seem to matter. Without boring you all, here is a synopsis of getting the cleanest images with AF. you must lock down equipment so no unwanted vibration or movement between frames. ensure the camera (I use both Nikon FX D600 and Canon 50D DSLR ) is set to manual exposure. I perform manual white balance but auto white balance seems to be ok. I always shoot RAW and process in 16bit TIFF as lossless. I then convert to low res JPG for posting on social media etc. ensure a good border when starting around your specimen to allow for any vignetting or post process errors. This is where using a larger pixel content than required gives the ability to crop leaving a good sized image. ensure that no natural light effects the exposure, I took a set of images once starting by sitting and then got bored so decided to stand up. The standing up images were one stop over exposed due to the light I was shielding by sitting down! Ensure that you know your kit well, I always start with the stage highest IE. Focusing on the furthest part of the image and focus through the image lowering the stage away from the optics. This ensures no accidents with your specimen kissing your objectives! You can rescue some imperfections with post processing but it is very difficult to improve focus sharpness, don't be tempted to over sharpen using unsharp mask etc as this will destroy your tonal range and look artificial. I have tried lots of focus stacking software, even those for astronomy but I am finding Affinity Photo is coping well for my needs. I leave all my Microscopes (3) permanently set up. Why? Because I know from experience I am more likely to produce work if the setup and completion time is quick and hassle free. I personally do not use computer tethered software only because when MAC OS went to Catalina the Canon software I was using with my 50D stopped working, I wrote to Canon and received a reply saying they would look into this but alas still no result. I am currently transferring images to my Imac by Memory card and then transferring all the RAW images to hard drive prior to processing as the read time is much faster than directly from Mem card. Enjoy this hobby, its been a lifesaver during this time of lockdown in the UK. regards Graham.
- 6 replies
-
- 2
-
-
- microscopy
- entomology
- (and 2 more)
-
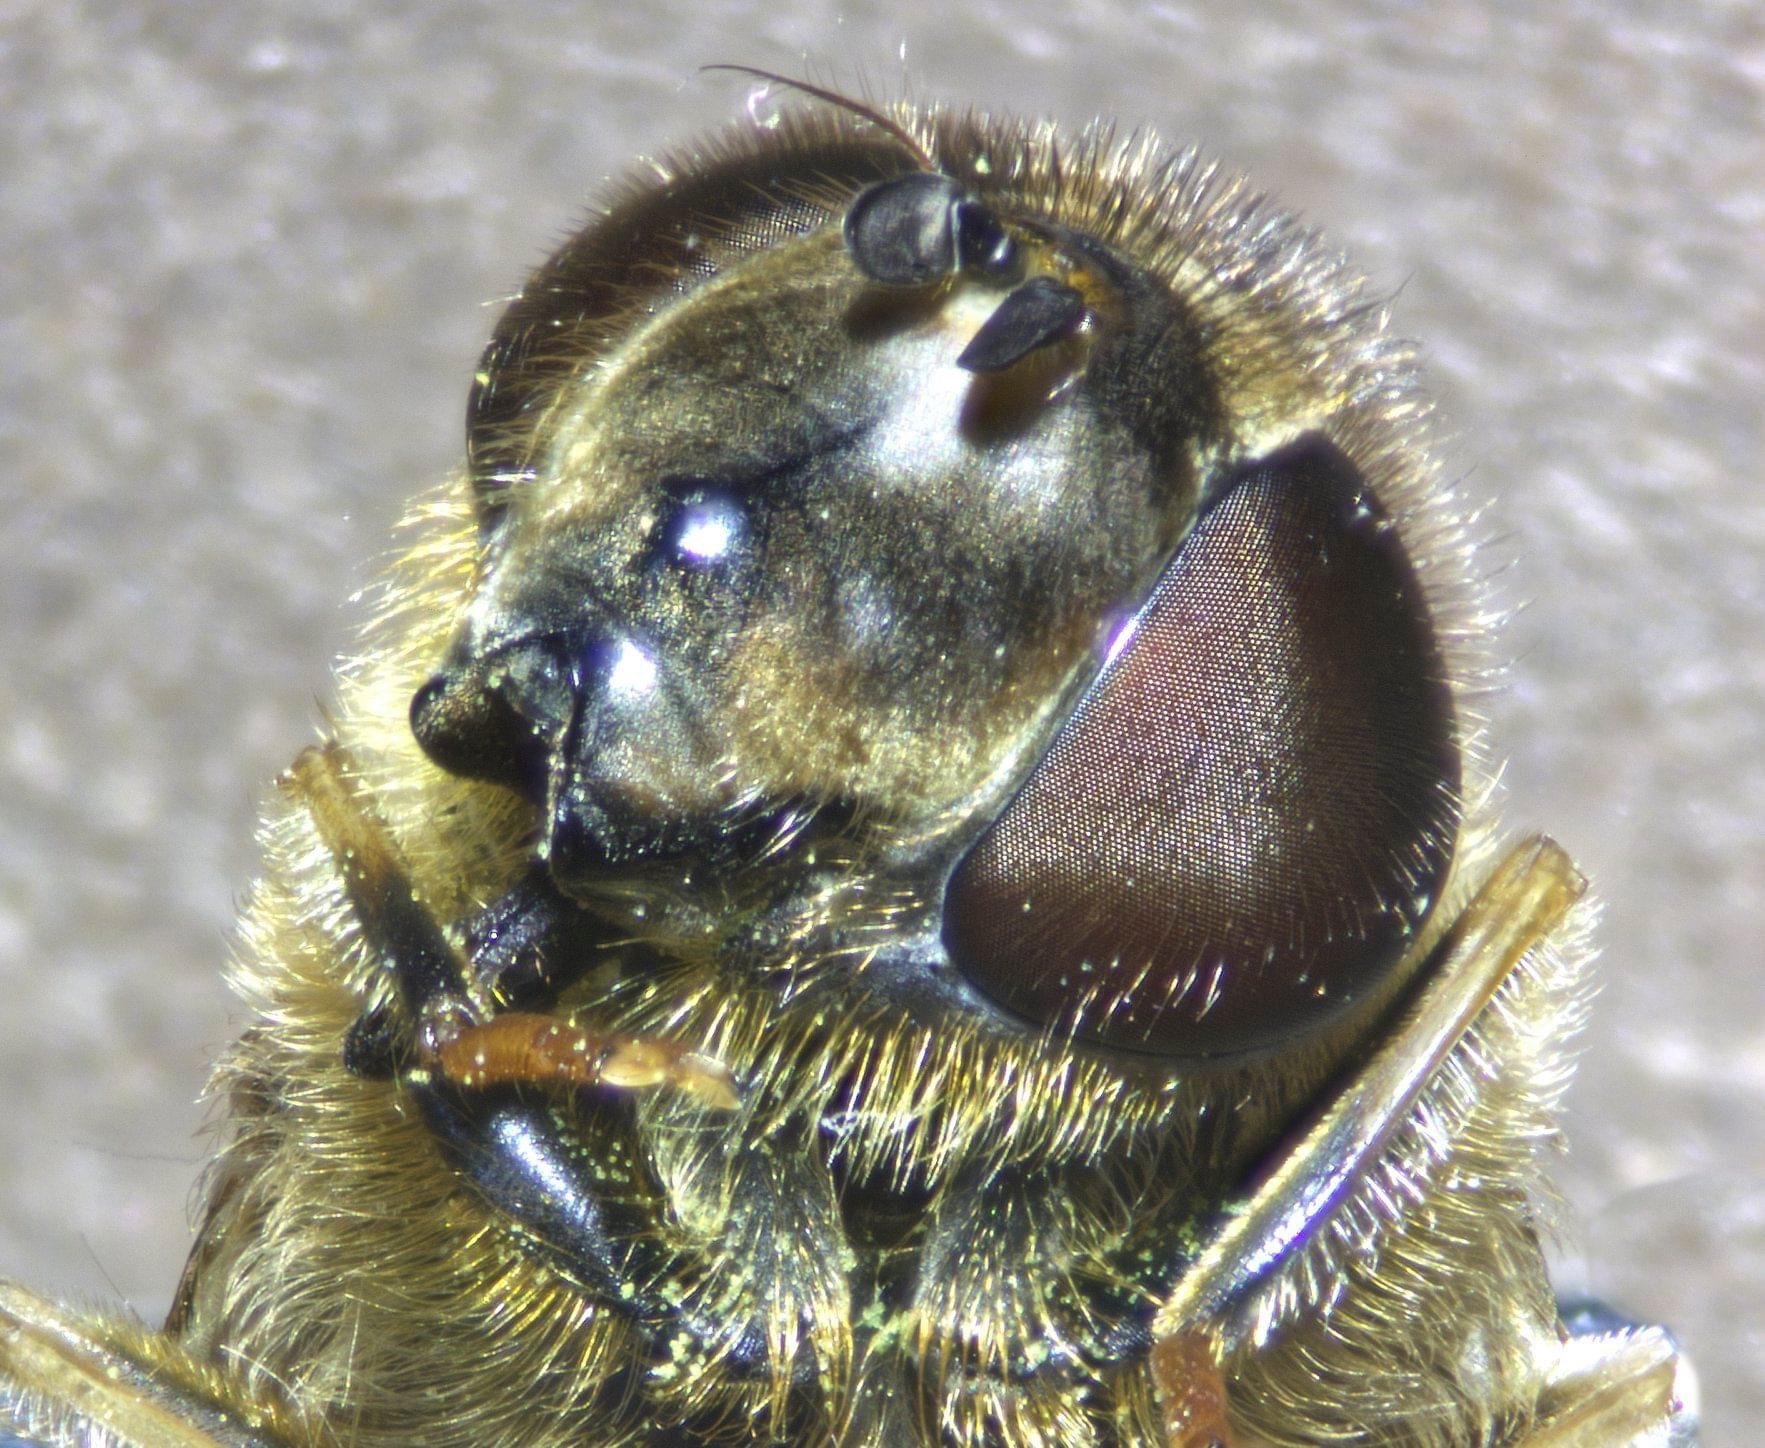
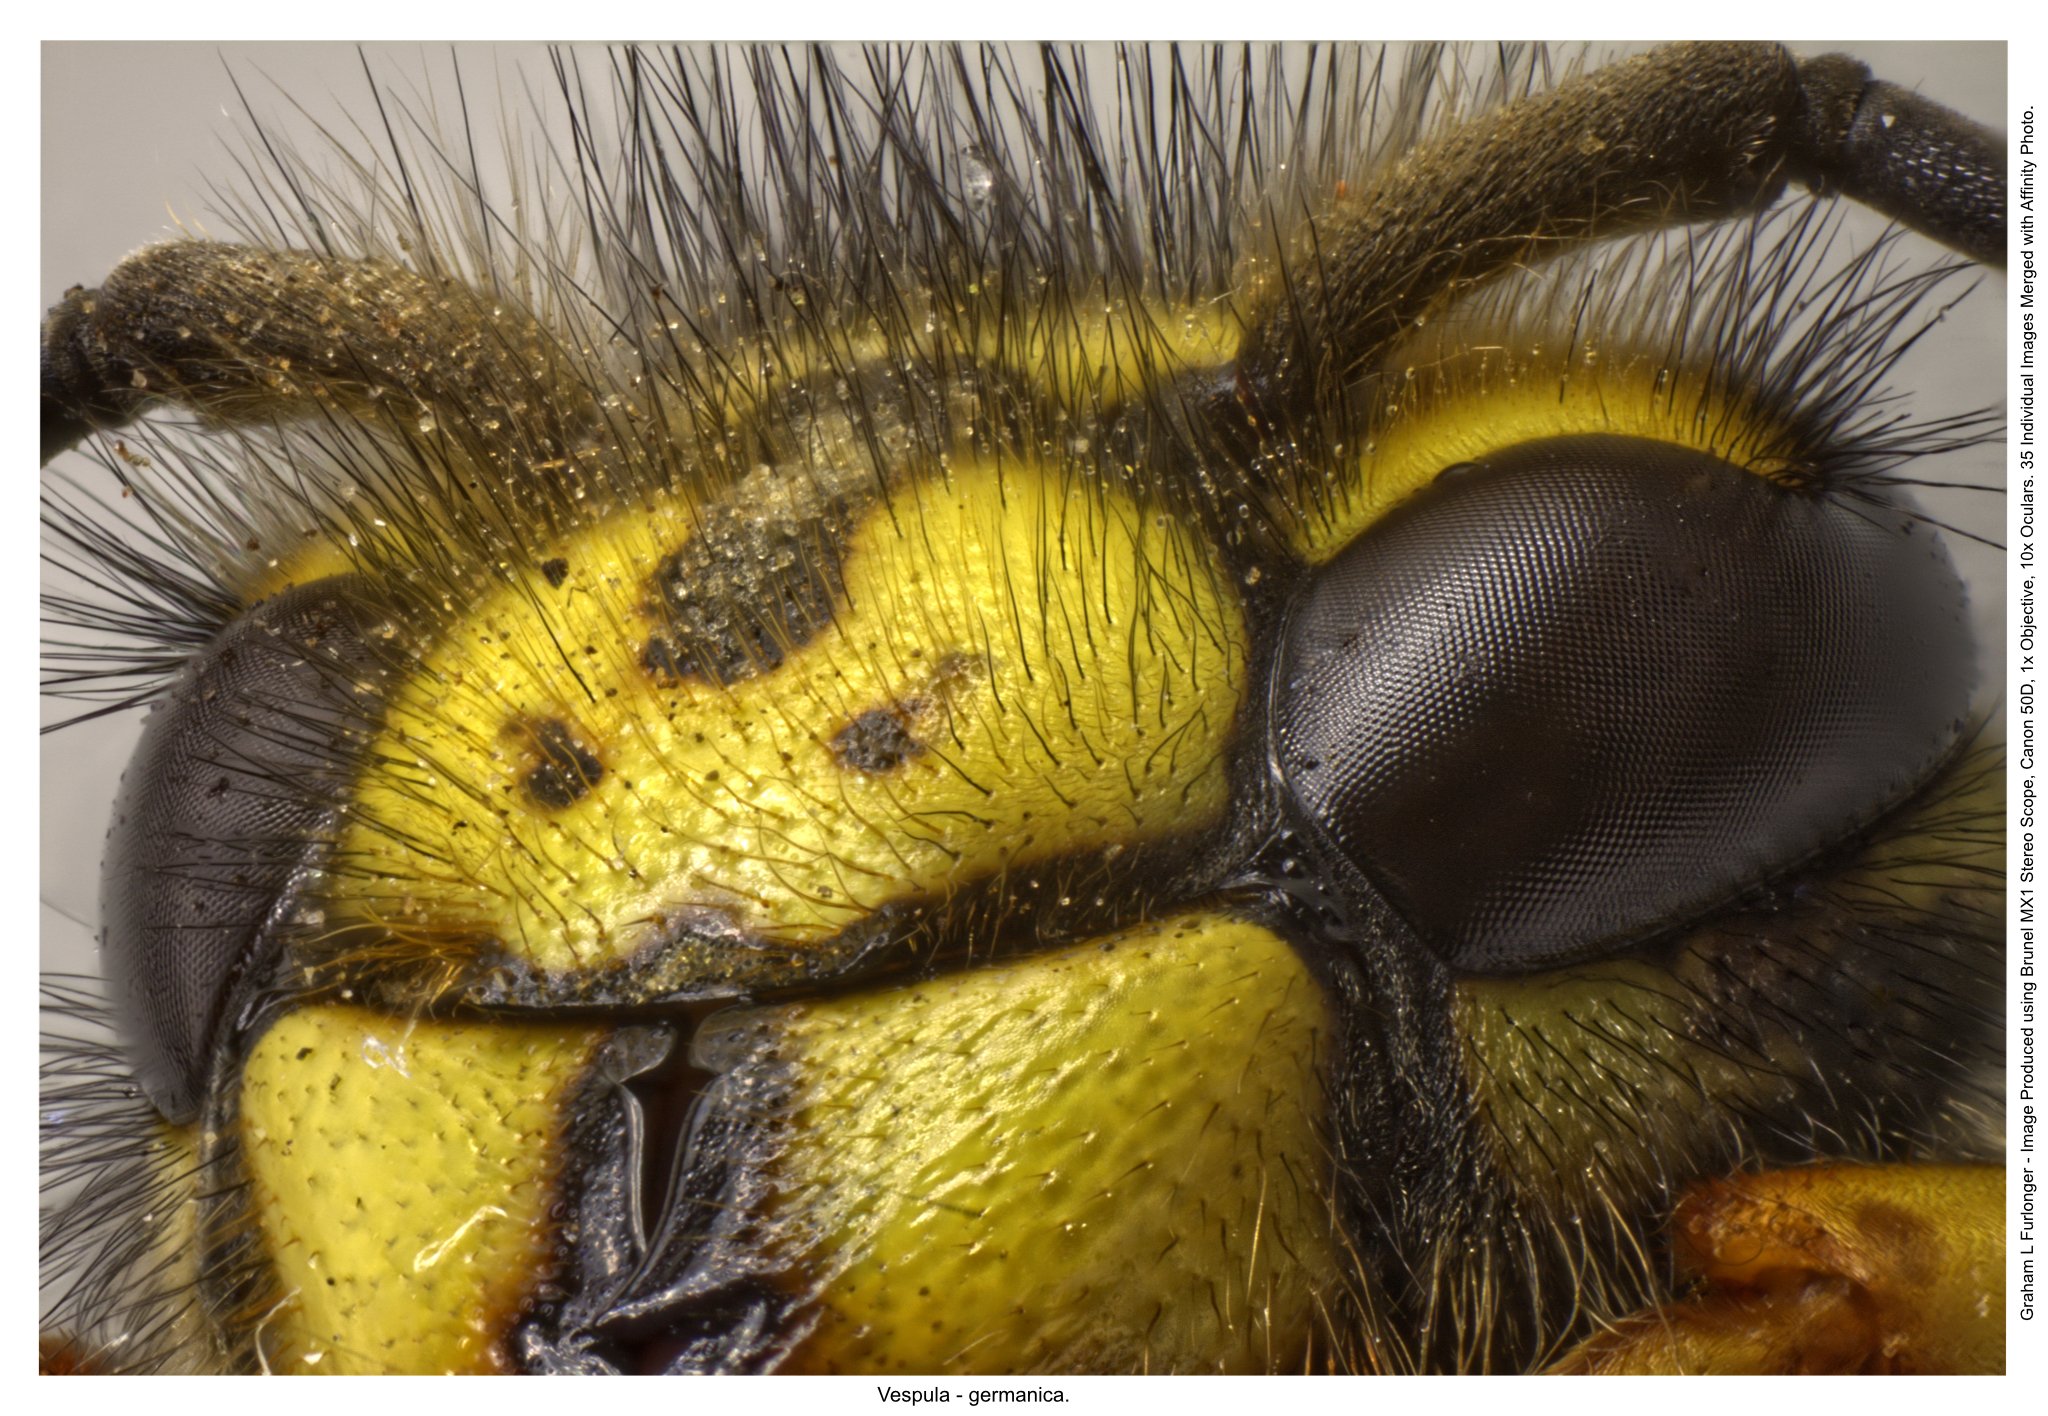
Hello Forum, I am posting this because I searched on "Microscopy" "Entomology" and "Focus Stacking" and saw few if any results, I may be in a minority?...... Having spent many years perfecting Microscopy with Entomology and recently converting from a well know rival, I was impressed with the power of Focus stacking within Photo. These two images were taken with modest equipment and a Canon 50d digital SLR dating from 2008 and a Brunel MX1 Stereo Microscope with 1x Objective, 10x Oculars, Giving resolution power of 10x, plus magnification of the camera. Whilst I have DSLR's with much higher pixel resolution, it is often not required and extends processing time, the 15 mp sensor These two images comprise multiple shots (35 & 24) focus stacked within Affinity Photo. I won't bore you with the technical details, but if you want them you can message (I am happy to share) Affinity has saved me exporting my images to a third party software which has enhanced speed of operation and ease of use, one thing to note is that the Affinity software is not too picky on the order of focus slices presented, which is a major benefit to other rivals. Of course this technique could be useful to many area's of photography including, jewellery for record purposes, medical, veterinarian, instruction manuals and service documents where close up work results in very narrow depth of field. Enjoy your photography and enjoy using Photo. Regards Graham.
- 6 replies
-
- 11
-
-

-
- microscopy
- entomology
- (and 2 more)