michaelreilly
-
Posts
21 -
Joined
-
Last visited
Everything posted by michaelreilly
-
I had the same thought about 30 minutes ago, this is exactly what I did. So I'm unblocked on my work for now... still though, an odd issue that seems like a bug. Thanks for your reply.
-
Attaching test document, and a scan of the printed output. Table 2 was created by option-click+drag of Table 1. They are identical. If Table 1 is the top layer in the layers panel (screenshot 1), table 1 will print with crisp text but table 2 will print with distorted (fuzzy, almost bolded) text (page 1 of scan PDF) If the two tables are switched in the layers panel with NO other changes to the document (screenshot 2), then the exact opposite will happen, table 2 will now be crisp and table 1 looks bad (page 2 of scan PDF). Note: If cell highlights are removed, both tables print the same and look crisp If cell highlights are set at 100% opacity, both tables print the same and look crisp. This is only happening with cell highlights that have reduced opacity. Is this a bug? Or is this some setting that I'm missing? Thanks in advance. Test.afpub Scan of Printed Output.pdf

-
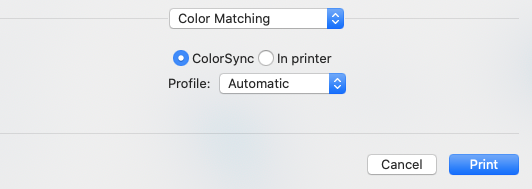
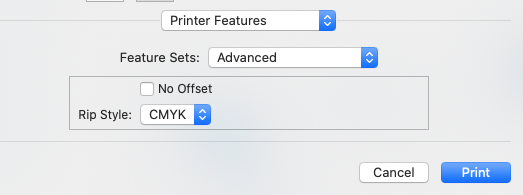
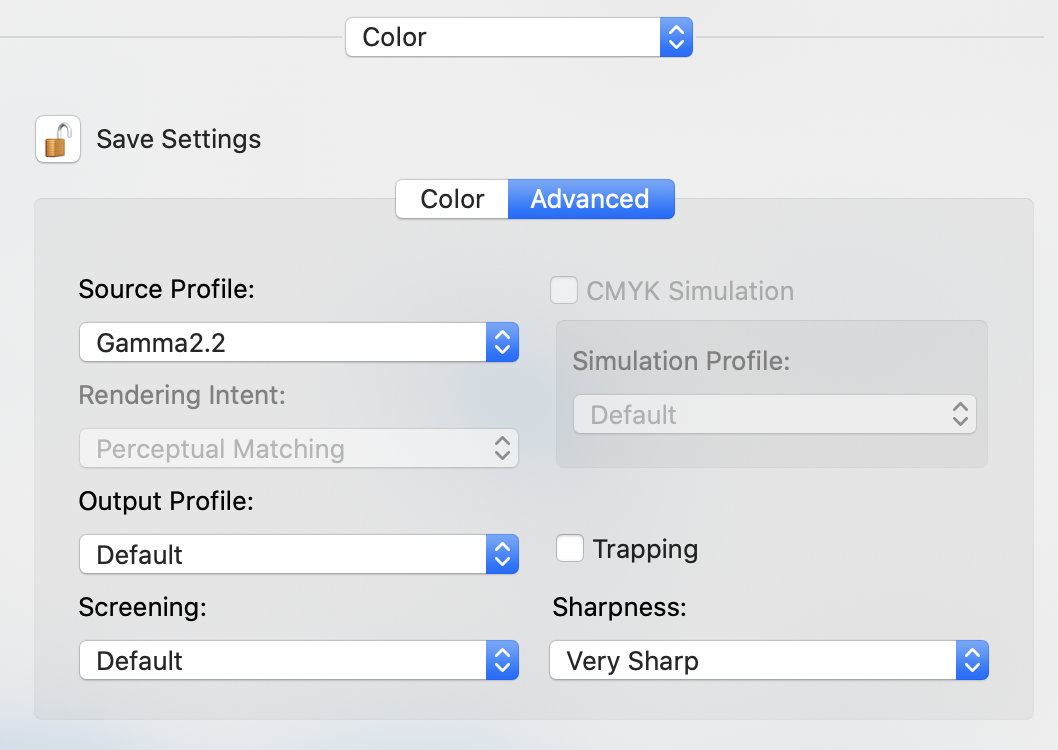
Agreed, this is certainly what I'm trying to nail down first. Not yet unfortunately... I've been working from home, but I'll be stopping by the office this evening and will give that a shot.... I'm certainly hopeful for it, as well as your 'Trapping' suggestion No dedicated interface for setting up the driver, only a 'printer features' section that is added when installing the driver. Under 'Printer Features', there is only one thing related to color, referencing a 'RIP style' choice between RGB and CMYK (default was set to CMYK so I left it alone). I'm not sure what this is, there is also a checkbox there for 'no offset' There is one other Color section (adding screenshot), which chooses between ColorSync, or In Printer.
-
Thank you, I will take a look at these, I do see a 'trapping' option. Thanks. I'll mess around with the Adobe Acrobat Reader free version first to see if there's anything in there... I'd love to not need an adobe creative cloud subscription (but if all else fails I can certainly load a trial and experiment). For the black color, I was mainly debugging with the table text and disclosure sentence at the bottom, since it was small font/italics and most sensitive to the issue. That brings up a question though... my understanding of 'black' colors is that layering CMY within the K will result in a deeper/richer black, and that K100 black alone is more pale. Perhaps when printing font size 8, it's better to just use the K100 because any slight offset in the inks will result in those artifacts/fuzziness... Is this just a tradeoff when doing non-commercial printing? Sacrificing the richness of the blacks in order to have sharp output? Is that just all dependent on the printer capability and calibration? Should I make sure all of my blacks are K100 with overprint?
-
Exporting to PDF (I attached the PDF export). Then opening on Preview on my Mac, and printing from there.
-
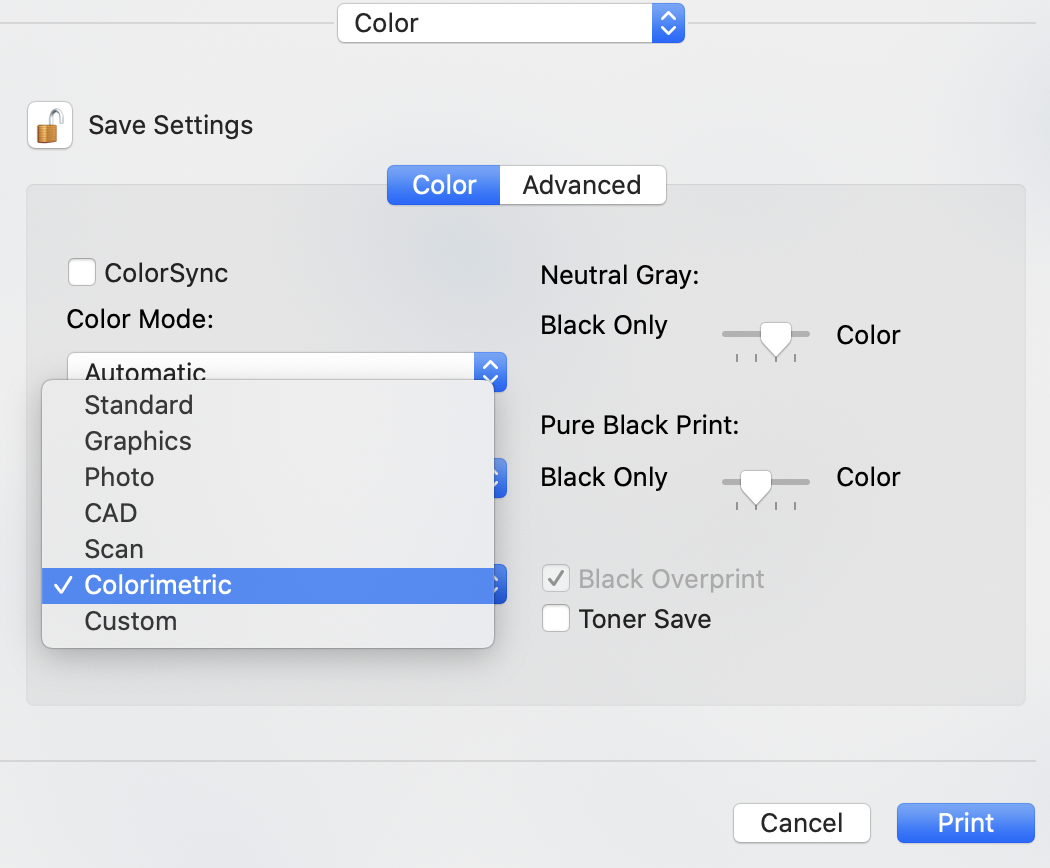
Hi all, The final print for my design in Affinity publisher is just not looking great. I won't at all be surprised if there is some user error here, but I've done a ton of debugging, and I'm hoping you might have some insight. I have a really expensive printer that prints 1200 dpi, so I'd hope to get a clean print (and I get crisper prints from Word document exports). I'm also needing to use smaller fonts, so crispness is really important. Summary of the main issues: There is a lack of crispness to my printed text. Grainy/hazy Black text on top of color has almost a white haze around it Setup summary: $6000 office printer, Sharp MX 3640N with correctly installed driver. I also ran registration adjustment and color calibration adjustments on the printer, to try and 'align' the CMYK printed dots When printing, I select, 'fine' for print mode', and 'very sharp', for sharpness in the print dialogue Attachment summary: AFPUB design file (scrubbed of personal/firm identifiers) PDF Export of design (using the PDF/X4 presets) 600 dpi scan of the printed result while using 'colorimetric' in print dialogue (with annotations showing problem areas) 600 dpi scan of the printed result while using 'standard' image type in print dialogue Screenshots from print dialogue 600 dpi scan of a printed page from a word document exported to PDF. Comments The text in the table is set up as a 'global' black, with CMY=0, K=100, with both spot and overprint. Same with the disclosure sentence on the bottom. However, I'm still seeing yellow in the printed output, so somehow in either the PDF export, or sending to the printer, this color has been changed. When printing with the 'standard' image type, the colors are just not right. and my blues end up being too light. Also, the white haze behind the printed table text is worse. When printing 'colorimetric' image type, the colors are closer to my design. Both scans show the 'yellow' in text that should have zero CMY, and only K. I'm working in the CMYK color space, exporting PDF-X4, but it seems something is messing up with the CMYK defined values. I tried using similar font size in a word document, exporting to PDF, and printing with the exact same settings. It looks much more crisp, and no yellow. Any advice?? Any other things that might help you give advice or debug?? Thanks in advance. AFPUB_Model_Performance_2020_Q1_scrubbed.afpub PDF_Model_Performance_2020_Q1_scrubbed.pdf Scan_Standard_600dpi.pdf Scan_Colorimetric_600dpi.pdf Scan_PDFexport_WordDoc_Colorimetric_600dpi.pdf
-
And thanks @MEB!
-
Thank you @thomaso! That helps explain... I thought 'global' colors was more about having a palette that persists across different documents... but this accomplishes what I need to do. Thanks for your help
-
I have a completed design with graphs and charts, each made up of multiple objects (rectangles, etc). Now that it's all laid out, I want to tweak the color palette a bit. However, there might be 10-15 different objects that are all the same color, and if I want to change that color, I'd need to select each of the objects individually (through the layers panel), and then change the color. That's pretty tedious if I have 5 different colors that I'm adjusting, with that many objects per color, and multiple iterations before deciding on my final color palette. It would be great to be able to link objects to a certain color, so when you change that color it updates all of the objects linked to it. If this is already possible, please let me know!!
-
No PDF bookmarks
michaelreilly replied to NorbertWeiss_1's topic in Feedback for Affinity Publisher V1 on Desktop
Thanks for this Jim... the free FoxIt PDF viewer did work for me to add bookmarks manually... thankfully I only have a few to add. I suppose this may have been tongue in cheek, but I certainly feel the exact opposite. I'll give Serif my money every day and twice on Sundays if that means I don't need to shell out 1000x more for an Adobe subscription. That said, I do agree that bookmark support is an important feature for a lot of our workflows, and it does unfortunately mean that Publisher isn't a 100% complete alternative to InDesign/Framemaker etc. It certainly pains me to "finish" my work in Publisher, only to need some other application to actually finish it. So I support you in this feature request! -
@emmrecs01 Thanks for the response. @walt.farrell Both applications are version 1.8.2
-
I purchased Affinity Photo (a long time ago) through the Mac app store with my personal Apple ID. Last year, I purchased Affinity Publisher through an Apple business account (via Volume purchasing / App Deployment), and deployed the installation to my Mac. Both apps are running on my computer but Studio Link can't link them, I assume this is because Publisher wasn't technically purchased with my account or Apple ID. 1. Is there any way to link them? 2. Is there any way to find my 'license key' to authenticate the Publisher beta build? I ran into a publisher bug recently which was fixed in Beta, so I'm using Beta for now as a workaround... but today it won't let me launch Beta without authenticating via license key. I checked the Apple business account side, and the app deployment side, but I can't see the license key, and thus am blocked. Thanks.
-
Hi DWright, yes I had commented that in a post yesterday. The newest Publisher Beta does include the missing detail... I believe I was running into the known bug that Lagarto mentioned. Thanks for following up.
-
Thanks. This post certainly looks like my original issue. I had a feeling like I was running into a bug.
-
Thanks. I just downloaded the latest Publisher Beta, and its definitely a step in the right direction. With the Beta, my exported PDF does contain more detail from the embedded images now (same with printing), though it still lacks the detail/clarity/'resolution' that I get when I print the background image directly from Affinity Photo. The images need quite a bit of sharpness, they are edited to look like a pencil sketch. I'm poking around a little bit in the export settings to see if I can improve, I'm thinking resample with Lanczos 3, perhaps resizing document in Affinity Photo to up the dpi before linking into the affinity publisher document.
-
Forgot to circle back with a thank you! Method 1 worked perfectly. I knew there must have been an elegant solution...much appreciated.
-
Ah. I've posted once before and was able to attach a screenshot, so I didn't expect that as a restriction. But I'm certainly a newbie on the forum, this is only my second post. If screenshots aren't going to work, then perhaps it boils down to: Are there known issues with embedded images in Affinity publisher resulting in hardly any detail when exporting or printing?
-
Nope, attachments still are not working, I'm getting a error '7' prompting to 'contact us for assistance' ... Is there an issue with attachments right now with the forum?
-
I'm designing a label for some homemade maple syrup and am running into issues with exporting or printing my design from Affinity Publisher. For the design (screenshot attached), there are two images.... The background of the pond is using the picture frame ellipse tool, and is a 'linked' images. My dog is placed using the place image tool, which is embedded. Both the background and dog pictures are affinity photo files. To test the AffinityPhoto images, I tried exporting the background picture to a PNG from AffinityPhoto directly, and then printed that. It worked OK (attaching screenshot) But when I try to export the final design from AffinityPublisher, the resulting PDF hardly includes any detail from the linked images, and same result if I try and print (screenshots attached) Am I missing something? Perhaps running into a bug related to embedded or linked images? And now that I've written this out... none of my screenshots are actually attaching, even after trying to downscale in terms of quality to reduce file size. I'm going to post this and see if I can attach screenshots after posting.... Thanks
-
(This is for Affinity Publisher)
-
Hi all, I have a header with white text and black background, which runs onto the next line (See screenshot). In the screenshot, the space in between the words "Testing" and "Screenshot" is outside the text box frame, and thus has a black background. Since all of the text is justified to the frame, It looks bad to have the black background that extends beyond it. I've tried looking at optical alignment, couldn't figure that out for a 'space' rather than a character. Also, a right indent doesn't work because if my header goes three lines, then the second line would result in the black background not extending all the way. I'm sure there must be a way to do this properly! Thanks.