A_B_C
-
Posts
4,409 -
Joined
Everything posted by A_B_C
-
 By the way, here’s a tutorial showing the possibilities of the dynamic shape tools … yes, these shapes are not called “smart,” officially, but I am used to call them smart, since they are … yes, quite smart … :) https://forum.affinity.serif.com/index.php?/topic/142-shape-examples-getting-the-most-out-of-our-dynamic-shape-tools/
 -
Well, a rectangle (as well as any other shape created with a geometric [dynamic] shape tool) is smart as well … there is not the least difference between a rectangle and a rounded rectangle in terms of smartness, since each of them can be transformed into the other one by using the parameters on the context tool bar. So from a logical point of view, having a dedicated Rounded Rectangle Tool is truly redundant, and I believe there was some response from the developers some months ago, that this tool is still available due to certain deeply ingrained customs and conventions … Therefore I would say you’re not a dimwit, but quite the contrary, a very logical human being … ;) Cheers, Alex
-
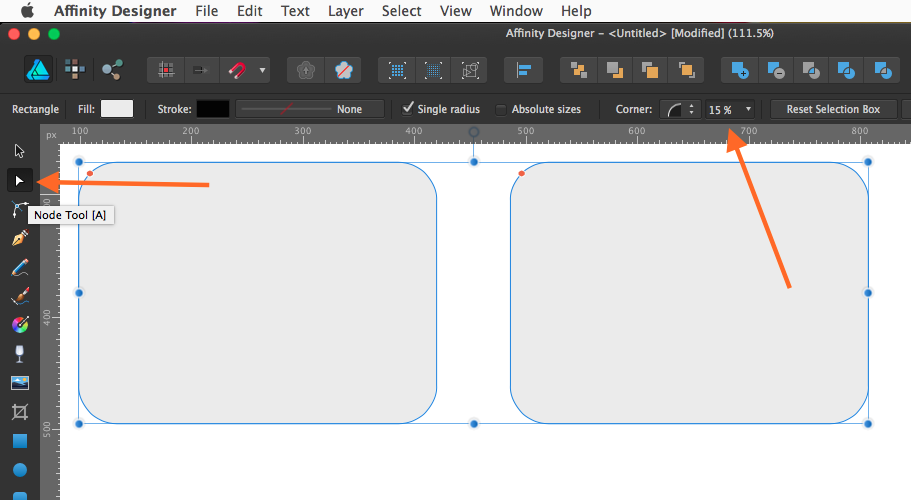
As Ben said in another post, if you just want to have rounded rectangles, it is advisable to use the smart shapes. One further advantage of that approach is, that you have percentage and absolute values for the corner radii available. So you could create your rectangles with the Rectangle Tool, select them all, choose the Node Tool from the tool bar (just to see the context tool bar with the corner settings for all of your rectangles instead of the alignment tool bar), and set the corner radii in percent on the context tool bar … :) Cheers, Alex :)

-
True, it’s the same in the German localisation, dominique91 … strange mixup of English and German … Ctrl + Launch reset does not help … :mellow:
-
Cute new avatar, Matt … :)
-
I would check the colour profile / format of the document, AshTeriyaki … perhaps the wrong one got chosen by accident … :)
-
- Snapping grids should act reliably in different artboards now They do, they do … :D (And by the way, the new sample documents are awesome …)
-
Hi Topper, there are two main classes of “healing” tools (Healing Brush Tool, Blemish Removal Tool, and so on) in Affinity Photo. One class is to be found in Pixel Persona, the other one in Develop Persona. To “close” a healing tool in Pixel Persona, simply select another tool. To “close” the healing process (and the Healing Tool, so to say) in Develop Persona, you have to click either Develop (thereby rendering your adjustments into the image) or Cancel (thereby discarding your adjustments) on the context tool bar (see below). Which tool were you talking about? :) Alex
-
Hi Topper, and welcome here … :) No fear, that you got the posting wrong, everything worked fine. I have a Logitech USB (K 150) keyboard as well, and I never had problems using this keyboard with Affinity Photo. But you seem to have the wireless version, and I remember a thread where similar issues have been discussed. Maybe you can have a look and see if any of the suggestions posted there will work for you: https://forum.affinity.serif.com/index.php?/topic/13350-use-of-logitech-pc-keyboard-with-affinity-photo/ Remember you can customise keyboard shortcuts in the latest Beta of Affinity Photo, but I don’t know if the Beta works alongside a trial version. Maybe it doesn’t launch. The App Store version with customisable keyboard shortcuts is promised for the end of this year, hopefully before Christmas. And here’s the link to the Beta: https://forum.affinity.serif.com/index.php?/topic/15427-affinity-photo-customer-beta-13515-rc5/ In any other case, please feel free to ask further questions … :) Cheers, Alex
-
Thanks, Matt … I know you (and all the other members of your team) are working very hard at the moment … I hope you will get some rest in the upcoming holiday season … :)
-
Ah, I thought you were talking about Affinity Designer … unlike in Photo, the Edit > Paste FX command is not available here … Would you mind to add it here as well, Andy? :) Cheers, Alex
-
Thank goodness, that there’s someone else who experienced this as well, celliot80 … I just started to feel a little dumb … :) And here’s another suggestion concerning art boards, grids and margins: Since we can have multiple art boards with multiple attributes in a single document, I would suggest to reduce confusion by changing menu item names and by labelling windows and panels appropriately: Suppose we have created two art boards A and B on a document. Then the single menu entry File > Document Setup … controls three different sets of object attributes. It controls (a.) the attributes of the document (both art boards), when no art board is selected, (b.) the attributes of art board A, when A is selected, and (c.) the attributes of art board B, when B is selected. I believe we need a Setup List, just as in my sketch below. (Please don’t mind the crudeness of my quick mock-up.) The same goes for grids. We need a Setup List for Grids as well. Last but not least, the menu entry Document Setup … does not seem appropriate anymore, when we are dealing with multiple art boards. Hope you don’t mind these comments. Thanks for considering, Alex :)
-
What about creating a custom style, motoko? Or just copy your source object, select the target object and choose Edit > Paste Style …? But be aware that this will copy all of your object attributes … :) So your idea is great … the Layers list could do so much more … :) Cheers, Alex
-
Ah, here’s the Designer document for my second movie, if that’s of any use … :unsure: Fail.afdesign
-
Hi everybody, are you still working on the grids? I still believe there is the problem, that grids that were created for an art board (different ones for different ones) do not move with the art board. And I have a suggestion for improving the user experience. I created a document with a 100 x 1000 px grid, and placed two art boards on the document, whose boundaries respected this very grid. Then I gave the second art board a grid of 30 x 1000 px, as it is not unreasonable to have different column sizes on different art boards. As my first movie (“01_Progress.mov”) shows, you can snap a path correctly to the grid of the second art board, as soon as the art board’s entry is clicked for at least one time on the layers list. So my first suggestion would be: As soon as an object is moved to another art board, it should immediately snap to the custom grid of that very art board, and that grid should be highlighted on touching the art board on the canvas, i.e. when we are moving an object onto that art board (or inside it, as you like). We should not have to click that art board’s entry on the layers list first, just to see and enable its custom grid. For my second movie (“02_Fail.mov”), I moved the second art board a wee bit to the left, exactly by 12 pixels. Although the grid seems to move with the art board (have a look at the grid lines), in fact it does not. When you try to snap the path to the “moved” grid, it snaps still to the lines of the grid before the translation.That seems to be a bug … and it renders the option of creating different grids on different art boards essentially useless, in my opinion. But I might be doing something wrong as well, and I wonder why nobody else reported this issue … :unsure: But thanks for all your efforts, Alex :)
-
AP Merging layers?
A_B_C replied to tonyt's topic in Pre-V2 Archive of Affinity on Desktop Questions (macOS and Windows)
You can just select your layers and choose Layer > Merge selected … (Shift + Cmd + E) to merge them destructively … :) -
Add an “l” after the “f” and you get “Zeichenfläche” … However, this word seems a bit generic to me: A single non-artboard document also has something you could call Zeichenfläche. “Zeichenfläche” is Adobe terminology … https://helpx.adobe.com/de/illustrator/using/using-multiple-artboards.html But don’t misunderstand me, I would not suggest to use “Zeichenfläche” instead of “Artboard” … I just wanted to express my opinion that “ArtBoard” is so awkward, that I would rather live with … yes, the word I spelled “Zeichenf(…)äche” … ;)
-
Thanks for the German help, by the way … :) One single thing: Why is “Artboard” spelled “ArtBoard” in the German help files and in the app itself? That makes my eyes stumble … I could rather live with the cumbersome “Zeichenfäche” … :huh:
-
I fear, Kip has a problem to get this working with his trackpad … :( https://forum.affinity.serif.com/index.php?/topic/14902-canvas-rotation-using-gestures-not-working-or-am-i-doing-something-wrong/ I wonder what might go wrong for him … :unsure:
-
Yes, those guys are simply too fast … ;)
-
Hi Leigh, I believe this is a known bug (I had it in the past as well) … and it should be resolved in the latest beta … yes, it is fixed, I just checked it … thanks, guys … :D - Fixed issue whereby transparent areas of a palletised PNG export would be blue instead of transparent. Source: https://forum.affinity.serif.com/index.php?/topic/15352-affinity-photo-customer-beta-13513-rc3/ Cheers, Alex :)
-
Hi northcoast brine, and welcome here … :) To render the fish red, just create a pixel layer underneath the layer containing your “fish” laser, fill this pixel layer with the desired colour and set the Blend mode of the “fish” layer to “Lighten” or “Screen” … just play around with the blend modes to get a feeling for what they do … (first screen shot). To render the background blue, you can take a similar approach. Simply fill your pixel layer with a blue colour, and set the “fish” layer to “Multiply” (second screen shot). And here’s the icing on the cake: What about a blue fish on a black background? Select Layer > Invert Adjustment to create an adjustment layer and drag this layer in the layers list onto the icon of your “fish” layer, thereby nesting it to this very layer … done (see third screen shot). Hope that helps … :) Cheers, Alex
-
Polygonal Lasso Tool
A_B_C replied to Kurt Becker's topic in Feedback for Affinity Photo V1 on Desktop
I am sure you have seen that you can convert a path created with the Pen Tool to a selection … might be useful for the mean time … :)
-
This is great … :) Seems you fixed most of the art board bugs … the only issue I noticed (and I do not want to sound annoying, but this is still a major issue) is the snapping bug that seems to be still there: https://forum.affinity.serif.com/index.php?/topic/15272-affinity-designer-customer-beta-13512-rc2/?p=68914 Thanks, Alex :)
-
Please let us know about the minor stuff!! You would be suprised what can be achieved in 3 days ;) I have a truly minor thing for you, Andy … LOL … I remember this was requested a couple of times, not just by myself. What about cleaning up the menus for the upcoming release (please have a look the links below) … I am sure it is a five minutes task to rename the menu items and insert dividers, and it would improve the user experience and the beauty of the apps as well … ;) https://forum.affinity.serif.com/index.php?/topic/7943-affinity-photo-public-beta-11224443/?p=32068 https://forum.affinity.serif.com/index.php?/topic/7943-affinity-photo-public-beta-11224443/?p=32106 And I dare not to ask for sticky settings for the Crop Tool, but that would be the icing on the cake … ;) Thanks, Alex :)