
AllAppsUser
-
Posts
364 -
Joined
-
Last visited
Everything posted by AllAppsUser
-
Lines in the background
AllAppsUser replied to Zen Assassin's topic in Pre-V2 Archive of Affinity on iPad Questions
Hey @Zen Assassin. So you’re definitely seeing the lines after export? If yes, then I suggest: Check if you’re exporting the image to a bigger/smaller size than is set up in your app. If yes, this can create problems. Look at the resampling settings (Bilinear, etc) and try them out. Ideally export it at same size which will mean it shouldn’t need to resample. Then if no joy, try out the other settings in the export dialogue. Could be either of these, and only methodical testing will tell you what to use.- 1 reply
-
- 1
-

-
Yeah, just Save (or Save As) to the Files app. From there you can send it to the Desktop via Airdrop. I do it all the time - I never use cloud/Dropbox for this. (I keep all my files in Files anyway, because they’re safer there than sitting on the Home Screen of the apps.) _____________ You can save direct too if you’ve set up the iPad as a user on your desktop. But that’s a bit more complicated to sort out. (I just happen to have a laptop with ancient airdrop - read: incompatible.) I tend not to save direct though, because I like that it leaves a trail of back-up files in Files. Simplest is airdropping from Files.
-
Firstly, I assume you’ve tried to import these by dragging them over the Procreate App (rather than touching the files in the Untitled Folder)? You’ve also tried a long press to bring up the menu with Open in it?
-
I can't highlight or drag texts
AllAppsUser replied to soulandorange's topic in Pre-V2 Archive of Affinity on iPad Questions
How do you know it's not working? Does it not highlight? Does it highlight and then not appear on screen? Are you expecting and not seeing the keyboard pop up? (it won't, btw) You're sure you've actually got text on screen or an empty layer where it used to be? What happens? We're blind here, we can't see what's on your screen, we've no idea what you're doing, or how your artwork is structured, so can't help you without more information I'm afraid. This is a professional grade app, it's deep and nuanced and takes a long time to learn it. It also therefore requires a methodical problem solving approach to figure out when you find you struggle with things. Beware of convincing yourself it's the app.. that mindset won't help you because you'll jump to conclusions that are likely to be incorrect. We can all end up there, btw, because frustration can blind us all at times. -
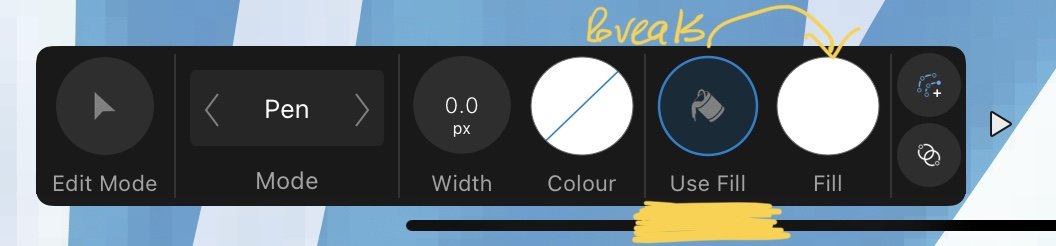
Re: Default stroke/fill setting on pen tool Harrrr, still not sure how the behaviour above works, but I am sure I’m a numpty. There’s so many nuances to this app, it’s easy to miss what then seems obvious once you see it. I hadn’t twigged to the ‘use fill’ option staring at me in the context bar. Doh! My excuse is that it doesn’t reveal the other colour dot until you touch it, so that’s why I think I’d not registered it. This does ‘stick’ and become the tool default. Not sure if that’s what @Alfred was talking about. (So much to learn... it’s a big investment. You can totally see why the adoption of these apps by the creative industry will take some persuading.) __________________________ None of this changes my wish for quick access to my document palettes from the context bar.

-
I can't highlight or drag texts
AllAppsUser replied to soulandorange's topic in Pre-V2 Archive of Affinity on iPad Questions
The layer should turn a lighter shade, the same as the illustration, after you’ve touched it (in the layers panel) - that will mean it’s selected. Does it turn a lighter shade or not? Is there a little padlock on it? Does it say ‘group’? Each thing in the list in the illustration is a "layer" so there are three in this example. The illustration shows what’s called the ‘layers studio, and what I was was referring to above. Apologies if you’ve understood all this, but we can’t get to the bottom of what the problem is without being thorough, double checking and exploring everything. Also, the more information you can supply, the better. Otherwise we’re guessing and that’s the really hard way to do it - virtually impossible for us to help in fact. If it doesn’t, try a screen shot like this above of your layers panel, it might give us a clue.
-
I thought it was odd that the rectangle worked for both myself and @Alfred , but not for you. Glad you’ve got something workable. Phew, an interesting one. Tired-out now, going for a lie down, it is late after all.
- 22 replies
-
- 1
-

-
- affinity designer
- vector
- (and 2 more)
-
@Estalfos - something to watch just so we’re sure you created the rectangle in this way, or did you do something different? FullSizeRender.mov
- 22 replies
-
- 1
-
-
- affinity designer
- vector
- (and 2 more)
-
My thoughts too. So my suggestion that @Estalfos uses an existing document might be a way forward.. though possibly not a robust one. Not sure why we both retained a handle at the top with the rectangle exercise though, and @Estalfos didn’t.
-
Are we on to something here @Alfred? There’s a setting somewhere? Or your existing document was originated before 1.9 and has retained something? So if @Estalfos was to open an existing document created before 1.9, then test to see if they get the handle at the top...they could paste in their work they’re working on right now and use it as a template going forward?
-
@Estalfos - this isn’t ideal, but may get you to where you need to be. Create a long thin vertical rectangle using the rectangle tool. Select it with the move tool and you should see the rotation handle at the top Convert to curves Using the node tool, select two of the nodes down the side and delete. This leaves you with a vertical line with the rotation handle at the top. (Or it did for me) You could then clone that for use. Not entirely satisfactory, but a workaround that might be productive for you.. I’m also not sure how robust it is - whether at some point it will revert to the handle in the middle. Hope that helps... for now.
-
@Alfred, I’ve just observed that creating a vertical line using the pen tool = paddle in middle. Drawing a vertical line with the pencil tool = paddle at the top. If I then create a vertical line using the pen tool, but create a little tick at the top, the I get the paddle at the top... So-o-o—o, there’s a nuance to exactly how you create a vertical line, that determines if the paddle is at the top? I’m not understanding this right now.
-
Hum, interesting one. So, the line you’re trying to rotate around the lower pivot point must stay an exact length, yeah? That’s why you’re not using the node tool to simply move the top node so it snaps exactly to the vertical construction line? If the answer to the two questions above is ‘yes’. Then I’m thinking snap might be your friend.. though the little bit of experimenting I’ve done suggests this is not straight forward. Once you confirm the line must stay a fixed length, then I’ll need to play a bit to see if I can help. Can’t promise I’m afraid - you’re into very sophisticated technical drawing using an app intended for creative illustration. Happy to see if we can push it though. ——- (I’ve always felt the rotation handle to be clumsy tool, btw, and this demonstrates why, perfectly.. it’s a tool that’s come from Microsoft-land and that’s rarely a good thing).
- 22 replies
-
- 1
-
-
- affinity designer
- vector
- (and 2 more)
-
I can't highlight or drag texts
AllAppsUser replied to soulandorange's topic in Pre-V2 Archive of Affinity on iPad Questions
Very difficult to help you without a visual. I assume you mean the text frame box.. or are you referring to editing the text inside the frame? My thoughts are immediately: Can you not select the text via the layers studio? Are they below other items/on deep layers? -
Sorry @Estalfos, I can’t visualise what you’re describing. Can you upload an image, or images, to show us what you had before and what you get now?
-
Yeah, there's quite a lot of inconsistency between all the apps that needs a good old sort out. Confuses the heck out of us users, so not a fail on your part at all. These are still early version apps of course, so I'm hoping they'll step back at some point and invest in the exercise big time. It's easy to forget these are still early versions because they're pretty good, and I'm utterly sold on them despite all the irritatingly obvious, and basic things Serif have failed to understand.
-
Is there a way in Designer iPad to ‘pin’ layers to the top of the layers stack, so that any layers created as you draw sit below them? Locking the layers does not do it. —————————————- Background: Why I need this. I’ve scanned a sketch. I now want to draw vector shapes based on the sketch. I’m using the image layer with a 20% opacity setting as a guide. I draw objects (at 100% opacity) below this top image layer. It saves me having to mess about with the opacity of umpteen layers rather than one. Some would call these reference layers. —————————————- . @Jowday’s post starts talking about reference layers in the Desktop app (I’ve not read it all).
-
It does sound like it’s asking a lot to me. I’d expect a just about every app to keel over with that number. I can’t help wondering why it reads as though you’re trying to stack absolutely everything you’d ever need into one template? That’s not what you’re doing is it? Designer isn’t really a high pagination app.
-
Yeah, the layer locking thing is a bit esoteric in these apps. I struggled with it when new as evidenced in the thread below. A quick search in these forums throws up lots of topics about it. Basically, Serif have been ‘sophisticated’ about the ‘locking’ concept (and I commend their ideas). Though you could ask, have they been far more sophisticated on this than any of us need? Even after becoming comfier with these apps, I’d still personally like a good old fashioned option to lock layers... completely, 100%, everything on them, no half measures.
-
Yeah, it’s a draw first, decide after workflow as said above. To me, the number of sides thing should be greyed out until the shape has been drawn - giving the user a heads-up that that’s how it operates. These apps have a bit of finessing to do yet - they’re in early days.
-
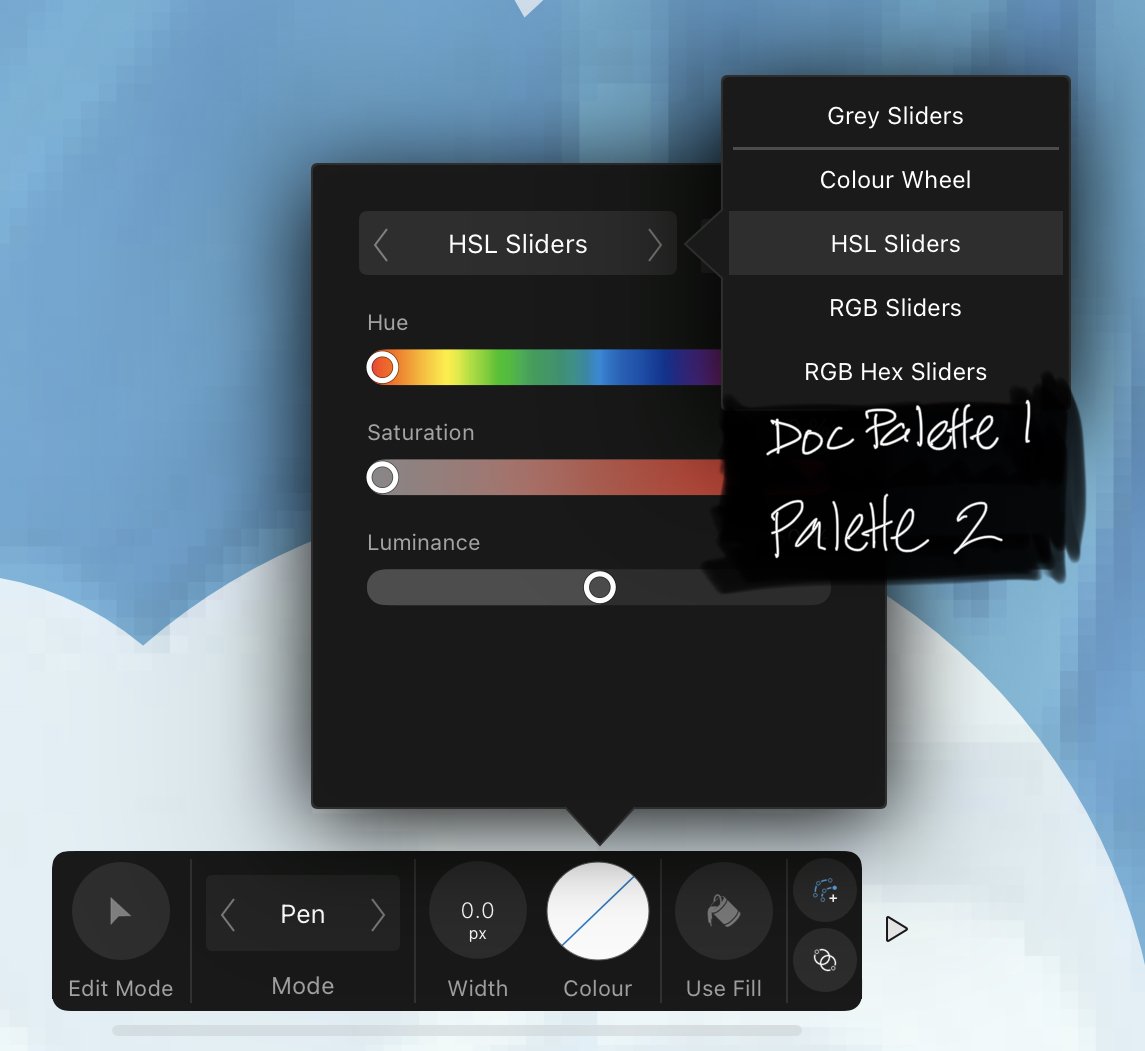
Yeah, my illustration above should have shown the palettes instead - see below. After I posted it, I thought using the word ‘swatches’ would trip folks up. And the pen tool does not always default to the last setting - only when the last layer is selected before drawing... or something like that.... still can’t got my head around what this behaviour is, tbh. What I do I know is that it constantly switches back to some default setting and I have to stop drawing in order to go switch studios around so I can access my palette and pick the colour... again.... again. I do not get the logic of restricting access to palettes set up expressly to use to make assigning colours to objects - quick! There feels to be something fundamental Serif don’t grasp here. The point of setting up a document palette is? A document palette becomes THE palette for the document. (Meh). It takes priority over all other colour spaces. It’s the most irritating thing about Designer right now tbh.
-
Is it possible to access swatches from the context menu as shown below? Of course I mean document palettes should be listed here shouldn’t they, logically? If not, why not? Thanks
-
Opposite Curve Text
AllAppsUser replied to AlliHarden's topic in Pre-V2 Archive of Affinity on iPad Questions
Not sure what you mean - which one? Or something else?
-
You might find this useful
-
Affinity Designer Rasterize
AllAppsUser replied to Kent Davis's topic in Pre-V2 Archive of Affinity on iPad Questions
Good spot @Alfred.