DDesignDude
-
Posts
23 -
Joined
-
Last visited
Everything posted by DDesignDude
-
 Thank you for confirming @walt.farrell that I will still have the ability to re-download and use the V1 apps! I look forward to upgrading when I can
 -
I currently have V1 of Affinity Designer, Photo and Publisher for Windows and IOS which I bought from Serif's website. If I upgrade to V2 via the V2 Universal License + Creative Collection offer will I still be able to re-download and use the V1 apps from my Serif account if I ever need to in the future? I ask this because I still use V1 on my older iPad which isn't compatible with V2. I am also aware that V1 projects can be opened in the V2 apps but V2 projects cannot be opened in V1 apps. That's fine with me. Thank you greatly for any answers on this.
-
Currently, only Affinity's iPad apps allow you to use touchscreen gestures to rotate the document view. Affinity's desktop apps on the other hand, do not support touchscreen gestures for view-rotation, yet gestures for zooming in and out are supported. While there are workarounds for this such as using the ALT+Mousewheel Scroll shortcut and trackpad gestures to rotate the view, these can be cumbersome for those like myself who draw on touchscreens laptops and are used to using gestures for rotating the document view like in many other illustration and art creation apps. Given that prominent art creation desktop apps like Photoshop and Krita allow for touchscreen gestures for document or canvas rotation, and that the Affinity Desktop Suite already supports them for zooming in/out, it feels like an oversight to not support the rotate-view gesture on desktop as well, especially since it is supported on Affinity's iPad apps. If it helps, below is an example of how Krita allows for view-rotation using just a computer's touch screen.
-
+1 vote for this feature. I also would appreciate having this feature as it would save me from having to use trial and error with the current stroke profile pressure graph to thin out or thicken the stroke in specific areas on a line. Having a tool similar to Illustrator's and CorelDraw's stroke width tool would be more straightforward and accurate for quickly making variable stroke thickness.
-
Vector/pattern fill
DDesignDude replied to bitblitter's topic in Feedback for the Affinity V2 Suite of Products
Having this feature would save me the additional steps of exporting a bitmap image every time I need to edit my patterns that are defined using Affinity Designer's Bitmap Fill workaround. As well, it's important for those like myself who use Affinity Designer art in vector animation programs where vector art is required for all assets so that they maintain their crisp quality no matter how large they appear on screen. I add my vote to this too! +1 -
Vector/pattern fill
DDesignDude replied to jc4d's topic in Feedback for Affinity Designer V1 on Desktop
Thank you for directing me there If anyone else wants to support the feedback request for V2, below is a link to where you can do so: -
Vector/pattern fill
DDesignDude replied to jc4d's topic in Feedback for Affinity Designer V1 on Desktop
+1 vote for a vector fill pattern feature to be implemented into Affinity Designer as well. I found using bitmap fills as a workaround unideal as it requires more steps and is ultimately not as easy to edit as Illustrator's Vector Pattern fill feature. I certainly hope this feature is later added to Affinity Designer V2 if it hasn't been already (I'm still using V1). -
I've made a video showing a potential way of importing Affinity Designer vector art into Toon Boom while retaining the project's layer order. Unfortunately, Toon Boom doesn't recognize separate layers from PDF files exported from Affinity Designer. And the only other vector file types that can be imported into Toon Boom are SWF and Illustrator files. So the only workaround I know for Affinity Designer is to export each layer as individual PDFs and then re-assemble them into Toon Boom. I have optimized the process as much as I can by numbering my layers so that they maintain the proper order automatically, but it still can be a little tedious without the ability to use Affinity Photos's batch jobs feature or script automation in V1 of Affinity Designer (As far as I know). I've also run into scaling issues when importing the PDF file into Toon Boom and have a workaround for that as shown in my video. None of this extra work is needed when importing Illustrator (.AI) files instead since Toon Boom is built with basic Illustrator file compatibility and can recognize its topmost layers with no issues.
-
Considering I bought Luminar 4 and not liking everything they changed from Luminar 3 this is awesome! Both programs need serious performance updates though. I wish other companies' software would run as well as Affinity's. Can't find anything that rivals Affinity Photo's Raw Editing speed on Windows.
-
I seemed to have found a workaround for now. By typing in the new width in the crop dimensions you can crop with respect to the Center. You can also crop with Documents>resize canvas and use the center anchor option. It would be nicer though if we could use the cropping tool handles instead so we wouldn't have to do trial and error with the dimensions until we get the desired crop. Here is a video showcasing both methods.
-
Has this feature been implemented yet? I haven't been successful when I tried on version 1.7.3 with any of the Alt, Ctrl, Shift keys.
-
Thanks zedrone for sharing darktable and rawtherapy! I knew about darktable but not Raw Therapy and prefer it more so. I would be continuing to use Raw Therapy had there not have been a deal available for Luminar 3 today. *EDIT Apparently the deal is actually from March 2019. So it should still work after today if it worked for me. Luminar 3 meets all my requirements as an Adobe Camera Raw and Adobe Bridge replacement but it is slower than affinity photo. It doesn't use sidecar files, but instead just keeps all the saved edits in a database it seems. (Still learning my way around it). I don't mean to deter people from using affinity photo for raw editing, it's just that I need to be able to go back and adjust my edits whenever clients would like an adjustment.
-
At the very least it would be great to save a .afphoto file with a linked photo and Developer Persona settings unbaked. The .afphoto files for raw editing would act similarly to a sidecar file and hopefully occupy next to no memory. Nothing would be embedded. Just the settings would be saved. Wishful thinking perhaps. Either way, I too hope a non-destructive and memory-wise solution will come someday.
-
Did some more Digging and believe I found the Answer in the topic below. In the Designer Persona, Select all your desired personas. File>Export Choose PDF and set the Area to "selection with background" Click Export. You'll get one PDF with artboards on different pages. Unless mistaken, I believe the order of them is still dependent on the order of the artboards in the layer panel. (Lowest will be First) I hope this helps someone too. Credit goes to Luis Sopelana for figuring this out and posting about it.
-
Thanks Luis Sopelana, I was really struggling with this issue and your post really helped me out. Have a good day too!
-
What I Wish To Do: Export only desired artboards in my document as one single pdf. Each artboard to have its own page in that PDF. I know there have been a few similar topics to this but they differ slightly from what I am trying to achieve. This feature is available in Illustrator CC by doing the following: File > "save as copy" Choosing to save as pdf Then specifying the range of Artboards to be included in the one PDF. (As separate pages of course). I wish to avoid deleting unwanted artboards everytime I wish to export a PDF with only certain artboards included. Otherwise doing File>Export>PDF>"Whole Document" would work, but it's not ideal. Any chance there's now a setting in Export persona that can manage this? Thank you for any input on this. Other Similar Topics I've Seen So Far: https://forum.affinity.serif.com/index.php?/topic/56432-multi-page-pdf-export-of-multiple-artboards-not-working-in-161-anymore/ https://forum.affinity.serif.com/index.php?/topic/26634-export-artboards-as-pdf-with-multiple-pages/ https://graphicdesign.stackexchange.com/questions/125558/in-affinity-designer-how-do-i-export-a-document-with-multiple-artboards-to-a-si
-
Excellent, it worked! I'm glad I could use the options in the toolbar once I added them. I didn't need to hold Alt on my PC though, but I figure it's alright since it worked. Thank you for your help. I'm glad this is possible after all.
-
I believe I have the same question or a similar one, so felt it was best to post it here rather than creating another topic. I would like to remove the background of an image using a mask created with the pen tool, but I don't understand how to use multiple curve objects for one mask. In this video, I have an image of a person in front of a white background that I wish to make transparent. I can make the white area surrounding the person transparent with one curve. But as you see, I need another curve to remove the white space between the head and the tassel. The grouping method didn't seem to work unless I'm doing it wrong. I'm including the affinity photo file too, just in case that helps. IMPORTANT: I wish to use only masks rather than pen tool selections. Masks allow me to go back and edit non-destructively. I'm aware I could the same thing with pen tool selections instead but this is not ideal for my workflow. photo_graduate_02.afphoto
-
Sorry for the late reply. Just wanted to say thanks for your effort in giving me some alternative solutions. I'm glad to hear Affinity hopes to keep building on the vector compatibility between certain tools. I look forward to seeing it continue to grow and accommodate different workflows. Either way, I was very happy to have purchased my copy of Affinity designer the other day.
-
That was a really clever solution. I just wanted to comment and say the workaround really helped me out. Thanks! I wish someday we'll be able to have this feature available without needing the extra labour. In Adobe Illustrator, this is simply done with the reflect tool.
-
Thanks for the reply and the Welcome! I'm sorry, I'm not certain what you mean by this - could you expand or provide an example for me? Certainly, I was hoping the paintbrush or another tool could paint fills and then merge or overwrite existing fills on the same layer. Like I did so when I was closing a gap in my video. I didn't have to manually combine or join paint strokes. ln AD I think the "Add" function is so far the only way to achieve this but it's not automatic. Meaning it will slow down my workflow. Also since the paintbrush only draws strokes I would have to expand the stroke every time (Layer>Expand Stroke) then Combine fills with the "Add" function. A slower process, but I guess that's the only option. I mainly work with fills so that I can animate fills changing shape in older versions of Flash. I'm hoping to create my characters in AD because it's a more modern program and works with touch controls and my stylus. Using the Vector Brush Tool you can Clip layers inside one another, meaning you'll only see the strokes that fit inside the parent object - That's like using a mask, isn't it? It's not exactly what I'm looking for but probably as close as it can get in AD. Ideally, the red paint strokes would be contained within a fill. Not the empty space inside the black circle. See gif below: True, but this could be done in any program with layers. I take it there's no mode to paint new art under new art instead of on top. Moving layers after making brush strokes every time is also unideal even with a shortcut. This isn't an important feature to me but thought I would check to get a better idea of what AD can and can't do. It's unfortunate the other features (aside from Path tweaks) are not available or are pixel-based. I hope someday it could be updated to be vector. Thank you again for your reply Dan C. I'll think I'll play around more with my AD trial and see if compromises could be made for now.

-
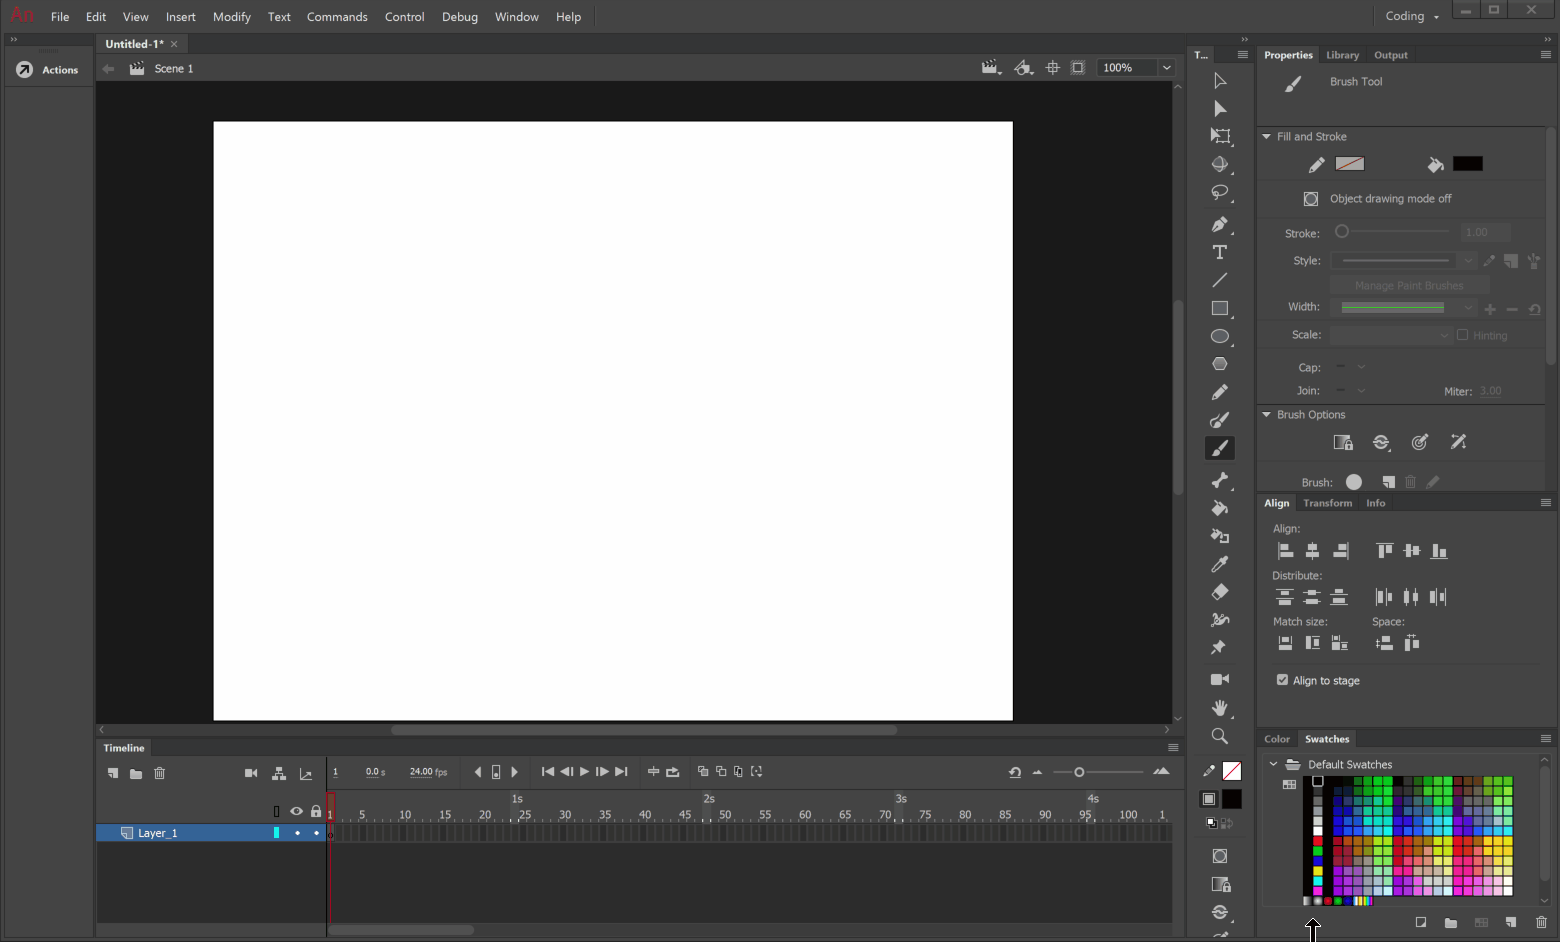
Is there any way to paint fills rather than strokes like I can in Adobe Animate? I'm making the switch from doing vector art in Adobe Animate (formerly Adobe Flash) to Affinity Designer. As well, I'm wondering if I can do some of these same features in AD: Paintbrush strokes convert to fills as they are painted and combine with already existing art Paint Bucket tool fills areas bounded by fills or strokes. Not just strokes. Eraser Tool erases strokes and fills; carving out unwanted details. Paint within a selection or within the coloured area you begin painting on top off Animate/Flash is unique compared to most vector editors. See this video example of some of the features if needed. Adobe Animate/Flash Vector Painting Features In a way, it behaves more like a raster image editing program since you can paint like you would in ms paint but still have it in vector form. Thank you for any assistance!