jkehoe
-
Posts
51 -
Joined
-
Last visited
Everything posted by jkehoe
-
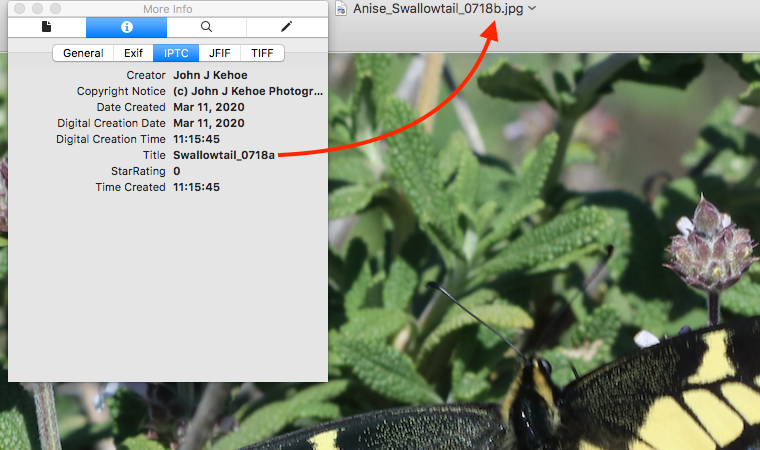
Thanks R C-R and GarryP, I found a quirk and figured it out: Within Affinity Photo, make a dramatic change to a file and use Save as... while keeping it an Affinity Photo file and renaming it as needed. The quirk is that upon opening the Metadata tab, File selection, the original Title persists (see the second screen capture above where saving file suffix a after resizing and saving as file suffix b) by itself does not modify the Title value in metadata. So, editing only the suffix in metadata and again choosing Save as... did not save that new Title. Oddly, it works when I delete the whole title value and reenter it as needed, then save again. Now I got it working
-
I found what I believe to be a bug in AP 1.8.x. where my work flow sets the original file Title as the new "Save as..." file Title, regardless of the newly saved file name. I've attached a screen capture from AP 1.8.1 on Mac and tried to resolve the Title value by editing it within AP. But it doesn't save the edit and when exporting to, say, .jpg, the file Title is still incorrect. Is anyone else seeing this? Thank you

-
Hi, Please direct me to the thread that addresses this if it's already been asked. I found a surprise in Affinity Photo 1.8.x in that the file's name no longer was the same as the file's title. I discovered this while editing a .tif file, saving as .aphoto, and processing it as needed. Upon exporting the file to .jpg, I often resize it down and modify the file name only slightly. For example, the initial file in Affinity Photo has a suffix letter "a" and when the exported version as .jpg is a different size, I save that version with suffix "b." But when uploading the export to, say, Flickr, the file name (Title) still shows as suffix "a" instead of "b." Opening the .jpg on the Mac with Preview and clicking the Info button, then the IPTC tab reveals the actual Title. I've attached a screen capture. This is not a problem, it only means I need to take an additional step that I didn't have to take before. I'm not sure when this started but I think it's with version 1.8
-
Clarity in photos
jkehoe replied to Trev B's topic in Pre-V2 Archive of Affinity on Desktop Questions (macOS and Windows)
Hi Trev B, I think the answer you're looking for is found in the topic of rescaling images instead of "expanding" them. The microscopic squares you're seeing are likely the actual pixels that make up the image. Low resolution images reveal their limitations as we zoom in on them (expand them). Rescaling tools included in Affinity Photo and other apps allow us to scale an image to a larger size but at a cost. Try the Help files within Affinity Photo for basic steps on image resizing and rescaling. The tutorials here are a great resource too: https://forum.affinity.serif.com/index.php?/forum/9-tutorials-serif-and-customer-created-tutorials/ -
Hi, I almost always use Affinity Photo offline (and Designer too). But a few caveats: I'm on a Mac and bought both a long time ago via the Mac App Store. I just updated Photo and Designer to 1.7.1 on one bootable disk and have used both apps offline. So running them after installation without a web connection is fine. Getting them running properly may require an initial connection though. We'll have to see what others say here. Also, I found Affinity Photo makes outbound connections to Amazon Web Services shortly after launching. I don't want my Mac making unusual outbound connections so I use Affinity apps offline.
-
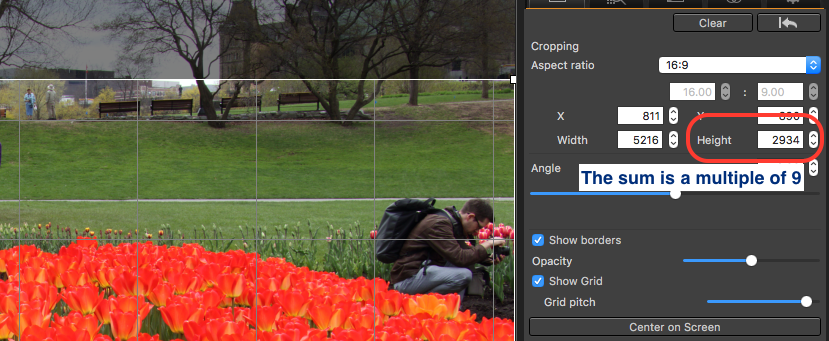
Hi, I discovered this fact a while ago and wondered about it too. I don't recall seeing this behavior in Apple's Aperture program that I had used earlier so maybe Apple did the rounding in the background? Regardless, a friend told me a neat trick with math ratios: when I crop an image that I want to export to 1920 x 1080 but my image is much larger, watch for the vertical / height crop value and add the integers. Notice that adding the integers of 1080 = 9, but a multiple of 9 is fine too. So that the cropping software doesn't have to round up or down, or create unusual decimal values. It takes a bit of fiddling with it but the end result is correct. I've attached a screen capture from Canon's Digital Photo Professional 4, which I use almost always when I want to crop before editing.
-
focus points
jkehoe replied to colin_g2011's topic in Pre-V2 Archive of Affinity on Desktop Questions (macOS and Windows)
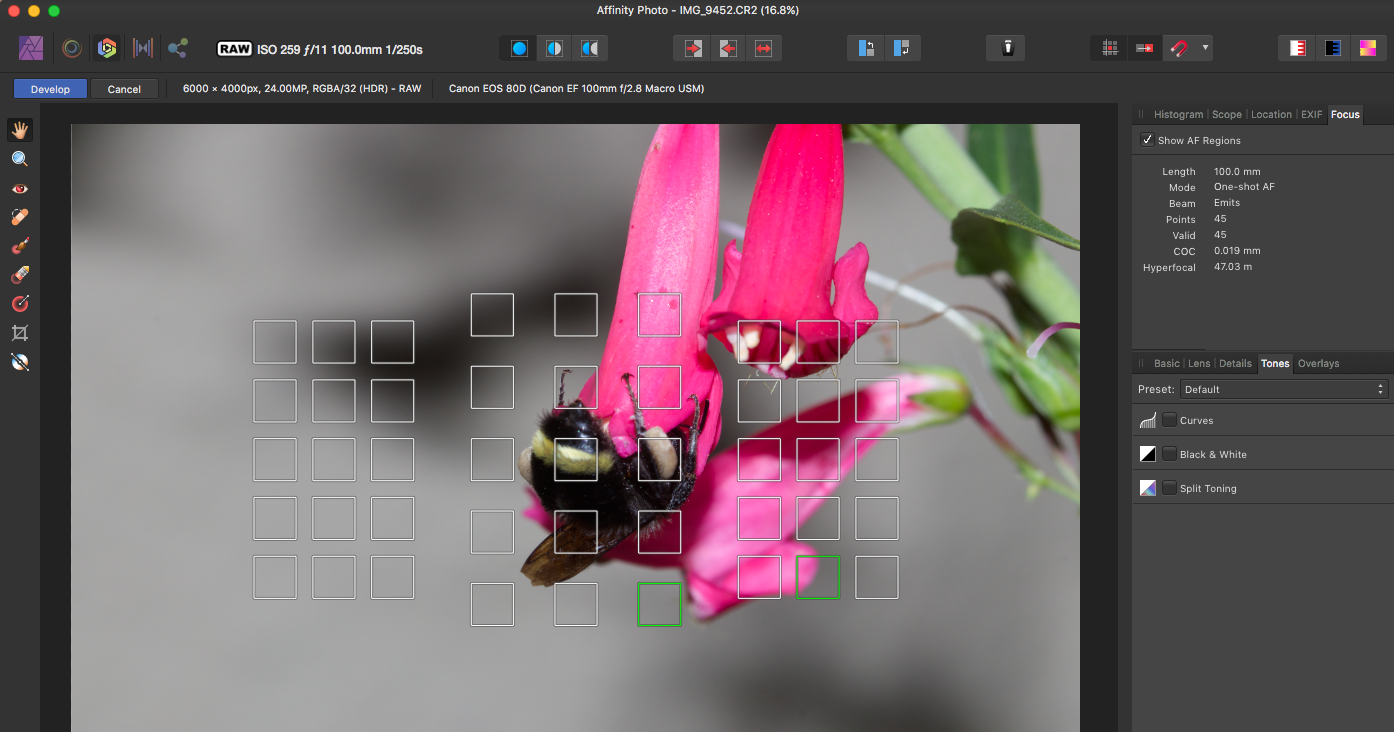
Hi, I'm seeing strange results on my Mac regarding these AF regions and actual AF points. I am using a Canon 80D and had found that Affinity Photo 1.67 didn't show the active AF point but did show all the AF points without identifying the one(s) that were active when the image was captured. After seeing this post, I tested it on Affinity Photo 1.7 and saw that it showed two green squares in the lower right of center but they're incorrect. I opened the RAW file in Canon's Digital Photo Professional 4.7.20 and it displays the correct AF point. I'll attach the three images here for comparison.
-
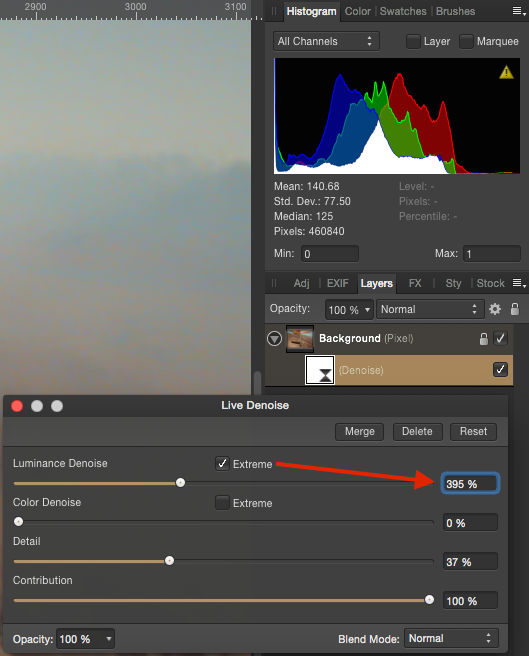
Hi Jaffa, I had to try this myself to see what you meant since I didn't know that we could push a denoise value beyond 100%. I see now that when adding a Live Denoise layer I can click / check the "Extreme" checkbox in either the Luminance or Color sliders and only then can I move the slider well past the 100% value. The Contribution slider stops at 100%; there's no Extreme checkbox on my Affinity Photo 1.6.7. I browsed through the pdf download of the Affinity Photo manual and couldn't find an answer to this so I did a web search on "Noise Reduction" and among other hits I found this one on RawPedia: https://rawpedia.rawtherapee.com/Noise_Reduction What's interesting to me is that some of these software tools add pixels to our image and, perhaps, pushing the value in excess is similar to exceeding the recommended maximum that the software recommends? When I tried high values on a few images I did see some very strange results that were impressive but strongly altered the image in such a way that I found comical. Let's see what other folks say about this topic.
-
Hi dondiego, I'm no expert but I do use a Mac and have had similar issues in the past (although not with Affinity products). I learned that sometimes we have to sign out of the Apple's App Store and sign back in before we can properly download apps or updates. The cloud icon with the arrow tells me that the item is still in the Apple cloud so at least our purchase has been verified, I think. Sometimes folks find that upon signing out of the App Store they can't sign back in even when using the correct credentials. The fix for that (most of the time) is to verify our Apple accounts at their website: https://appleid.apple.com Best regards, John
-
Thank you very much, barninga and Gnobelix, you are both very helpful and I really appreciate your quick reply and details.
-
Hello Everyone, Just to add to this topic with a question: Can someone please describe some details about using the HSL Adjustment tool in Affinity Photo? I recently received my Affinity Photo Workbook, even though I've been using Photo since beta (on Mac). The workbook exercise (page 116) indicates adding a new layer as an HSL Adjustment layer to a jpg file. Using that tool confused me at first since the tool palette looks odd until I reviewed the "science" of HSL and now see that it's represented in a 3 dimensional wheel-like structure. That's why, perhaps, the tool shows red tones at both ends - it's a loop. The confusing part for me is the next step, number 7: "On the color panel, ensure your active color swatch is set to a pure white," even though the goal is to increase the red tones in the sample image. In an older digital imaging guide I have, the authors stated that, in HSL, pure white has a value of zero. Is that why we select white in the Workbook exercise? The resulting effect is that the color adjustments we make in the HSL sliders spills / flows over the HSL white value? Thank you very much!
-
Hello DerHerr, Although I'm on a Mac I have been using Canon's Digital Photo Professional software to process my CR2 files into TIFF. I then edit them in Affinity Photo. Canon's software is free to download (we could say that we already paid for it by purchasing Canon products). So there's that two-step process to go from shooting Canon RAW files and having a nicely edited JPG or PNG or whatever. Canon's software is okay and between that and Affinity I find it serves me well enough. I am not a professional. Best regards!
-
Hi Everyone, I had delved into this in the past and found Microsoft's Visio to be a stellar application for, among other things, mapping network topology. Symbols are included for all manner of network nodes, computers, routers, etc. And they have handles that allow our lines (ethernet or equivalent) to lock onto them. Moving nodes around will also move the network lines. I had fun working with that application and made my manager very happy! Visio includes process flowchart tools that are simpler, like circles, rectangles, triangles, etc. Disclaimer: I don't own a PC nor Visio; it was only in my old workplace. Best Regards ;-)
-
Hi Thomaskarlmaria, Since you mentioned "iPhoto" instead of Apple's newer "Photos" app, can we presume that you're on an older Mac OS? If so, perhaps that Mac OS doesn't support your Panasonic RAW file format since Apple stopped updating that component. Try this: in Affinity Photo, open the Develop Assistant and ensure that the RAW Engine is set to Serif Labs and not Apple's. If I have mine set to Apple under Mac Yosemite, Affinity Photo will crash upon attempts to open / Develop RAW files from my Canon 80D. Setting it to Serif Labs resolved that. Best Regards =)
-
Raw support
jkehoe replied to psaudio's topic in Pre-V2 Archive of Affinity on Desktop Questions (macOS and Windows)
Hello Everyone, Thanks for posting these interesting findings; I'm learning a lot from you! For what it's worth, I have a Canon 80D and almost always shoot in full sized RAW. Since I'm on Mac Yosemite (10.10) and Apple won't offer their RAW converter for this OS, I've been using Canon's Digital Photo Professional 4 or Affinity Photo / Serif Labs converter. Affinity Photo crashed only when I had Apple's RAW engine selected in it; switching to Serif's resolved that. I just updated Canon DPP to version 4.5.20 and found it to be a much better performing one than version 4.4. When using DPP, I convert the RAW files to .TIF. This may not work for you in the long run, but it may get you out of a bind on a case-by-case basis. Best Regards, and thanks again for posting your findings ;-) -
Hello, I have a similar interest in sketches, illustrations or cartoon-like images and I've found that using Affinity Designer's pen tool and layers to work well for me. I'm sure that there's a better way to do this and, hopefully, you'll get better responses to your questions. But for starters, I choose a digital photo where you'd choose your scanned cartoon character and we'd have a jpg or similar file type saved on our hard drive. Here's what I do next: Open the file in either Affinity Photo or Designer and save that as a new file. This image is now the base or background of the project. Add a new layer on top of this base layer and, in Designer, choose the pen tool. I like to zoom in quite a lot to get the level of detail for the project. Trace the outlines of the object by clicking on the edges with the pen tool; these clicks set "nodes" along that path. Break up the tracing in logical sections. For example, my quail image is made up of the body, head plume, left leg and right leg tracings. Save the project as you go, being mindful of the overall size in pixel dimensions. In Designer, click File > Document Setup and choose a new size and rescale to meet your end result needs. Save that as a new file version. Go back to your original Affinity file version and continue building other elements for your character. Once we have an Affinity Designer project with these tracing pen lines we can choose/select that line, change to the node tool, and move sections of these lines around as needed. For example, a cartoon character's arm could be flexed as if waving its hand. The node tool is helpful here. I've attached a partial screen capture of a project that uses the outline of a quail, rendered down to be a small icon. The Affinity image is zoomed-in to 400% to make the nodes more visible; there are a lot because the original quail photo was over 3000 pixels wide. The end result of my icon is about 200 pixels wide. It takes me a lot of time to do this but I enjoy it ;-) Best Regards!
-
Loading CR2 File
jkehoe replied to DMF's topic in Pre-V2 Archive of Affinity on Desktop Questions (macOS and Windows)
Hi, I know that the Canon T2i isn't a new model but DMF indicated "he's" using Mac OS 10.7.5, which is old by Apple standards. My Mac Mini running Yosemite caused Affinity Photo 1.5.1 to crash when trying to open and develop my Canon 80D images. It would happen every time until I reset Affinity Photo to use Serif Labs' RAW Engine in the Develop Assistant tool. I had it set to Apple's RAW engine from my older Canon camera setup. Perhaps DMF might reset Affinity Photo to use Serif Labs' RAW Engine? Thanks, and Happy Holidays! -
Hi, I tried replying to this twice today and, I guess, upon attempting to attach a small screen capture, my post doesn't appear here. So... This does work after all—the key is to use Affinity Photo to open an older RAW file and then reset the RAW engine back to Serif Labs' one. I had mine set to Apple's, which of course won't work since they dropped support for Yosemite in their RAW converter update. Thank you MEB and everyone else that continues to make improvements in Affinity software!
-
Hello, I just installed Affinity Photo and Designer updates to versions 1.5.1 and have just begun testing these on my Mac with Yosemite (10.10.5). Each attempt to open the Canon 80D RAW file with Affinity Photo causes it to crash and then display the pop-up message offering to report the crash (to Apple, not Serif / Affinity). Interestingly, these RAW files open in Affinity Designer 1.5.1! I know Apple is not offering their RAW converter tool update for Yosemite and I don't plan on updating this Mac OS. I have been using the RAW converter within Canon's Digital Photo Professional, version 4, and will continue using that. Still, I am enjoying all that Affinity offers. Best Regards! Also, I opted to NOT install the included macros at this time. I'll explore those later on.
-
Hi, I'm not affiliated with Affinity staff; I'm just a Mac user that also runs Affinity Photo, Designer and Aperture. There's always something going on at Apple that leaves some Mac users left behind—Aperture being one of them. You didn't mention in your post what file format you want to move between Aperture and Affinity but if .tiff was involved in your workflow, others have reported problems with that, too. Here's a recent discussion: https://forum.affinity.serif.com/index.php?/topic/24996-large-tiff-files-not-displayed-in-imac/ Since I'm still using Mac OS 10.10 (Yosemite) and had bought a new Canon 80D, I had to adopt a new workflow. Under Yosemite, Apple does not offer the RAW converter for later Canon DSLRs. They offer the update for El Capitan only. Here's a workflow that I've adopted in recent months: Open all Canon 80D RAW images in Canon's Digital Photo Professional 4 Process select images, convert to .tiff and save them in the same folder as the RAW originals Open the .tiff files in Aperture (I still like some of its features) and create a new Aperture Project for them Crop each image to my liking and tune as needed (exposure, black point, etc.) Export that version as a .tiff but resized to the dimensions I like or need (I think Aperture does this part better than Affinity 1.4.x) Open the new .tiff in Affinity Photo and process further (I really like the Live Filter Layers tools and the Curves Adjustment) Export the final version to jpg from Affinity I know this reads like a complicated mess of steps, but I can go through it pretty quickly. Best Regards!
-
Hi Everyone, I just wanted to share how Affinity Photo and Designer helped me set up my cover art file for publishing my iBook onto the iBooks Store. The original digital photo had been edited in Apple's Aperture over a year ago but one version was saved as a .tiff. Here's a brief outline of my workflow: Open the .tiff in Affinity Photo and save it in .afphoto file format (just my preference to do that) Add a New Live Filter Layer > High Pass Filter (I really like this tool) Make minor adjustments and save it Open that same file in Affinity Designer and save it in .afdesign format Add layers as needed to build text boxes, keeping each box in its own layer Ensure that the font type matches that used in the iBook project File > Export to jpg in best quality setting The file dimensions are pertinent only to this case as it pertains to an iBook that was built using Apple's iBooks Author app. Best Regards!
-
Firewall Alert
jkehoe replied to mfoster's topic in Pre-V2 Archive of Affinity on Desktop Questions (macOS and Windows)
Mfoster, As I understand your question and situation, your computer has an "Affinity Toolbar" installed and it is causing a security alert in your firewall setup. Serif is the parent company that creates and sells Affinity Photo and Affinity Designer; they don't offer this "Affinity Toolbar." I did another web search on "Uninstall Affinity Toolbar" and included a screen capture below. Please try a web search on your computer and decide which way to go. As I see it, you have a web browser add-on or extension or some other kind of tool that added this toolbar to your web browser and it happens to be called "Affinity Toolbar," no relation to Affinity Photo or Affinity Designer. Web browser extensions, add-ons, etc. are generally uninstalled or disabled from the web browser menu. Best Regards, John
-
Firewall Alert
jkehoe replied to mfoster's topic in Pre-V2 Archive of Affinity on Desktop Questions (macOS and Windows)
Hi Everyone, This message caught my attention too and I did a web search on "Affinity Toolbar." I've added a partial screenshot of some of the hits and they look like they're not related to Serif. I did click on one of them but avoided anything more. It looks like a trick to me. Thanks for adding interest to this forum, too!
-
Hi CPR-Productions, That's an interesting image you've posted and I don't know what happened to it. But I, too, use a Canon 80D in RAW mode and, so far, use only Canon's software, Digital Photo Professional 4, to convert the RAW files into TIF. I then open them in Affinity Photo or Designer but I haven't seen the condition you have shown in your attachment. A few other Affinity forum posts have asked about support for this new Canon RAW file and Serif staff have acknowledged that it is in the works. Apple's RAW compatibility update does support the 80D but only under El Capitan and I'm staying on Yosemite for now. I know this doesn't answer your question but at least Affinity Photo will be updated in the future. Best Regards, John
-
Thank you, MEB, your ongoing support in this forum is stellar! I really appreciate all you and your colleagues do for us =)