Otto Manuel
-
Posts
158 -
Joined
-
Last visited
Everything posted by Otto Manuel
-
 My circumstance is just as described in the thread I linked to. 1) I like to work fast, oftentimes with a zoomed-in view, using hotkeys to switch tools and focusing my attention on the artboard rather than the side panels. 2) Selecting the brush first and then making the color selection does not guarantee that the color selection is loaded into the color selection that is in top focus. Sometimes, it loads into the equivalent of the "stroke" color and sometimes into the "fill" color, oftentimes into the color circle that underlies the color that informs the brush color, despite which of the two color circles was in top focus immediately prior to making the color selection. It has been a nagging annoyance for several years, but I finally thought. I should pause what I am doing and try to figure out if there was a surefire way to select a color and have it be the actual color that the brush will be loaded with. Can I look forward to a Designer v2 interface that limits pixel persona to a one at a time color choice when using a monochromatic brush? It always seemed like the two choices of the "fill" and "stroke" colors were never meant to apply to the pixel persona and were a sort of artifact of incorporating the cool pixel features into the vector application. Thank you!
 -
Hi, Just so I can be clear, I was not been expecting an update for this but rather hoped I might be able to learn that I could improve my work habits to prevent it from happening. I had hoped I just was not using the tools properly. I would gladly update to Designer v2 but I have read that it will not install on my Win 7 x64 OS computer, so I will not be able to upgrade to Designer v2 until I upgrade my computer. Thank you.
-
I found this thread, which describes the issue I am trying to describe. I read the thread in detail and repeatedly. If I understand it correctly, the person asking for help seemed to accept defeat and consoled themselves with a new shortcut, while others who did not recognize the problem declared it was solved. Am I missing the solution? Is there a solution? Thank you!
-
Hi, I'm still on Affinity Designer v1 with a Windows 7 OS, and I have a question about the pixel paint brush color selection. With the pixel brush the color dialog displays what would be the "Stroke" and the "Fill" colors in the Vector persona. Sometimes, when I choose a new pixel brush color, it gets assigned to the unfocused stroke or fill circle, so I have to go and promote the color to the focused position. Is there any way in v1 to avoid or stop that confusing behavior? Thank you.
-
Does a designer V2 install on Windows leave v1 untouched? I am wondering if I can depend on the old stand by while learning about the new version. Yes? No? Thank you.
-
Hi @Old Bruce, Thank you for the helpful info. At least I can stop hoping for a solution. :-) Thank you!
-
Hi, re: Affinity Designer for Windows This morning I was pixel painting in a multi layered project and repeatedly made the mistake of painting on a layer that was "locked". I acknowledge that I must have mistakenly caused the wrong layer to become selected, although I didn't know when that happened and would have to undo a bunch of work to start again. This happened several times. It was enough to cause annoyance. I know enough about Designer to regard the lock feature as untrustworthy, but today i was enjoying painting with the pixel brush and color choices so I wanted to trust that when I started painting in the intended layer that I remained in the intended layer. Am I missing a preference or checkbox? I would like a locked layer to be locked and safe from unintended modification. Thank you!
-
Hi, I have an older project that is a technical line drawing with lots of labels that I am migrating from Adobe Illustrator format to Affinity Designer. The line work in the .AI opened in Designer and is easy to edit further. The text though, seems to have migrated to Designer with a modification that appears as over sized text boundary boxes, and some hidden groupings. The results seem similar to what I sometimes see occuring with awkward pdf compilations that I have tried to edit. I would like to work on the text as if it was placed with the Affinity Art Text Tool. Is there any knowledge base that can help me understand what is happening and what I can do to most easily migrate to an Affinity workflow with the Art Text Tool? Thank you!
-
Yes, I have the problem as well as just completely losing any connection to the fonts list where I can not resume the up/down scrolling. I was hoping to find out I am doing something wrong and can learn how to do it better.
-
Hi, I need to learn the exact sequence of steps for selecting a text item and then scrolling through my fonts while I watch the fonts change. FWIW, about 20% of the time I can make this work by using the up and down buttons, but when I can't do it I can't figure out how, what, or when I should do to get the function working. Sometimes it works great. Most of the time I can't get it to work. I imagine it's me that is causing all the confusion. Can you help me learn how to do it every time I try. Thank you!
-
It is a mix of empty pixel, image, pre-populated vector, & text layers. It is not every time I create a new document. It is every time I would call on a template with the hope of saving time and redundancy at the onset of a type of project I frequently work with. When I think "template" I think about all the stuff that I could avoid doing over and over and over again. Back to the audio media analogy. I have templates for duets, rock bands, bluegrass ensembles etc. etc. I spend quite a bit of time making a template when I first work with the musicians and on subsequent sessions I just open a template file and hit record and all the fist pass volume adjustments, equalization curves, sound effects, and mix routing have already been established by the template definitions. All I do is open the template, hit R and they are free to start creating content. Now, picture a 4 frame comic strip template, maybe for reasons I can't explain I like each frame to be a group. When I open a template for that I'd love to have the frame one group open, with the "line art" layer selected and active, and my favorite first pass brush (for this particular type of work) ready to go, so all I have to do is start drawing. That does not seem too crazy... does it? You are fixating on the group, but that it is only one tiny aspect of my interest. I would enjoy having every aspect of my template set up and ready to go in the same exact state everything was in when I exported the template. And... I could have other templates for other sorts of jobs when I was not always working on the type of job I described above. I have given up on the idea. Thank you!
-
Yes, that is exactly what I described. For my interest I only need one of the group's expanded to enjoy the benefit, and that would be the group that I had left expanded just before exporting the template, and subsequently found collapsed when I opened the template again. Also, as I mentioned, having a suitable default brush associated specifically with that template would also be a nice time saver. I would find it very helpful, but now that I know that it is not currently possible, I'll just continue repeating myself over and over, when I start a new project. Here is an example of how it works with an audio multimedia program: I open a "template" file that can have any number of blank lanes, which can be thought of as layers, any or all of which may have adjustments pre-set in the lanes, hit the keystroke "R" and begin the process of recording audio. So that is Launch application, open template, hit R, go for it with a bunch of adjustments applied on the fly. For a portion of the work I am doing in Designer a similar type of template functionality would be ideal. Thank you!
-
Thank you for answering the question. It sure would be nice to be able to do this. I honestly can't think of a drawing program that does this, but can think of many multimedia applications in which you can open a template and find everything in the state you left it in all ready to go. I starting to realize how many times I have had to repeat the steps to get a Designer project started after creating a new project or opening an old one. Thank you!
-
Hi, I am wondering if there is a way to store useful status information in a .aftemplate file. For example; It would seem ideal, for me, if I could store the state of a group's expansion, current layer selection, the persona view (such as pixel), and brush selection details including color, size, character, stabilizing and symmetry settings etc. It seems like I can bake the layer selection into an export, but the group collapses so the selection is not visually apparent upon opening the template. The rest of the stuff seems to default to basic states and I find myself having to select persona and brush details each time I open the template. It seems like it would be great to have all that ready to go, so I could open a specific template and immediately start drawing. Can it be done? What can I learn about this? Thank you!
-
Yes, I had not looked and realized that opening a file such as "SomeNamed.aftemplate" in Designer resulted in a project known as "Untitled", I just assumed it would have opened as "SomeNamed.aftemplate". I am glad to have figured this out. Thank you!
-
I was about to say "perhaps I am missing something..." but I just went and looked at the save options and realized the source of my confusion. What I found confusing is that when I open one of my templates and want to save some edits I am offered two options: File > Save and File > Save As. I anticipated only having an option to "Save As", but now, if I understand correctly, in this instance the option to Save or Save As are identical or redundant. I have always been hesitant to select "Save" as I assumed it would overwrite the template, and have assumed that anyone could do so. I also had to remind myself, and I hope I recall correctly, that you actually need to File > Export as Template rather than simply save a template. The fact that the "Save", and "Save As" commands displays the suggestion that you can save either an *.afdesign, or *.aftemplate contributed some confusion. I guess I assumed that if you open an .aftemplate that designer will "Save" an .aftemplate by default. There does not seem to be a dialog box method to select a choice to write the .aftemplate rather than the default .afdesign, but I found that if you manually type the .aftemplate suffix Designer will recognize it and not append anything after the identifier. In any event, I am reassured that for the most part the templates function in the manner I had hoped for. Thank you for the helpful information!!! Thank you!
-
Hi, I am curious to learn the most effective way to share a template or basis project in a way that would prevent the contents from being overwritten. I other words, is there a way to force subsequent users to opt for the "Save As" command so that the template is preserved and not corrupted by unintended modifications? Is there a way to do this with Affinity templates or do I have to rely on additional back up or archive copies being kept available if a change to the template occurs which requires restoration to the original state? Thank you!
-
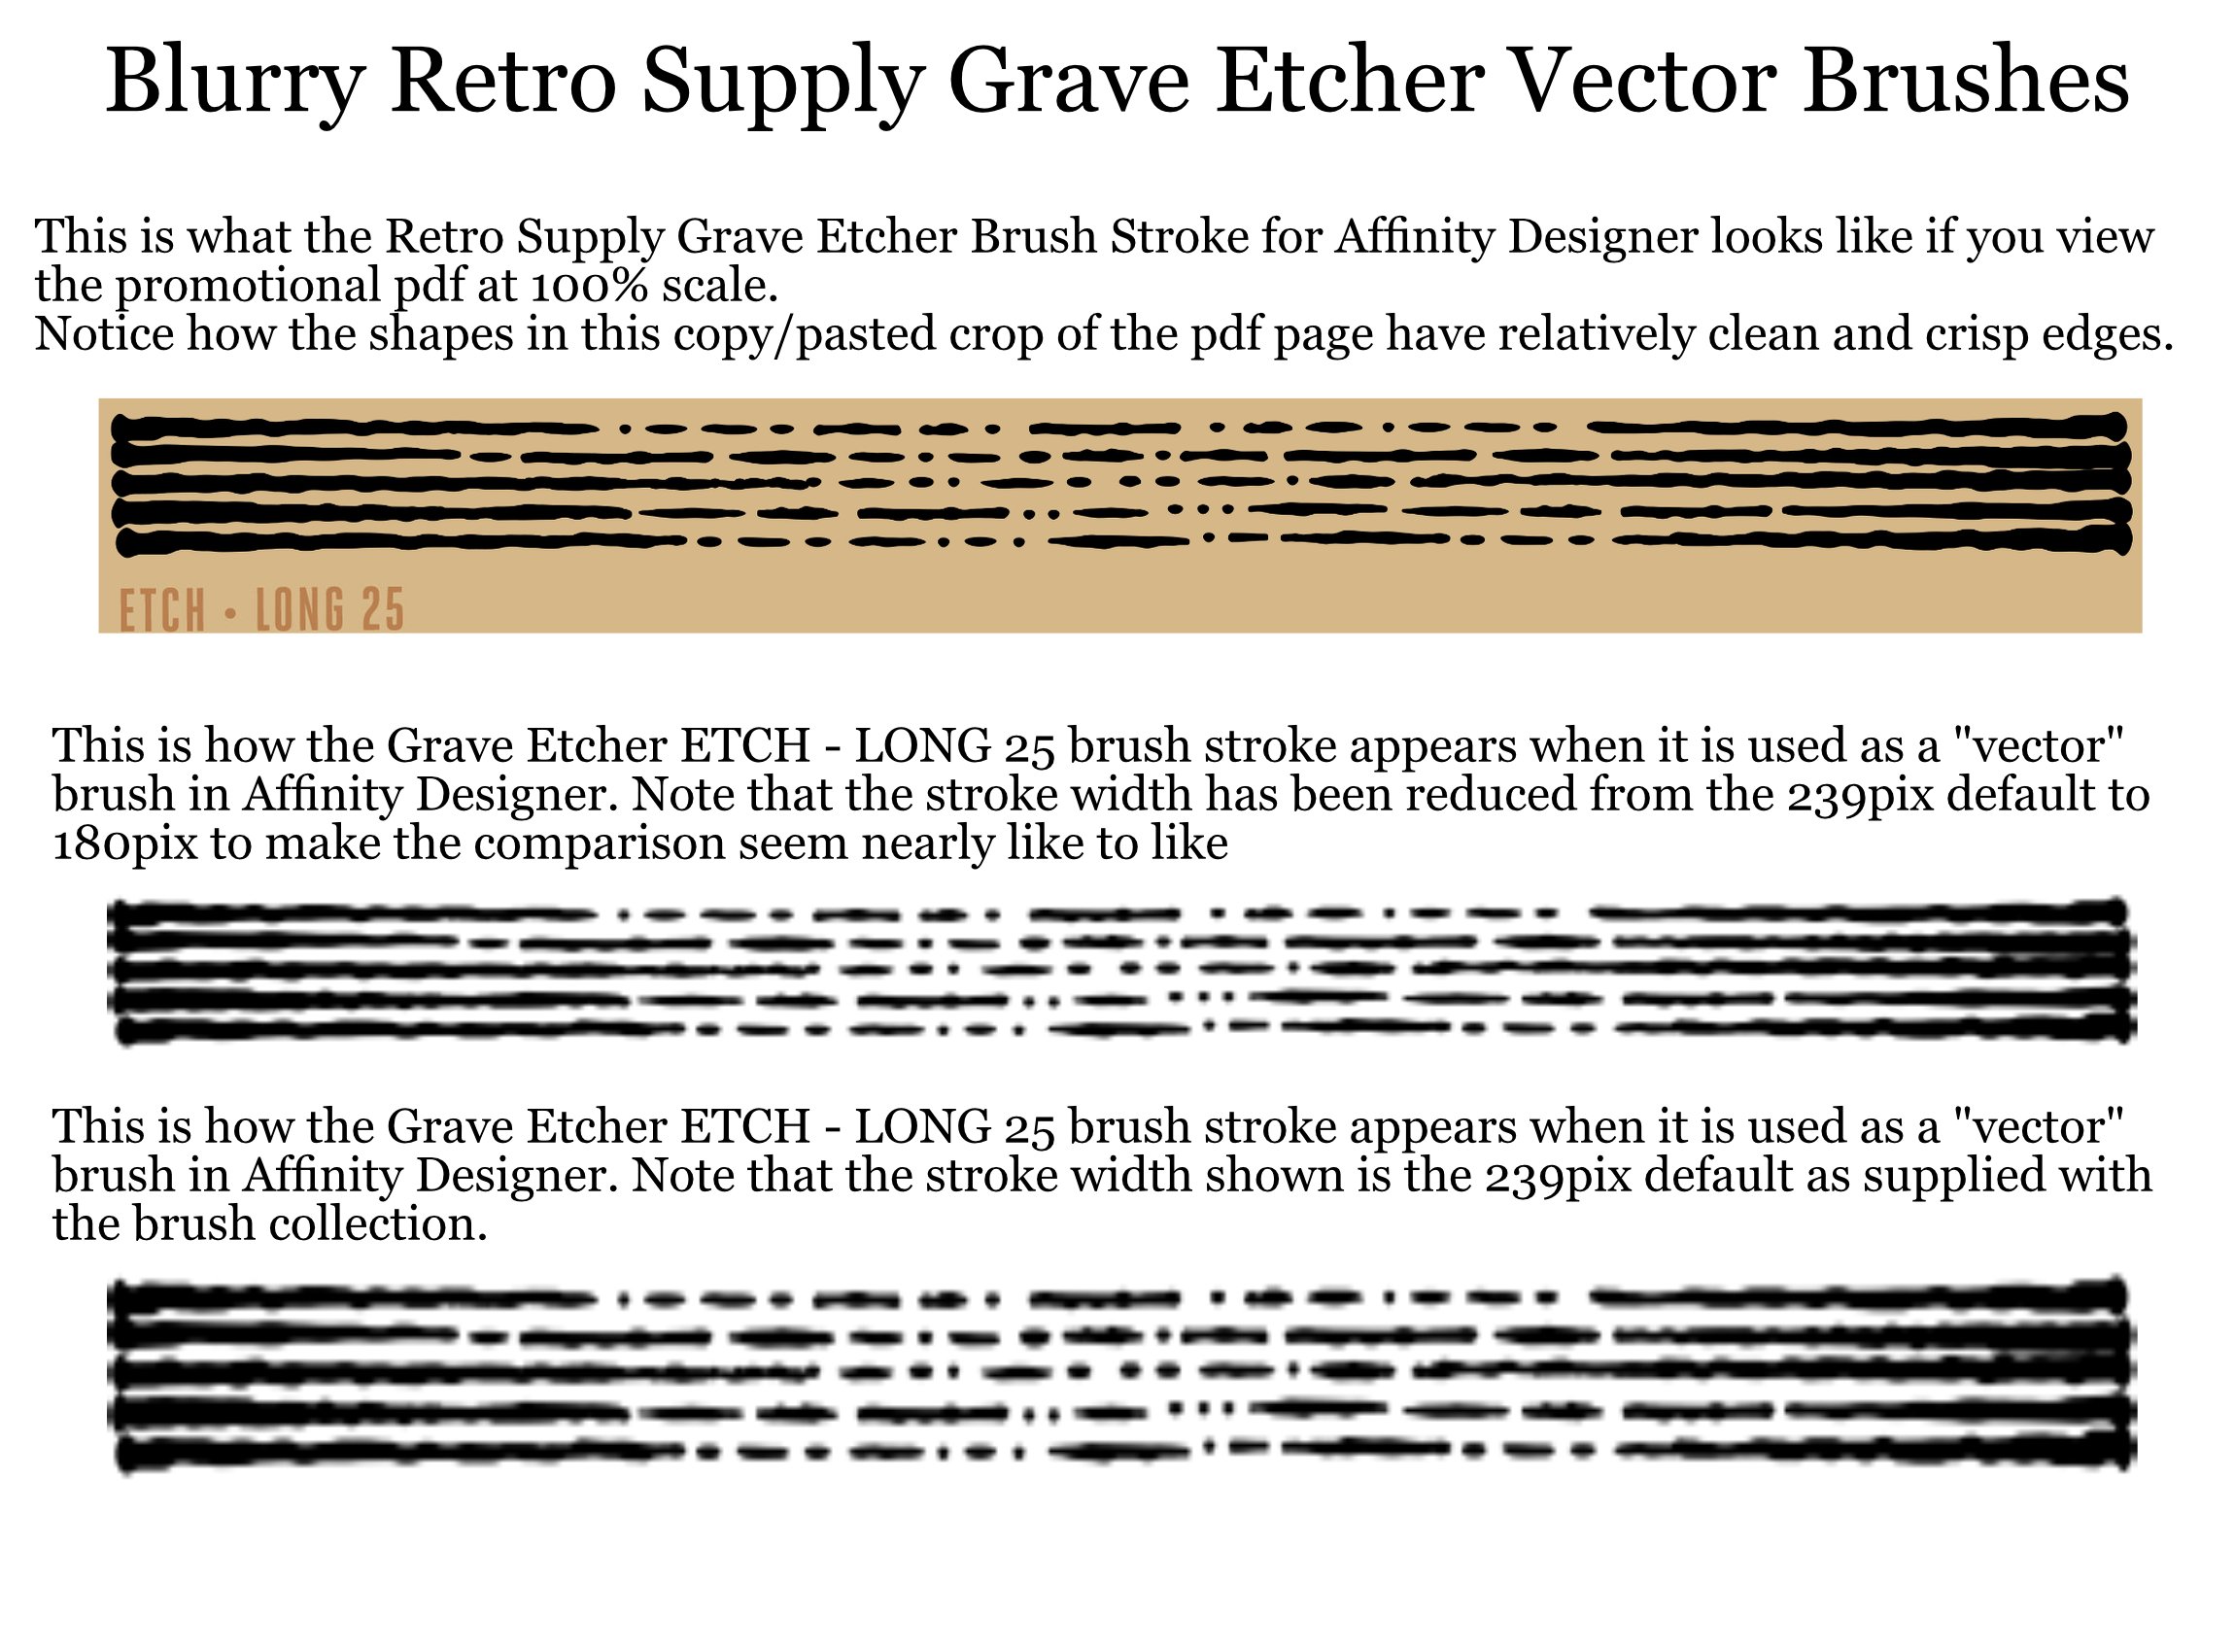
The document that the images shown above were made from is 300 dpi. Some of the brushes in the Grave Etcher collection look better than others, but none compare favorably to the examples that Retro Supply publishes in their example .pdf pages. The basic engraving brushes included with the Designer install, and the custom brushes I made for myself, using Designer to draw source files as true vector shapes before conversion to .png, are both much more refined with regards to the edges. Thank you.
-
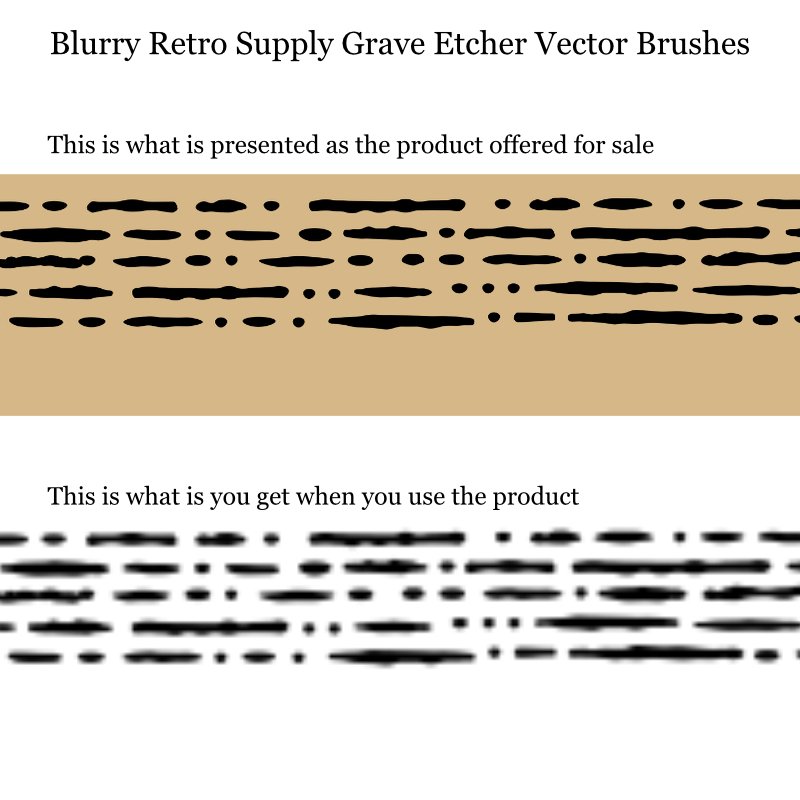
I very much enjoy using Affinity Designer to make illustrations. Having used the old standby products since the late 90's I find the Designer workflow to be refreshing in a way that reminds me of sketching in a carefree manner, which appeals to me now that I am practicing art primarily for enjoyment and personal fulfillment. Every now and then I encounter a gotcha which makes me understand the limitations of Designer, but on those occasions I opt to look at the sunny side of the issue and try to learn the best way to make best use of Designer. I really enjoy using Designer. Thank you! I finally bumped into a gotcha that seems to warrant a sincere critique. In the past few weeks I have considered buying a license to Retro Supply's Grave Etcher Vector Brush Pack for Affinity Designer. It had been on my wish list for a long time, but I usually illustrate with a clean stylized appearance so I kept procrastinating. A couple weeks ago I had a project that worked well with a wood cut stylization so my interest was renewed. For that particular project I made my own custom engraving brushes, and learned a lot about how the brushes need to be prepared to scale well with clean crisp edges when they are composited into an illustration. The scaling is probably less of a concern if you are using some style of blurry or bushy brush stroke, but my interest in a wood cut engraving appearance highlighted the need to plan for the final presentation when preparing the source files for an Affinity Designer Vector Brush. It was fun to make the brushes I need and it was fun to learn more about Designer. When I finished my project I was curious how a "professional" asset supplier might handle all the details, so I took another look at the Retro Supply Grave Etcher and Wood Cut collections. The promotional info looks great and the designers seem to supply a thorough collection of brush sizes and shapes. When the recent Affinity sale halved the price of the Add Ons I thought it was a great time to make a frivolous purchase and try out the Grave etcher collection first hand. It only took me a few moments of use to realize and understand that the Retro Supply Grave Etcher Vector Brush Pack for Affinity Designer was a disappointment. I have been left with the impression that the porting of this collection, from a true vector shape set to Affinity's version of rasterized vector brushes, was made with compromises that undermined the quality of the product. In an attempt to understand and then explain why I was disappointed I made a few demonstration projects which displayed the marked difference between what I expected and what I did not. Here is an export from a simple afdesign test project that compares a cropped portion of the pdf promotional file provided by Retro Supply and the very same brush, as actually implemented in Affinity Designer. I don't understand how the supplier of these brush strokes could expect this product to be acceptable to customers. The purchase price seemed trivial but the disappointment compelled me to delete the category and request a refund. Thank you. This image shows one of the brushes at the full scale. The image is resized for the forum formatting, but you can view the image in another tab and see it at the original 100% scaling. This image features cut out portions of the image shown above and has been sized to appear at full 100% scale within the confines of the forum formatting.

-
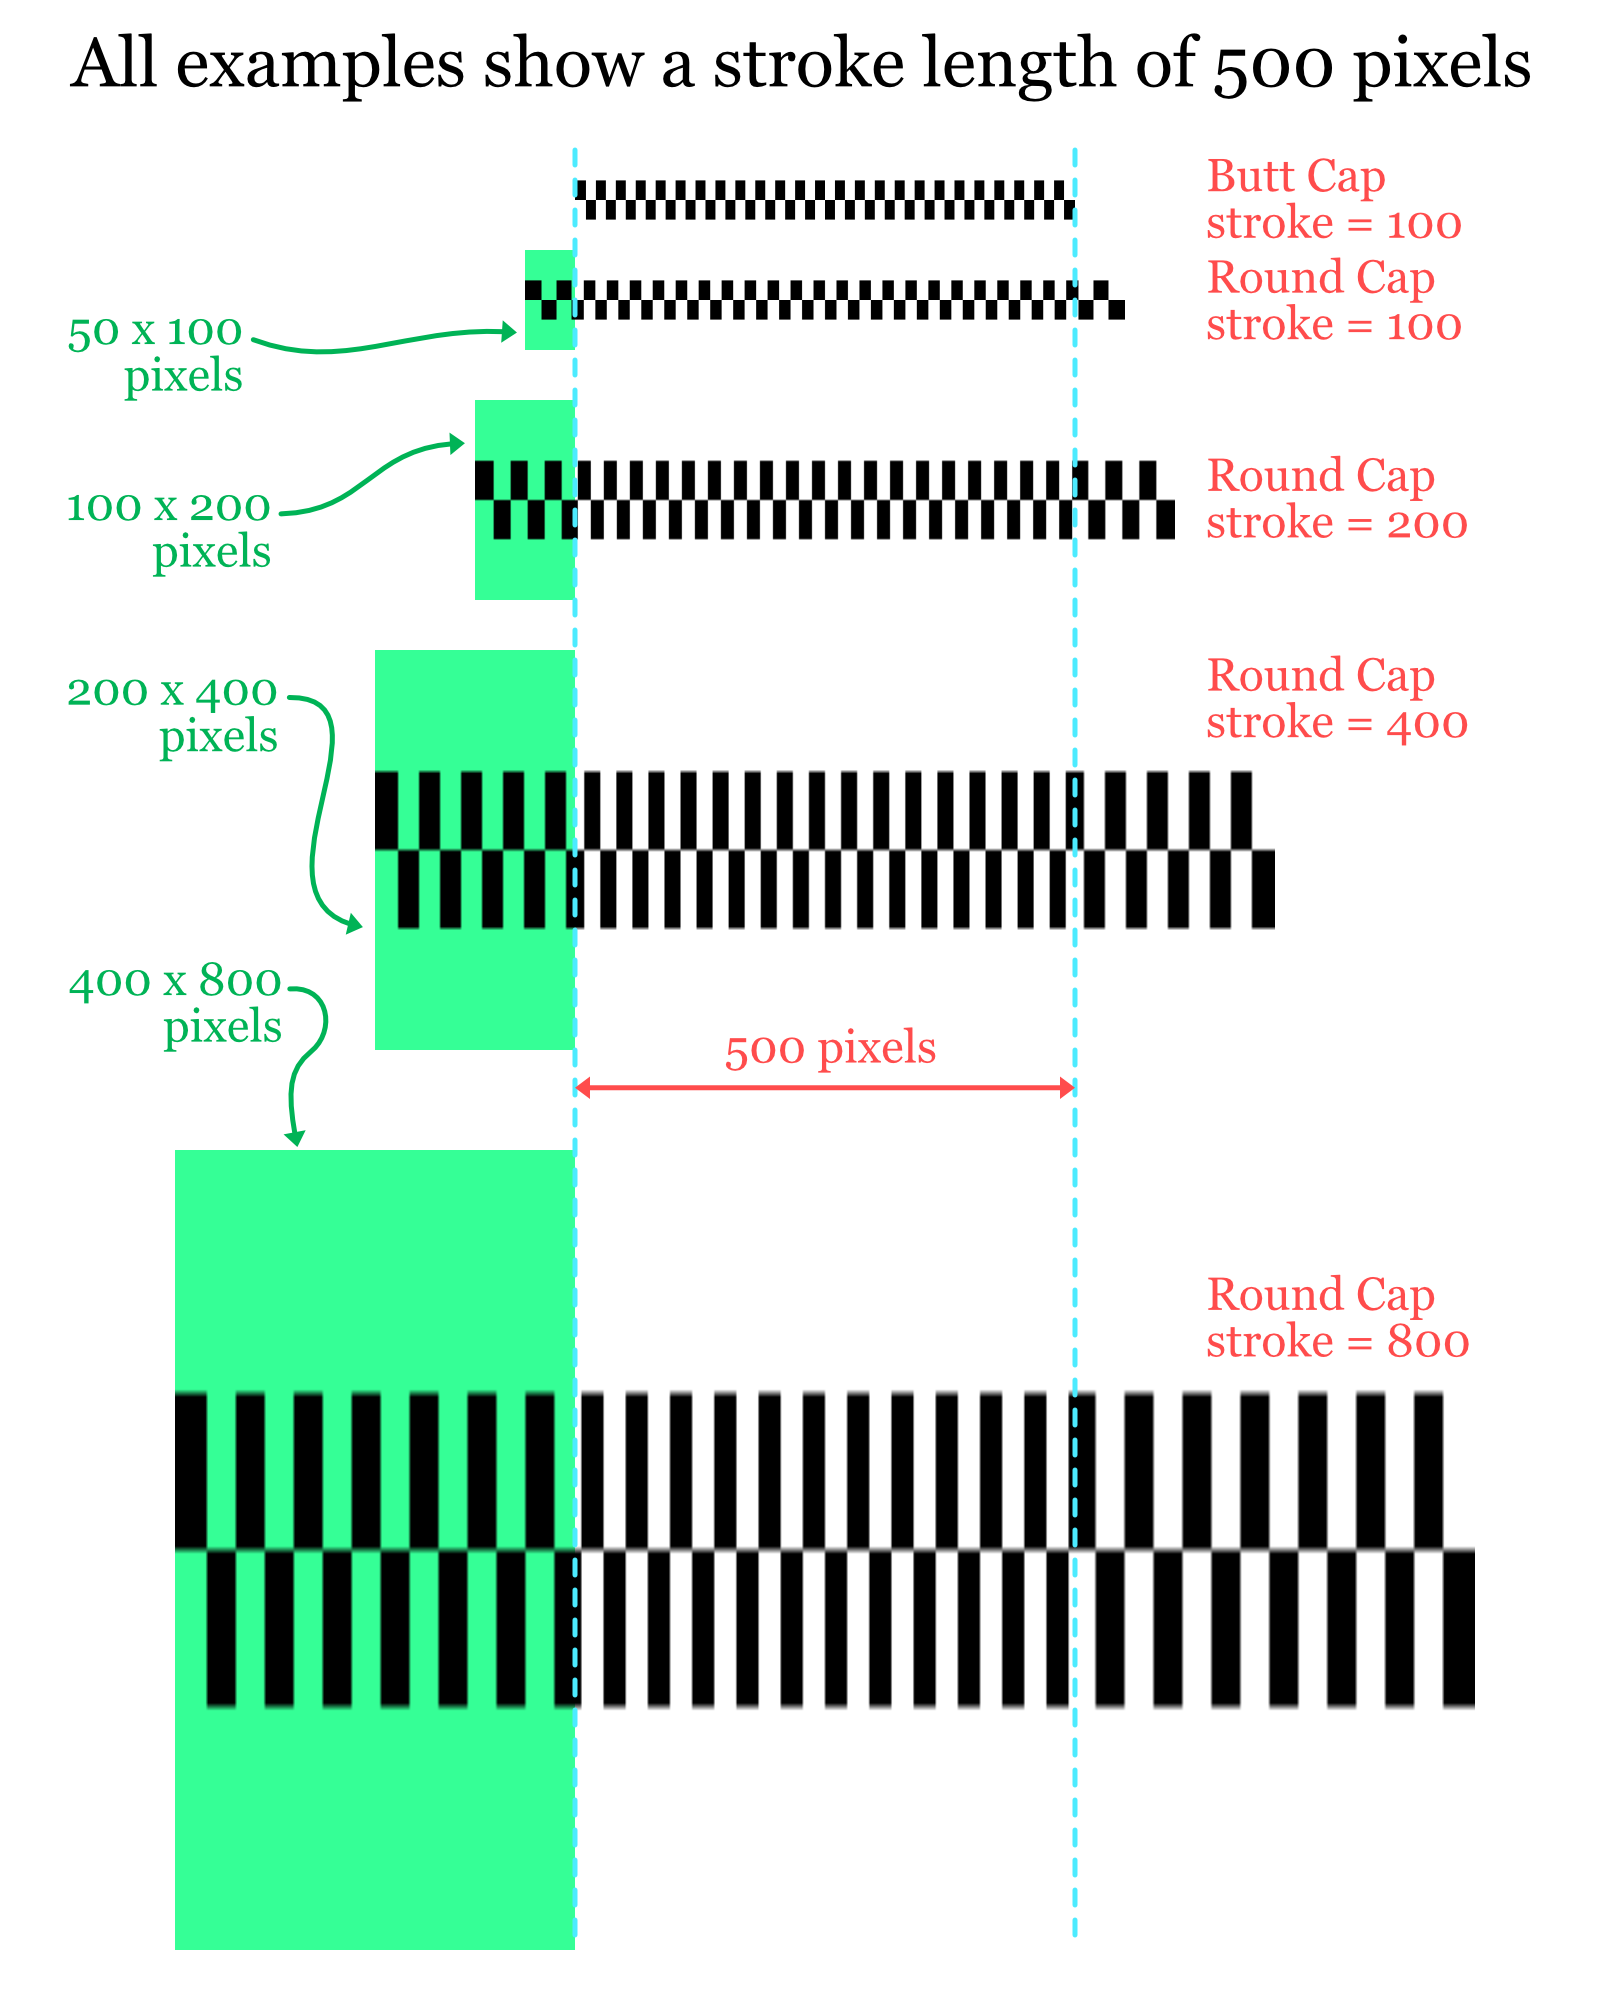
Using the reverse engineer procedure I think I stumbled upon the idea that the extension of the Round Cap and Square Cap is 50% of the stroke width. For example if the stroke width is 100, the vector brush will extend 50 pixels beyond the end point node.
-
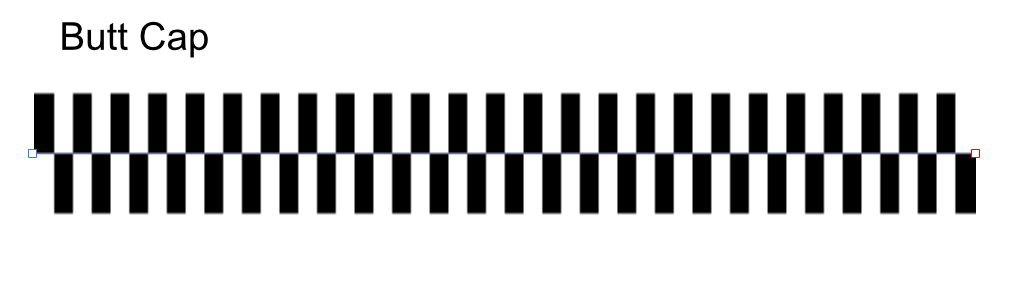
That's a good question. I tried all three and now realize the butt cap places the source file precisely on the stroke. The round and square caps are the ones that include the extension, which I would now guess is somehow proportional to the stroke width. IF I work with the butt cap style I will be able to prepare source files that appear as the brush strokes I imagine. Thank you!
-
Here is the edit brush panel for the previously mentioned brush. Note that the offsets are specified at the exact edges of the png source file.
-
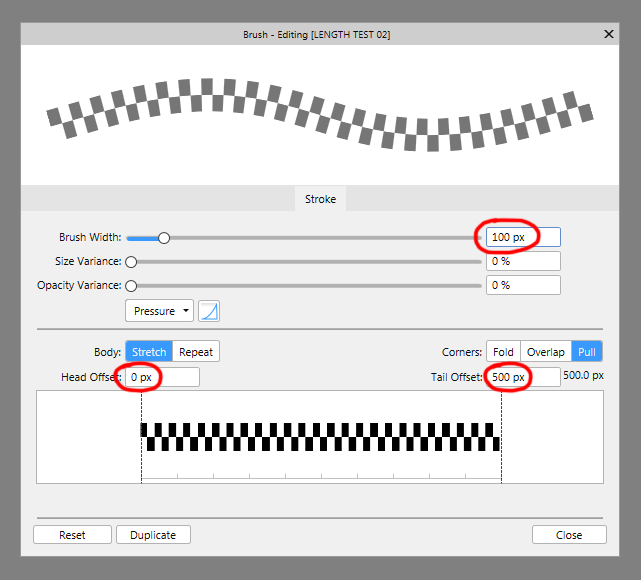
Here is an example I just made in an attempt to reverse engineer quantify the offset. I have attached the png source file which I used to make the custom Vector Brush, as well as a screen shot of the brush being instantiated in Designer. The source file is 500 pixels long by 100 pixels high. The white blocks are 10 pixels wide. The screen shot shows a stroke with an actual length of 500 pixels long and a stroke width of 100 pixels. Designer seems to have stretched the "Brush" stroke. The fifty 10 pixel wide white blocks, that fit precisely within the 500 pixel wide source material, seem to be stretched beyond the end point nodes of the 500 pixel wide stroke. When I zoom in on the screen shot it looks like the Brush stroke extends approximate 38 pixels past the end point nodes of the stroke. I am hoping to learn how to anticipate where the end of the source file brush forms I am making will appear when I create and use a custom brush. I have been *investigating* by trial and error and figure I ought to just ask if there is any info that describes the specifics. Thank you!
-
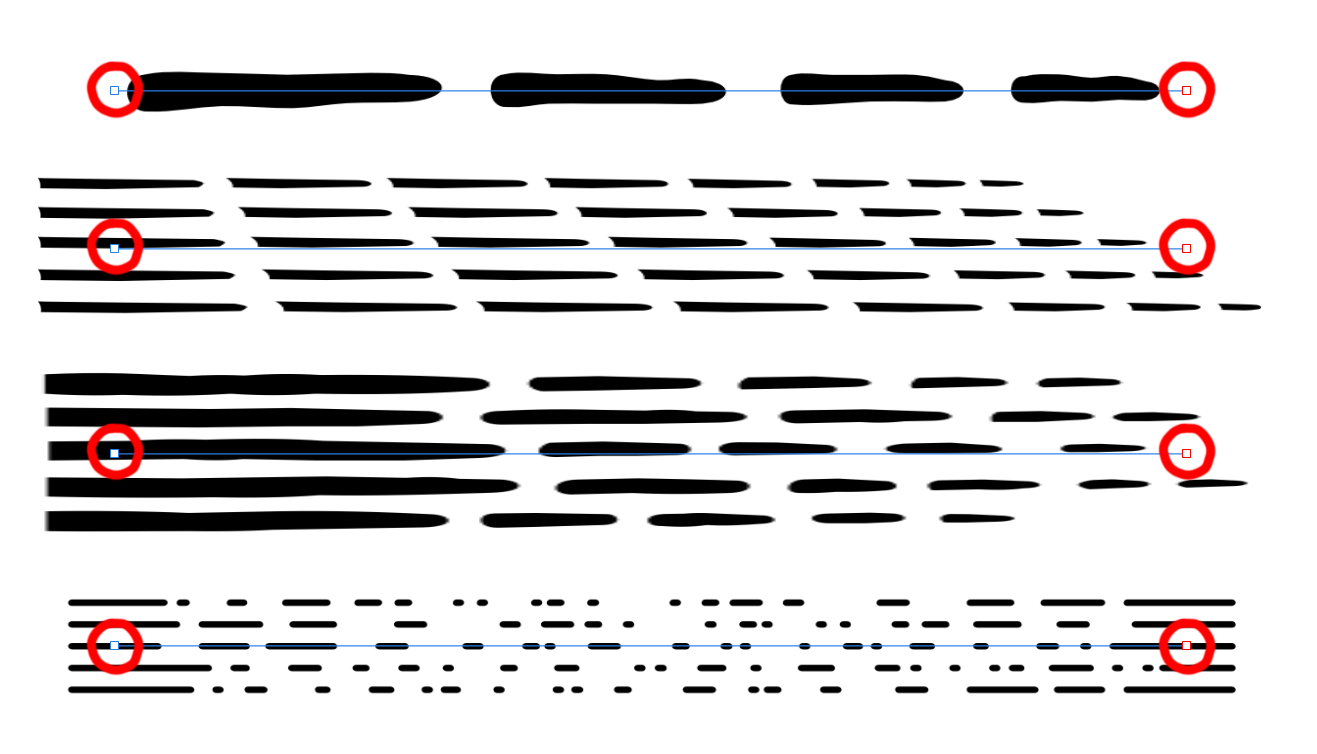
Hi, Ihave been spending some free time making some custom Vector Brushes and have not quite figured out how to predict where the stroke's endpoint node will be located. I have attached a picture showing 4 copies of the same stroke with 4 different brushes assigned. The length of the stroke is the same with each example, but the apparent length differs. I suspect that the difference lies in how the brush forms were placed in relation to the margin of the png source file, but I can not figure out if the placement is an absolute distance value, or a percentage, or something more nuanced. Is there any info explaining how the left and right edges of a brush can be expected to rest upon the stroke? Thank you!
-
Hi, FWIW, after trying to make some engraving styled brushes for a particular project I have been working on, I think a learned some basic concepts that I have not seen in the very limited "research" I have conducted while trying to learn about custom brushes. 1) It seems best if you begin making a custom brush with a specific display size in mind. This includes both width and length, as changing the ratio later will create distortions that may not seem desirable. 2) The width should closely match the stroke size you will most often use with the brush. 3) If you use the stretch function, and the brush has distinct shapes like many engraving brushes, the length should closely match the length you will use, or you may employ the repeat function to vary the length without too much shape distortion. 4) Once the basic size is determined, it seems like a good idea to prepare the source file at or about a 4x resolution. In other words if you for see using a brush with an 80pix stroke and a 300pix length, your source file can be sized 320 pix high by 1200 pix wide. This will ensure clean edge rendition when you view a brush that you intend to display with a clean edge. I tried making the brush source file the same size as I wanted it to appear in the final project and the edge resolution was obviously fuzzy and soft. That's it for now, I imagine there is lots more to learn.