G13RL
-
Posts
717 -
Joined
-
Last visited
Everything posted by G13RL
-
 Make sure that the color profile of your Affinity application is "sRGB IEC61966-2.1". You may also want to check the monitor profile.
-
@JimmyJack, You are right, it is true that when the gap is transparent the placement of the stops is less important. 🙂
-
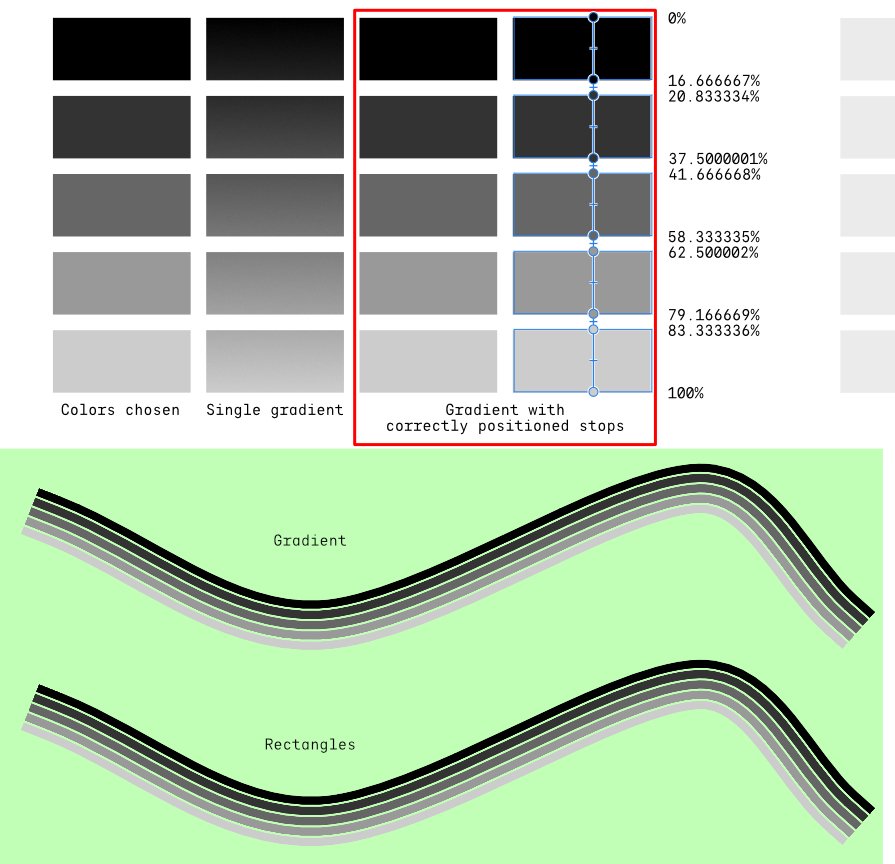
Hi @JimmyJack, I think that having the stops placed exactly at the boundaries of each line ensures that the colors on them are consistent on each line, since the stop values are identical. This is certainly due to my propensity for precision, and this one often makes me complicate my life!
-
No, and indeed, the text frame behaves like a group, so the text changes position.
-
You are right, I forgot about the group specification. 🙁
-
Hi @GeirSol, I'm not sure if I understood your question correctly either, but if you want to proportionally change the size of the texts while keeping their individual locations, you can enable "Transform Objects Separately" before making the size change.
-
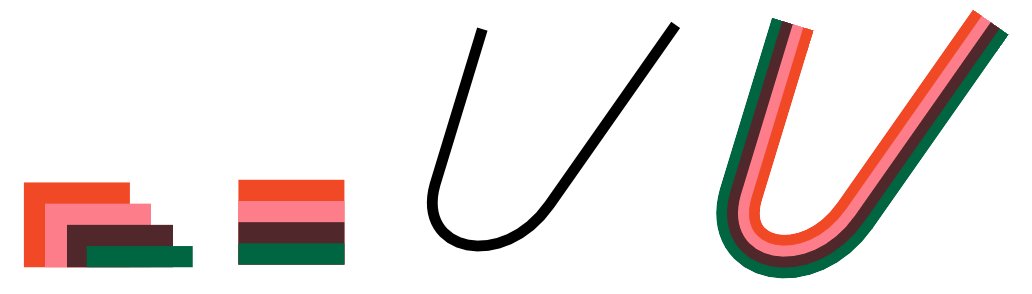
If you want to use a gradient, @NotMyFault's magic sauce (recipe) avoids having to position exactly the different stops of the gradient, which is already painful for some lines but would become frankly unmanageable for a large number. In my simple example (few lines and equal spacing), I assumed that the total spacing was equal to a rectangle. For this type of brush, I would instead use rectangles directly with the chosen colors, as in the first column.
-
@shérifderek You can create a brush for this. Draw a rectangle without an outline and fill it with one of the desired colors. Make it 4 mm high (for example). Copy and paste it under itself, change the height to 8 mm and change its color. Do the same for all the colors by adapting the height. Select the whole, export in PNG (in "Area", choose "Selection Only"). Then in the "Brushes" tab of the Studio, click on the "hamburger" at the top right next to the close button, click on "New Textured Image Brush. Choose the Png you have just created, the brush is then added to the category you have chosen (or created). Select the stroke to which the brush is to be applied, in the studio, select the "Brushes" tab, select the category in which you have placed your new brush, click on it (it will be at the bottom of the drop-down list). To make the colors appear on the stroke, set the stroke color to "None". Set the line thickness.
-
@Alfred, thanks for the file, here, on Windows, I don't have the Bubble Gum font and I get the question mark, like every time a font is not installed on my system.
-
Sorry, I could not attach the file directly. Once on the site, click on the red button to access the file. https://www.cjoint.com/c/LCntAsNUUh2
-
Sure, I'm preparing this.
-
Another way to do it: apply a gradient with the three desired colors, superimposing exactly one yellow stop and one red stop at 33.33% and one black stop and one yellow stop at 66.66%. Then rotate the gradient or circle. Select the circle, create the style from the selection.
-
Thanks for the feedback, it is indeed possible that this font has a design problem that causes the disorder during the boolean operation "Add".
-
Hi @Malena, Once step 3 is complete, "Layer", "Fill Mode", change from "Winding" to "Alternate" should solve the problem.
-
@Ron P. I just tried it (Windows, AD 1.10.5.1342) and I see the same thing, it did not happen with previous versions.
-
You're welcome!
-
@narfwin I don't think there's a way to do that once the design is done. The best way is certainly to create the first key, bake it and then create the whole keyboard with "Ctrl/Cmd + J". Maybe someone else will have a solution.
-
@narfwin I gave this answer because I thought you wanted to "catch up" after forgetting to bake the corners. To bake the corners before changing the size of the design, select the set, take "Corner Tool" and click on "Bake Appearance" in the contextual bar.
-
@narfwin, Select all the keys, ungroup (right click on one of the layers in the layer panel). Take "Move Tool", activate "Transform Objects Separaly" (in the contextual bar). Then take "Corner Tool", select all the nodes, adjust one of them, the others will follow the movement.
-
Hi @JIPJIP "XFM" is the shortcut for "Transform" when the tab is not expanded. Unopened tabs all show a shortcut, for example "Nvg" for "Navigator". You can rotate with the mouse wheel. Select the object to be rotated, click in the "R" window of the "Transform" tab, use the mouse wheel: Mouse wheel only: rotation from 1° to 1°. Mouse wheel + "Shift" pressed: rotation from 10° to 10°. Mouse wheel + "Ctrl/Cmd + Maj" pressed: rotation from 0.1° to 0.1°.
-
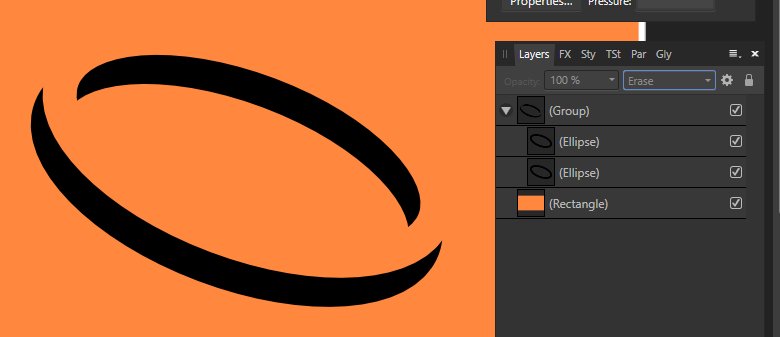
@anemoshere's how to do it. If the background is colored, group the two ellipses together before setting the blend of the top one to "Erase" so as not to pierce the rectangle @Old Brucemay want to add some more details.
-
You're welcome!
-
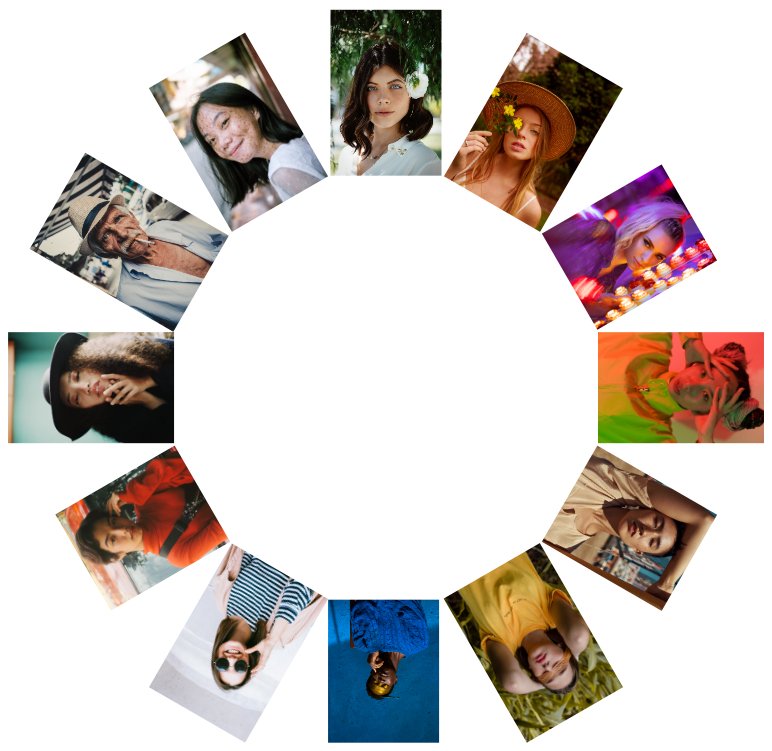
@Helmar, First, calculate the width that the pictures should be in relation to the perimeter of the circle. Then place them one by one on top of the circle and use "Ctrl/Cmd + J" to distribute them around the circle. Delete the photos covering the ones already placed as you go along.
-
Hi @Pedro Suárez, Another way to do it, draw the circle on the red shape. Group the two together. Select the circle, "Expand Stroke". Select the outline of the circle, put the blend on "Erase". To move the circle, select it and the outline (without grouping them), move. Link to the video I made, once on the site, click on the red button to access it. https://www.cjoint.com/c/LCbpszI7Fc2
-
You're right, I had proposed this solution because the OP hadn't talked about filling, just joining the curves.