Dr_No
-
Posts
160 -
Joined
-
Last visited
Everything posted by Dr_No
-
 Lee, insofar as I can tell, I'm not using a Beta version. When I open any of my Affinity apps and see there’s an updated version on offer, I always download and relaunch to set the latest version as my active version. What causes you to think my version may be Beta? I'm curious, because if there are tip-offs, I'd like to know what to look for. Thanks.
 -
The procedure was File > Open to ensure that normal procedure was followed …
-
Interesting. A subtle yet applicable distinction. In the ongoing tale of the Inapplicable Reset / Undo icon’s functionality, I imported a .CR2 file and clicked the Rotary Reverse Arrow for the Exposure (after resetting ‘Apply Tone Curve’ to ‘Take No Action’). Damned if it didn't correct the exposure. Granted, this is one time and one file, and the image was produced by a Canon instead of a Nikon, but still … More to the point: Once ‘tweaks’ were made in the different panels and ‘Develop’ was clicked, there was no reversion to the original darkened image. Next step is to replicate this with a Nikon .NEF image. If both produce similar results, I'll be a Happy Camper – but still in the dark as to the ‘Why’ regarding the causal factor for this behavior. It's really nice (and often important) to understand the ‘why’ about things that happen, yes … ?
-
Update time: The ‘solution’ I thought I'd stumbled upon is NOT a solution. Clicking ‘apply tone curve’ does, indeed, brighten the image, and one can click thru the adjustments and make changes to light/dark tonalities, correct exposure, etc etc - and the moment the ‘Develop’ tab is clicked, everything - as before - is undone. The only changed detected now is that the ‘developed’ image is much darker than the RAW file as opened, which is much less than being ‘the best of all possible worlds’ …
-
Thanks … out of curiosity, is there a functional diff'rents between ‘Reset’ and ‘Undo’ or is it just a semantic diff'rents? … i.e., do they do the same thing but under a diff'rent name?
-
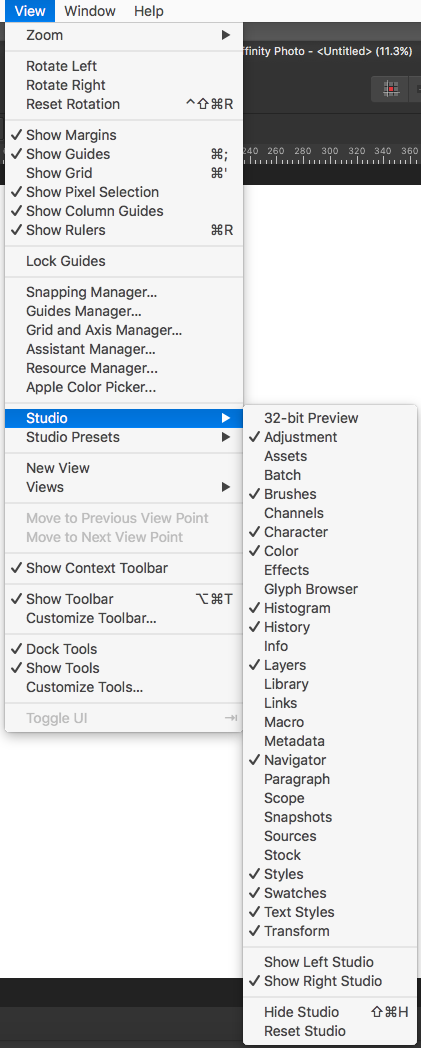
Okay … Put this in the ‘Mama, how come … ?’ column (see screencap, attached below). This was not covered in Olivio's tute, but provided the same effect as did his click of the ‘Undo’ rotate icon. The change (‘Apply Tone Curve’) was made, as shown, using a random test image in the Assistant module and results were instant. All other settings remained at their respective defaults. Whether this is a viable path forward will be learnt as new images are processed, but for now, this (’scuse the blatant internet meme ripoff) ‘One Simple Trick!’ appears to do what the ‘Undo’ rotary icon does in Olivio's tute. Here's the screencap …

-
A quick followup with a screencap to illustrate settings … the ONLY item that changes anything is the 32-bit PREVIEW setting. Changes can be seen on-screen as made. There is a problem, tho’ … the second the ‘Develop’ button is clicked, EVERY ONE of the changes just made go ‘POOF!’ and the image reverts to its auto-settings dark preview as if nothing had ever been altered. Thoughts and suggestions welcomed …
-
firstdefence … Thanks for the screencap. Unfortunately, the problem continues unabated and the auto-applied ‘corrections’ remain intact and unchanged even after making the changes suggested. This. Is. Maddening.
-
Please expand on the Assistant Mgr settings and their interference with the ‘Undo’ circular arrow. The RAW files are only of two types: .CR2 and .NEF as-shot and as-imported from the CF card.
-
’Allo again, mes amis … today the Big Question is: ‘How Come It Don't Do It Like Dis?’ … You've heard of and seen the excellent series of tutes produced by Olivio Sarikas, yes? He does an excellent job. In this particular tute, he examines Affinity Photo's built-in quirk that automatically applies a series of pre-sets to the RAW image(-s) opened in Developer persona. Note that, in his vid, he selects the ‘Exposure’ tab and clicks the ‘Undo’ Swirly Arrow to remove the presets and display the image in its as-shot state. I have tried and tried and tried yet again to have Affinity Photo duplicate on my Mac this same behavior. Nuh-unh, Charlie. It don't be playin' dat. The picture brought remains as unchanged after clicking the Reset circular arrow as if it had never been clicked. The same applies to every other ‘undo’ arrow for the rest of the settings in that panel. Here’s the link to the tute if you want to see it for yourself … undoing the preset(-s) is the very first thing he covers, so it's not a long wait. All feedback as to how to make this work outside of the vid is appreciated. Please advise if this ‘sauce’ works for you on your machine, too. Thanks.
-
NotMyFault … thanks for that. I'm a bit puzzled because this color-behind-the-text is something that only recently began to occur. Until about three weeks ago, I could draw out a text box (Frame or Artistic) and enter black text with NO background coloration and modify it as needed. Not now. So far as I know, I haven't made any changes in the Prefs for Designer or Photo (it occurs in both now) to initiate this behavior. It's quite crazy-making. A quick check of the Preferences in both reveals no ‘secret sauce’ that can be used to remove the BG color, either. Thanks again for the link.
-
Hello dere, chér … mais, me, I almost did not saw you dere, but I'm glad for you to see me yeah, I tol’ you dat f’true. Now, what I got to ax is mebbe a simple quextion but me, meh, I do not know dem answer no, me. Oh. What it IS, you aks? Well, I'm glad for you to axe me dat, so … When I use either the Artistic text tool or the Frame text tools, I begin by selecting one, then drawing out a rough-sized text box to put text in. That's when the problem crops up. The BACKGROUND is filled with white and the text is default black. I have no problem with black text, ’cos it's gonna be changed later anyway. The Big Quextion is as follows: How I got rid of dem WHITE BACKGROUND FILL BOX COLOR, hanh? Looking thru the Menu choices produces no clue as to Remove Paper Color, Remove Background Color, or anything else. It has not always been this way - and it happens in Designer and Photo, not just one. Ma chérs, if you know you dem Answer about how to done got rid of dem white Background coleur from dem tex box, I be Returnally Greatfull fo’ dat knowlidge. T’anks in advance fo’ you assist wit’ dis quextion.
-
firstdefence … as ‘Scotty’ of ‘Star Trek’ fame may have said: “Aye, Laddie, and there's the rub!” … I can see exporting the .svg from AI, but since PS is rasterwerk, would that then render it moot insofar as applicability? One way to find out, yes? I shall give it the proverbial shot …
-
firstdefence … Thanks for that tip. Of course, it does (of necessity) assume a certain level of (a) intelligence and (b) proficiency on the part of the recipient of the technique. And now it's Dumb Question Time: When using Add Style from Selection, does the style populate the the GRADIENT intact or only with the COLORS used in each gradient? I've seen that before but have so far never used it. If each of the gradients are brought in, well then, it's Problem Solvèd, yes? Dumb question Nr 02: You mention AI gradients. Will PS gradients also work in this scenario? I'm attempting to bring in a set of 40 PS gradients, so that could have an impact. Thanks again for your input. I'll give it a shot.
-
walt.farrell … I think I meant to say ‘filled objects’ but didn't (you know how that goes sometimes, yes?) … but to the point: The steps would then be (note: logic is being attempted here) — Open PS & load gradient files; create new document in PS with one filled object per gradient; save the .psd file and open said file with Affinity Photo. Izzat about where it's going? Other than involving 40 separate steps, it's actually pretty simple (why, I think even I could do it!) …
-
walt.farrell … It's not that I particularly want to export – and your solution appears to be in line with NotMyFault’s as well. In order to do that, tho’, I'll need to create the filled objects in PS (after I load the gradients into it), then export them (perhaps as a group, or maybe as individual objects), import / place them in Photos, then use the tool to create a new Gradients Palette. Does that sound like the most logical (note: not ‘easiest’) solution to the quandary … ? Maybe the long way ’round is the shortest way home? Thanks again …
-
NotMyFault … Thanks. I'm making the SWAG that I would therefore need to create, say, a tiny square, apply the gradient, repeat until all 40 are applied, then export all as a .jpg, import or place that file in Photos, then create gradient swatches to save in the Gradients panel … ? Is that correct or did I miss something? Thanks again.
-
Hello again all, and welcome to the latest round of ‘Whaaaaa … !’ Yes, that's right, there's a new and (possibly) even dumber question than those which have preceded it. That question is: HOW does one UPLOAD a GRADIENT SET to a GRADIENT PANEL in Affinity Photo? Please see screencap for the source of this query's ‘where’. I can find no panel accessible in Studio(-s), and although there is a Gradient Tool, and gradients present in the Swatches panel, I can find no corresponding Gradients panel in any section of the Studio. Am I chasing shadows becos there is no Gradients panel to upload to? As to what is being uploaded, this is a set of 40 Photoshop .grd gradients. Is there an incompatibility that prevents uploading to Photo, or are .grd files an inherently non-uploadable filetype? Thanks again to all for your assistance with this query. And now for Today's Feature Attraction, here’s The UPLOAD of available choice in the Studio panel … Ta-Daaaaaa!
-
Desaturating A Layer …
Dr_No replied to Dr_No's topic in Pre-V2 Archive of Affinity on Desktop Questions (macOS and Windows)
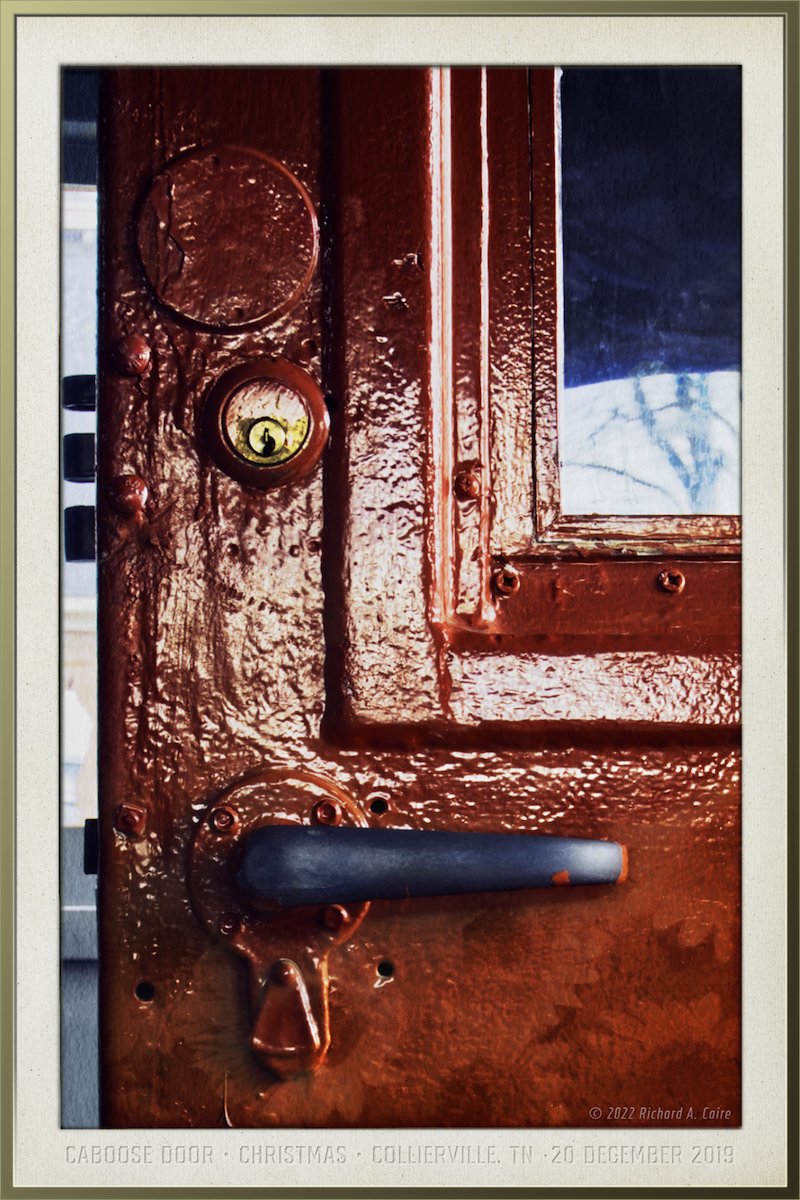
Thanks to all for your input and comments. If you (like I) have been wondering ‘What's he on about anyway? And why?', I've attached L'Image Final with this so you can peruse it at leisure. The FX were needed for the overlays and textures, not so much for individual pieces 'n parts of the image … Enjoy, and thanks again.
-
Desaturating A Layer …
Dr_No replied to Dr_No's topic in Pre-V2 Archive of Affinity on Desktop Questions (macOS and Windows)
Iconoclast, I'd love to use G'Mic, but everything I see at its site states that they're ever so sorry, but Mac users are out of luck when it comes to using their ware. Granted, I may be (and probably am) overlooking something staring me direct in the eye, but I found no link there to d/l a Mac version of G'Mic. That's a shame, ’cos Olivio has put out a great tute describing how to use it. The 'Simulate Film' option would probably have done the trick. Tried the LUT solution, but it required much more input and fiddly-ness that wasn't rewarded with a satisfactory result. -
Desaturating A Layer …
Dr_No replied to Dr_No's topic in Pre-V2 Archive of Affinity on Desktop Questions (macOS and Windows)
Wosven … love the textures you've used in that example. Quite nice. I'll be studying some of those FX, too. Thanx for the send. Kaffeeundsalz, danke - you're probably right. If I were in Serif's position, I'd probably feel the same way (even tho’ that feeling is at the moment a bit of a bother during the execution phase of the process). -
Desaturating A Layer …
Dr_No replied to Dr_No's topic in Pre-V2 Archive of Affinity on Desktop Questions (macOS and Windows)
Walt, Lisbon, and RichardMH … the technique that finally approximated (but didn't duplicate) Photoshop’s Layer > Desaturate command was a 'kinda-sorta' combination of all three approaches. Easiest method was applying a HSL layer to the image to set a correct value for the ‘look’ and ‘lightness/darkness/texture’, then make it the Child layer. Once the proper values were plugged in, it was possible to click the Parent layer to pick a blend mode to approximate the look and ‘feel’ I wanted. It's not what could be called 'intuitive' by any means; rather more ‘blunt force and immediate trauma’, but it provides the closest match to the ‘look’ I wanted. I can remain hopeful that a true Layer > Desat command will be putting in an appearance in future iterations of the ware, yes? Thanks again to all for your assistance. -
Desaturating A Layer …
Dr_No replied to Dr_No's topic in Pre-V2 Archive of Affinity on Desktop Questions (macOS and Windows)
Hello again, and thanks to all for your contribution to arriving one day in the not-too-distant future at La Soluciòn … and the trip continues (even as we speak). RichardMH: The Majick 8-Ball says ‘Yes’ … NotMyFault: First, thanks for your confidence that I'm ‘mathematical’ (if it's beyond the ‘2+2’ stage, I'm lost). I almost want to flatter myself and believe I'm comprehending the solution you advance, but that would probably be overestimation by a factor of at least 2x on my part. I do, on the other hand, grasp the concepts you present. What I'm attempting to realise in AP is: (a) Base Layer is the color image layer; (b) Layer atop BL (L1) is the layer to be converted from color (let's say it's a sheet of textured yellow paper) to BW. Goal: Remove (desat) all yellow from (L1) without rasterising to convert it to greyscale and then use Blend Modes to adjust its FX on BL. If I HAVE to rasterise the layer to achieve that, well, I'll have to rasterise the layer, yes? Please advise … Walt: Thanks again for your input. I'll assume that the term ‘adjustment thumbnail’ = ‘target layer’, yes? If that assumption is correct, then I should (extending the ‘textured yellow paper’ from above) click on the ‘TYP’ thumbnail to force-present the dialogue, and select ‘Merge’, yes? That seems to be worth a try. Best result is that it works, yes? Thanks again to all … I'm off once more To See The Whizzard … -
¡Hola, amigos! Yo soy – ? – ‘bien’ ? That's close enough for government work, right? Right. Today’s Big Question: How You Desaturate Dem Layer What Got Dem Color In It, Hah? A simple question asked by a Simple Mind. Please ’splain me where I can find a simple equivalent of the Photoshop command Layer > Desaturate to remove color from a layer so that it becomes black and white and still responsive to Blend Modes. I've tried the HSL panel with spotty results. If HSL FX is applied as a PARENT layer, it functions marginally well. When the HSL FX are applied as the CHILD layer (a/k/a 'mask'), it's a whole ’nuther story. At that point, any ‘finesse’-ness is gone. Adjustments made to the Child mask layer do not play nice with the Parent layer above. Insofar as experimenting with other FX (live or not), I continue to come up empty. HSL appears to be as close as I can get to where I want to be, but it's half-a-league, half-a-league as regards color removal with xparency FX and blend modality intact. In a perfect world, there should be a way to electronically tell the ware ‘Hey! I want the color removed from this layer. Just do it, ’kay.’ … but if there is such a method, I haven't yet found it. Oh please oh please oh please … Prithee, envelop me in thy Secret Sauce which removeth Color from a layer so that it majickally becometh un Noir et Blanc (and the Blend Modes are still next door). Thanks in advance to all.
-
Zero-Point Snapping …
Dr_No replied to Dr_No's topic in Pre-V2 Archive of Affinity on Desktop Questions (macOS and Windows)
Just a quick follow-up to all who responded: thank you for your input. I have since tried the ‘no-Option-drag’ solution and … VIOLA! - like majique, everything automatically snappeth to place! The old Adobe Trick of Necessity (AI & PS) which involves using the Option (Alt) key just isn't needed here - and that's nice. Simpler is always better(-er) …- 5 replies
-
- 2
-

-
- zero point
- snapping
- (and 1 more)