

lacerto
-
Posts
5,768 -
Joined
Posts posted by lacerto
-
-
1 hour ago, thomaso said:
Oh, this would be a change in V2 towards V1, below a V1 example with PDF 1.7.
What do you mean? I now compared this with v1 (1.06.1665), and the only difference seems to be that version 1 apps upscale in PDF/X-3 also when NOT forcing the image color spaces to CMYK. I first thought that this happens because Affinity apps convert images to CMYK when using PDF/X-3, no matter whether using the "Convert image color spaces" option or not (even if the images could stay in RGB color mode). This happens both in v1 and v2, and probably because PDF/X-3 does not allow live transparencies, and as Affinity apps do transparency flattening by rasterizing, Serif has obviously chosen to do CMYK conversion anyway (also for objects that do not contain transparencies).
As for inadvertent upscaling of vector cropped (masked) images, version 1 and 2 apps seem to behave identically.
EDIT: Note that I have so far tested this only on Windows versions, so there might be differences between platforms.
-
The most likely cause for having -- inadvertently, but by (bad) design) -- upscaled placed images is using the Crop tool to crop images, since a masked image will be upscaled to document DPI (or to specified export DPI) when exported. To fix this, use a clipping mask, instead (clip the image to its desired size by enclosing it within a rectangle with no attributes).
To demonstrate this, the camera on the left has been cropped by using the Vector Crop Tool (creating a mask), while the camera on the right has been cropped by using a clipping rectangle:

When exported to PDF, the right side has kept its initial size and 39PPI placed resolution, while the left side has been blown out, and has accordingly become blurred.
I have sometimes noticed that Affinity apps might inadvertently upsample placed images simply by having chosen a PDF/X-1a-based export method, but have not been able to reproduce this consistently, so there is a specific situation that triggers this behavior.
EDIT: Wrong, it does it consistently when using PDF/X-1a export method, which forces conversion of RGB placed images to CMYK. It does it also when using PDF/X-3 and manually forcing conversion of image color spaces (using PDF export settings). Oddly (but luckily), it does not do it when using PDF/X-4, or any non-PDF/X-based export method, even if forcing CMYK conversion.
It is clear that upsampling should never happen automatically so I consider this a serious error in a page layout app.
UPDATE: To answer your question: make sure that you do not have placed images that have been cropped by Vector Crop tool (or masked), and make sure that you export using a non PDF/X-based method, or if using a PDF/X based export method, use PDF/X-3 without forcing conversion of color spaces, or use PDF/X-4 (with which you can force conversion of color spaces). If you are forced to use PDF/X-1, or PDF/X-3 and have all CMYK color space (and do not want to have increased file size), and do not have anything in the design that is rasterized at export time, force using a low DPI setting (matching the PPI of the image that gets inadvertently upsampled) when exporting to PDF [EDIT: Note that if vector cropped image is the issue, export time DPI does not affect this; instead upscaling will always happen at document DPI resolution, so to use this trick, the document DPI needs to be changed before exporting]. If that is not possible and the file size does not matter, enlarge the image using an algorithm that does not cause blurring so that Affinity app does not upsample the image at export time. If nothing else helps, create a smaller design and ask the printer to enlarge it.
-
The way Designer document is embedded does technically create a transparency group that the preflight software detects as a possible issue (and obviously also a factual one, if it results in an erroneous flattening and knockout, even if it is nominally marked as a non-knockout, i.e. overprinting, group):
My experience is that Affinity documents should never be embedded in print jobs, they have complexities that do not show in PDF previews but can cause problems at print time when the job gets processed and flattened (rasterized). It is kind of a theoretical question "who's to blame" (whether a document is correctly created and just erroneously interpreted and processed), so to avoid problems, it is a good idea to keep things simple and avoid embedding of documents that can cause confusion, or more generally, anything that requires print-time resolutions (at least if ripped proofs are not available).
-
Here's additionally a clip of a real-life palette-conversion job (from a Corel .XML spot color palette to an Adobe .ASE spot color palette).
-
-
2 hours ago, loukash said:
Wasn't it more about overprinting?
Sorry, I seem to be confusing -- or perhaps there was a thread once where both spot colors and overprinting [in context of gradients] were discussed, and really weird workarounds were invented!
-
1 minute ago, loukash said:
we can't have global gradient swatches.
No, we can't. Nor can we have child tints as swatches that retain their dependency on a parent swatch.
-
Just now, loukash said:
By the way, at least you can use spot color swatches in gradients.
Yes, the workaround you have demonstrated works but is very convoluted...
-
-
1 hour ago, walt.farrell said:
That sounds like a bug which should be reported if it hasn't been already.
In a way it is useful to have it both ways (and have a universal license), to be able to force process colors. But I suppose the code is meant to behave identically on both platforms.
-
I am not sure if I understand what you are trying to achieve, but true duo/tri/quadtones with special inks by applying different inks as defined e.g. by a tone curve cannot be done within Affinity apps. You could simulate something like that by e.g. applying one ink for a grayscale image and then using shapes with e.g. Multiply Blend mode on top, using different inks, and getting their intensity values from the underlying image. I have no idea why non-PANTONE-based special inks are required but technically you could specify and use inks from different spot color systems.
-
I do not know which of alternative spot color palettes are really in public domain and/or freely distributable, but technically it is possible to "borrow" complete spot color libraries from e.g. Adobe and CorelDRAW, the latter of which coming with mostly Lab based representation color definitions in 53 spot color palettes for e.g. the following spot color systems: DIC, Dupont (Spectra Master), Focoltone, Toyo, HKS, Onyx, PANTONE (legacy and current 11 different) and Roland. Munsell and Natural Color System should be available if not free, then at a nominal fee.
It is possible to manually create any spot color palette within Affinity apps and pick official color names and their (typically sRGB based) representation colors directly from manufacturers, and digitized palettes are available for some color systems, e.g. in .ASE format. For some reason it appears that at the moment only macOS versions of Affinity apps can import .ASE palettes containing spot color definitions. On Windows, spot .ASE palettes are imported as process color swatches. If spot color palettes are needed on Windows, they can be ported from macOS by exporting them as .afpalettes and then importing to Windows.
VectorStyler can open multiple palette file formats, including Corel .XML, Adobe .ACO, .ASE and .ACB, and export them to .ASE (which can be opened in Affinity apps). Anyone doing palette-based color definitions a lot, or depending on spot color production, would do well getting VectorStyler.
-
7 hours ago, SpotColour said:
@thomaso mentioned that the white rectangle’s corner radius differs from the cut contour line radius. That is correct, and I have been looking for a stray element in my design, but it’s not there.
Perhaps there is one, but without an attribute. The cutting line might have been created by using a defining line with an outside aligning stroke, as the kind of shape that got clipped out (the white rounded rectangle), when using certain rounded corner angle, creates pretty closely a shape where the outer edge defines the cutting line.
What actually happened, is not clear, but knowing that Affinity apps will auto-expand non-center-aligned strokes could easily result in multiple cutting lines, once merged shapes get separated. Perhaps something like this happened during processing, even if visual appearance of the design seemed to be ok. -
26 minutes ago, thomaso said:
I'm wondering if the break at the bottom of the cutting contour is caused by the logo file being placed above in the layer stack hierarchy... while the corner radius of the outline and the white rectangle are different.
Might be, though it is odd that the printer did not mention about a broken cut line.
The following clip demonstrates a situation where a non-PDF/X-based PDF placed to be passed through will be rasterized when exporting using a PDF/X-based export method, and creates a transparency. This, combined with e.g. outside or inside aligned stroke (causing an expanded fill, instead of a stroke), could explain miscellaneous cutting job errors, including unexpected knockouts when ripping the job.
The "layer" thing might be related to something like opening the resulting PDF in e.g. Illustrator, and seeing object groups, instead of having everything flattened to the root layer..
-
1 hour ago, Hietaharju said:
It didnt render at all, I have attached the output with the corel file.
Thanks. The UI is pretty complex. The Corel version is likely to ignore (at least) part of the element IDs so it probably could not toggle visibility state of object groups even if it were able to display the initial view of the design. If I manually change the opacity of svgcontainer, I can see the drawing rendered for a moment but then it is hidden again.
There might be point in trying to use the Corel-created version as a starting point (since it at least opens in version 2).
As far as I know Affinity apps do not support applying object IDs via UI so if you create this from the scratch, you would need to add these kinds of things directly in the code.EDIT: Not true, at least 2. versions will export the object ("layer") names as ids. But they do not add class names, which makes attribute management more cumbersome. -
Please check two things in your design:
1) If the logo(s) is (are) PDFs and placed to be passed through (the default), they, too, must have been created using PDF/X method, since if you export using a PDF/X method (no matter which version number), the placed PDFs will [though not always] be rasterized (using your document DPI) in Affinity apps, if they have been produced using a non-PDF/X method.
If the logo is an RGB PDF and placed to be passed through, it will be retained in RGB color format when exported, which basically should be ok when exporting to PDF/X-3 or PDF/X-4 (which both allow mixed color modes), but might cause these kinds of issues when processed.
If the logo is a PDF file and you let Affinity interpret it instead of passing it through, please make sure that either the placed PDF has an embedded profile that is ISO Coated v2 300%, or that the CMYK profile under Preferences > Color is ISO Coated v2 300%, since a CMYK file without a profile will get the profile specified in the Preferences as its assigned color profile at the time it is placed in the document (and not the CMYK profile of the document). [But with just pure white objects, this is not likely an issue.]
If the logo is originally a CMYK bitmap, please check that it does not have an embedded color profile, or if it does, it matches your document CMYK profile (which is ISO Coated v2 300%) (if it does not have an embedded CMYK profile, it will be assigned with the document CMYK profile so its original color values will be retained); otherwise its color values will be converted at export time, which might potentially cause problems. [But again, with just pure white objects, this is not likely to happen.]
2) As the cutting line seems to be broken (and because your unwanted rectangle has rounded edges, implying that the cutting line could have been used to determine the shape of the knockout object), please ensure that it has been created as specified: using M100 that is made a spot color and given overprint attribute, and named as required, and the line itself is a center-aligned stroke (and has the recommended width).
-
4 hours ago, Hietaharju said:
For now I have to use Illustrator I guess.
Most probably so. Affinity apps especially have limited capability to interpret SVG, and as demonstrated above, there are limitations in older software (like Illustrator CS6) as for complexity of object hierarchy that is supported.
Btw: did the Corel-created file fail to render at all, or was there mainly just a viewbox / dimension related error: I placed the file in a portrait A4 page and exported the whole page, while the original SVG had pixel dimensions and basically enclosed in a bounding box.
-
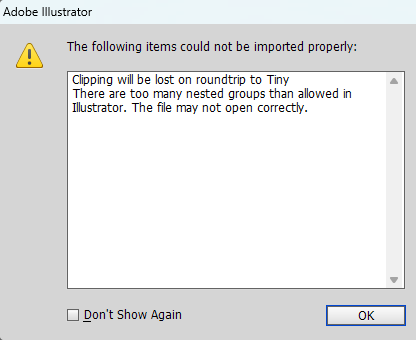
If I try to open or place the SVG file you provided in Illustrator CS6, I get an error message related to too deeply nested groups, and the file displays incorrectly but is opened nevertheless, without anything rendered (but objects being there, so viewable and editable in outline mode).
I can open the file, as you mentioned, in Publisher v1, and also in CorelDRAW (2023 tested). If I save it from CorelDRAW, using SVG version 1.1, Publisher 2 can open it, too (but I had only a cursory look on the file so cannot tell if there are errors in rendering). Illustrator CS6 cannot render correctly the Corel-created file, either (but allows viewing and editing in outline mode).
Here is the Corel-created file for examination:
UPDATE: I subsequently opened your original SVG also in Xara Designer and Inkscape, where they appeared to open correctly (though the former reported of a couple of missing links), but saving as SVG from these two apps did not produce files that could have been opened in Publisher (at all, or rendering all over the place), or Illustrator CS6 (resulting in same error message about Tiny SVG). CorelDRAW 2023 however appeared to open correctly both the Xara and Inkscape created files.
-
6 hours ago, loukash said:6 hours ago, Andy05 said:
I will never be able to reinstall my Adobe suite once I change the system or OS. 😕
Have they turned off the license servers already?
@Andy05 Why so? Do you know if something has recently changed?
I bought a new Windows 11 Pro laptop early in 2022 and on a specific request on Adobe chat support "for reactivation" (there are guys who do specifically just that) and with the help of one of those guys I was able to install CS6 Master Suite on the new computer while they waited to verify that activation works. I had four installations on other computers. The support guy asked me if I want my installation count to be reset to zero, and I did not reject, whatever that meant... I do not know if that had any effect on my subsequent activations and installations of CS6 Master Suite, but about a half year ago I purchased a new Intel NUC on which I installed the same suite (license). I still have old installations on the mentioned four older computers, and I can deactivate the suite on one computer and reactivate on another, as I wish. These are Windows 10 and 11 Pro computers. On one of these computers, I recently experienced an issue with Adobe Acrobat X Pro (part of CS6 suite), but managed to resolve this issue by downloading a cleaner tool from Adobe web site, and then reinstalling just Adobe Acrobat Pro from the suite. So I do not feel being let down by Adobe -- but as far as I know, they offer activation help
only with CS6 suite (and not e.g. even with 5.5)[EDIT: According to the link referred above to Adobe site activation support seems to work for versions CS5 and later, but I am not sure if they offer live chat support and activation count reset service for versions other than CS6, so not being able to deactivate because having broken computers would likely be an issue.]On the new NUC I also managed to get my old QuarkXPress 2018 activated. I had it installed and activated already on the allowed max two computers, the other being a virtual Mojave macOS on my old Dell laptop. Here, too, I had support personnel on live chat, and while QXP2018 is already out of support, they promised to reset the installation count if I failed to get it deactivated on the mentioned virtual mac. That worked, and even if QXP 2018 is not officially supported on Windows 11, it seems to run just fine on it.
Adobe CS6 Suite is now over a decade old software and runs without issues on both Windows 10 and 11 (we have two licenses and four computers where the whole suite is activated and run professionally all the time). Based on recent experiences, Adobe activation servers are still operational (with CS6, for which we have two licenses), so one can deactivate on one computer and activate on another.
I also just used a Black Friday offer to upgrade my CorelDRAW Graphic Suite from 2017 to 2023 (perpetual license, for both Windows and macOS) at about EUR 350 (VAT 0), which is nice to have in its own right (we had already version 1), but also to be able to use newer features not available e.g. in Illustrator. Photoshop and Microsoft Office are currently the only subscription based apps our family company uses, and we hope to be able to keep it that way during the remaining time of our professional careers.
-
Regional formatting is very complex already in Excel, and is made further more complex by applying custom regional processing in the client code:
As can be seen above, it is possible to create custom date formats that work fine within Excel (at least on a system that uses the regional settings of the computer where these formats were created), but when this kind of an Excel sheet is passed in to Affinity Publisher, the values returned by Excel are discarded, and instead the date formats are processed using client code. At first it seems that formatting is taken from the operating system regional settings, but they are not. E.g., Finnish long date system format would give in Windows 11 "perjantai marraskuuta" for something like DDDD MMMM (in Finnish notation pppp kkkk, instead of "perjantaina marraskuuta", which seems to be an older Windows regional setting that was achieved by adding 'na and 'ta literal suffixes in regional date formats). And the custom US English date formats that should only give short and long days and months, in Affinity give short and long full dates including years, but not weekdays, like Nov 24, 2023, or full dates like Friday, November 24, 2023:
This is a nightmare that will probably never be fixed, and at least not across platforms, so it is clear that formatted data should be passed either as literal or custom lookup values, or by using e.g. custom functions that return literal values.
With lookup tables:
UPDATE: I had not tested this previously, but have now verified that custom VBA functions ("macros") written on Windows work fine also on macOS (Sonoma 14.1.1 tested) Excel (latest version), and when used in Publisher 2:
The same screenshot also demonstrates the problem related to "internal formats" which on macOS seem to be dependent on the user account's display language (rather than regional settings), but on Windows appear to be dependent on regional settings (I have US English as the display language also on my Windows computer, but have Finnish regional settings on both computers; my Office apps are also in US English on both platforms).
-
6 hours ago, loukash said:
The main reason being how PDFlib handles transparencies, layer effects and adjustments: poorly, i.e. it goes by "if in doubt just rasterize everything".
One big reason for bigger production file sizes is that Affinity apps miss the InDesign option for "Automatic (JPEG)" compression, which means that the program [i.e., InDesign] determines the compression / quality ratio by analyzing each image and varies the compression rate according to image properties. Affinity apps, by default, need to use very high quality setting of 98% for ALL images, to avoid an issue where a random (lower-quality) file, when compressed, will show clear artifacts. Affinity apps also miss separate handling for color, grayscale and monochrome images (the last mentioned are not actually even supported in Affinity apps).
-
I have not found a way to place multiple pages from a PDF in a satisfactory way (I have only tested the 2.2.1 Windows version). There is often a small positional error even when using snapping to the guide lines (or page/spread mid point), and it does not seem to be possible to determine the page box beforehand, so it will always be TrimBox, no matter what setting was last used, or what method an already placed PDF uses (also, I am not sure if the placed pages are supposed to replace existing items on a page, if the Replace box is checked, but this does not happen at the moment).
Accordingly, it seems to be faster to place one page or spread, make sure positioning and page box are defined as wished, add the number of pages needed, and then copy paste an existing page or spread onto successive pages and use the Spread box to determine which pages should be placed on each spread.
-
1 hour ago, EatMoreBacon said:
I will need to use codes that I find and replace after the merge?
Yes, if you use 2.x versions.
1 hour ago, EatMoreBacon said:Or is Alt 010 something that can be inserted in Excel?
No, Num keys do not seem to work in Excel cells (basically using CHAR code or ALT+ENTER does the same within an Excel cell).
-
10 hours ago, R C-R said:
that seems to be a trend for other companies as well, like with Apple's obsession with hiding things until they are rolled over
When I recently cleaned my MacBook Air and clean-installed Ventura, then upgraded to Sonoma, I noticed that when using Apple Magic Mouse (which effectively also hides mouse buttons, and enables "secondary" button only by a non-default user choice), auto-exposing scroll bars on mouse-over event does not work!
Fortunately they still offer "always on" option for having these oh so highly disturbing (very narrow and dimmed) UI elements visible as part of the (still visible) window contours!
On the other hand, that tendency seems to be balanced by offering title bars that are a kind of a UI joke. There is so much crammed activity on modern app title bars (especially on Windows), that there is barely room for the title itself, or grabbing and moving the window (some apps allow doing that by a way of grabbing a control that exists there, some by grabbing a random narrow empty spots that exist between these controls)...
Both these tendencies (excessive minimalism and excessive clutter) cause usability issues, but at the same time, also appear to be work of UI "specialists" whose job it is to develop UI, rethink and improve the "user experience", and they seem to have the final word.
Yes yes: grumpy old guys complaining because of bad eyesight and shaky hands not willing to learn any new things 🙂


APub: How to stop upscaling images on export to PDF?
in Affinity on Desktop Questions (macOS and Windows)
Posted
Yes, and the same is true with version 1 (1.10.6.665, Windows version tested). So versions 1 and 2 seem to behave otherwise identically but v1 apps also upsample when using PDF/X-3 (whether forcing conversion or not). Version 2 apps only upsample if color space conversion is forced (which is kind of silly because RGB images will be converted to CMYK within PDF/X-3 whether having this setting on or off).