lacerto
-
Posts
5,768 -
Joined
Everything posted by lacerto
-
II might have misunderstood something, but I have not been able to reproduce a situation where 8-bit vs. percentage values have any significance in managed/unmanaged color conversions, or inadvertent redefinition of swatch definitions (they just further complicate the way color values are displayed). Lock does not have any effect on this behavior, either, in any other control than the Color panel, where it prevents color definition from changing if the color model is changed (if the lock is turned off, simply just switching the color model will redefine the selected object's color into the color model switched to). In context of Swatches panel color editor (drop-down control), color values displayed are unmanaged in 1.x and 2.04 versions, and managed in beta, no matter whether 8-bit or percentage values are shown, and in versions 2.04 and beta the swatch definition will inadvertently change to whatever color model is used in the swatch editor drop-down, whether the lock is on or off. It happens immediately when the editor is opened, whether color model is changed or not. In 1.x versions this does not happen so there the user must type in color values, or touch the sliders, to cause redinitions. Switching the model in the Swatch editor does not change the definition, either. None of this (non-managed conversions, or inadvertent redefinition of colors) happens in any of the mentioned versions on Windows. But in all versions and all platforms, the user can re-define swatch color definitions by using the Swatch editor by typing in values or using the sliders. IMO this should be made more difficult (since even without the glitch in 2.x versions on macOS, it is too easy to make "inadvertent" changes), either by offering a mode where editing is allowed, and then requiring a separate operation where the made changes are saved to the palette (e.g., in context of switching the palette, closing a document and having edited any of the document palettes, or closing the app and having changed any of the application palettes), or perhaps by requiring the confirmation as per swatch (similarly as deletion is confirmed), which would of course make massive editing a bit tedious. Or, by doing the same as when a color is picked from a PANTONE palette: copying the swatch definition into a document palette rather than allowing editing the original definitions in the palette from which the color was picked. UPDATE: This error has not been fixed in the 2.1.0 release version of the apps.
-
Ok, thanks, so basically native graphics, then. Perhaps involvement of the brush pack might then explain the attribute confusion.
-
The design is possibly an imported IDML template created for InDesign so the objects involved are not "native" in that sense and their attributes are somehow confused. The affected lines are originally probably true vector brush strokes which are converted to a bitmap based Affinity vector brush. Though this is technically one curve object, its locking resembles that of a group of objects each having an individual locking state which cannot be changed, either, by changing the locking state of the parent object. Applying Unlock All or Divide (or copy pasting) "normalizes" the object and as a side effect corrects the attribute confusion.
-
The curves forming the dotted lines can be unlocked either by choosing Layer > Unlock All, or Layer > Geometry > Divide.
-
i do not think that it is possible in InDesign, either (not at least in CS6): even when forcing conversion of color space to pure gray, the print marks (crop, bleed, registration) are always tagged with "Registration color" (similarly as when exporting from Publisher). Grayscale bar is also always registration color (10% black is C10M10Y10K10). Only the color bar is in DeviceCMYK. So I guess you are right: if registration color is problematic, it is likely that print marks are not wanted. EDIT: Being tagged as "Registration Color" would of course mean that when separated and K plate only is output, the print marks would print correctly as K-only, together with "DeviceGray" art. So they should not be problematic in any case (expect for a brain-dead preflight routine).
- 14 replies
-
- 1
-

-
- bug or issue
- colourspace
- (and 1 more)
-
Thanks for the additional information. Yes, I think this happens (or at least used to happen) also on Windows. It may be that something similar also happens in 1.x and 2.04 versions on macOS when the swatch editor is opened in CMYK mode (to edit an RGB based swatch): the CMYK values are oddly off (not converted according to color profile environment). in 1.x versions the underlying swatch values however are not changed unless the user touches the slide controls or types in values in color boxes. In versions 2.04 and still in the latest beta, the color definition is saved to the swatch simply by opening the color editor (double clicking the swatch), or switching the color model, the difference being that in latest beta the color is now initially correctly converted, according to the active color profile environment. It is odd that this behavior is not experienced on Windows since typically the underlying code seems to be logically identical. Perhaps there is something OS control specific, since it does not seem reasonable that there are residues of some simplistic formula based abstract color conversions left in macOS versions of the apps (at least up to 2.04 release version), but not in Windows versions. Though it is basically fine to allow editing of document and application palettes, the apps would benefit greatly if they made a distinction between "working palette" (the kind of document palette used e.g. in InDesign or Illustrator) that gets automatically or manually updated based on colors used in the document, and which keeps the (global) assignments. This palette could then be freely edited (with improvements, like with ability to assign to another color in context of deleting a color), while editing of secondary document and application palettes -- even if not file-based -- would by default be disabled. Editing could be allowed but the resulting color definition would be automatically added to the working palette (a bit similarly as when adding a swatch from read-only PANTONE palettes). The apps could perhaps allow editing of secondary document and application palettes, too, but that would be an explicit act, and changes would need confirmation. This way it would be safe for users to import "library" kinds of industrial palettes like RAL, additional PANTONE guides, NCS, DIC, Toyo, TRUMATCH, HKS etc., and also miscellaneous shareable user-defined palettes. Typically color values of all these kinds of palettes are not wanted to be touched in context of usage, but it would nevertheless be fine if Affinity apps could be used as palette editors on demand, and edits would be confirmed. Since changes are saved only within Affinity apps, the original import files would never be affected. Sharing is currently limited to .afpalettes. but should ideally be improved to cover at least the .ASE file format export. UPDATE: It just occurred to me that e.g. Windows API (native 32-bit) requires color management applied manually to UI controls, and not all control types can be covered unless using custom ("owner-drawn") paint routines. This would mean that part of the UI controls would be guaranteed to behave differently than a complex color-profile based color management used in graphic design apps, or possibly left totally unmanaged (the kinds of things we have seen e.g. in context of applying color to pixel layers selected with vector shapes, or at some point, saving "CMYK" PNGs (technically impossible but if "done", the "management"=raw conversion would be left to the OS) . Perhaps something like this has happened on macOS (and still may happen with mini-editors within controls on both platforms). Windows has always been poorly color managed at OS level (e.g. in context of File Explorer) but might provide robust color management in context of modern frameworks.
-
I don't know what this should be called, naive conversions or what. I am not sure if this specific issue has anything to do with conversions, it appears to be just sloppy macOS UI programming. I cannot reproduce this behavior on Windows versions (latest 1.x, 2.x or beta). It seems to be somehow related to refresh issues. In 1.x versions the swatch specific CMYK sliders are not updated at all (RGB based are; have not checked other models), in 2.04 they are updated once the color is assigned to the object and it gets repainted (on second assignment), in latest beta there is some issue with RGB color model getting updated (possibly just on model). I am not sure if it is getting closer --perhaps it is now close enough 🙂 colorcontrols_refreshissue.mp4 Btw, the behavior is not palette specific, it can be reproduced with any palette. 2.x versions introduced some new refresh issues related to color assignments while also fixed some other. I am not sure if the problem described by @Hangman is also related to screen refresh issues, but I could not reproduce it on Windows versions. UPDAtE: No, it's worse than ever (on macOS): as Hangman described, the swatches now get inadvertently redefined in selected color model, hence the shift of RGB color definition shown in the video above when using the latest beta and CMYK sliders. Might a programmer palaver be worth an effort (the Windows guy at least understands the logic)? I do not think that the internal color values of library palette based swatches should ever be changed. Their CMYK/RGB definitions should stay within the original color scope and not fluctuate based on whatever color profiles are currently in effect. UPDATE2: These are basically all consequences of bad initial design of color palette functionality. Editable swatches should be clearly separated from color definitions of saved palettes, and at least saving should be made an explicit operation.
-
Have you tried DxO PhotoLab (Windows & macOS)?
-
In case one ends up being in a situation like this, and images not positioned as inline or pinned are involved, there is basically no other way to resynch than doing part of the layout again, e.g., reflow the text and resize images until the text and images reach the original synch. That is because a design that is laid out as spreads typically has object positioning where it matters what is on the other side of a spread so one normally just cannot push layout forward and expect that everything works. But if it really does not matter on which side of a spread laid out content resides then in Publisher it is possible to select objects simultaneously from multiple pages (something that cannot be done e.g. in InDesign), which makes it possible, even if a bit tricky to fix a problem like this and reposition the objects on "wrong side" of a spread and have them aligned correctly with mirrored margins, basically just in two moves. With long documents, there might be some problems with real estate (like on the video where I do this remotely on a Windows computer but viewing the pasteboard through a 13.3in MacBook Air peephole. So unless working with a desktop display it might be a good idea to do this in batches to make selection of a desired page area a bit easier (I am using the info box showing the number of objects selected to determine that I have objects on the left or right side of spread selected). fixaddodd.mp4
-
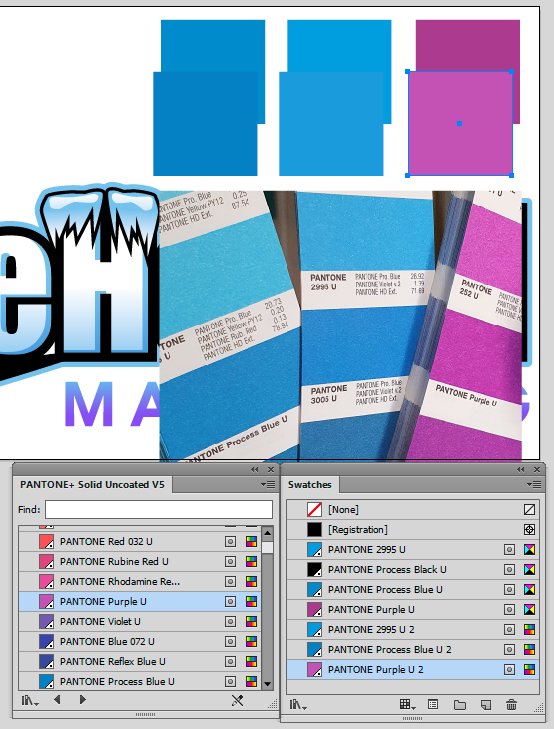
I had yet another look on the design, based on my comment above related to inability to reproduce properly the bright cyan of the logo. As two of the defined four spot colors, PANTONE Purple U and PANTONE Process Cyan U, were not effective (even if present as zero tints), and process Cyan and Magenta (or their equivalent RGB definidion) were used instead, I assume that what had happened in the design was that the tones of the design were originally planned to be reproduced in richer gamut PANTONE inks, especially the "icy blue" for which PANTONE 2995 U was chosen, but the purple-violet tones for which PANTONE Purple and PANTONE Process Cyan were initially selected were later replaced with standard process inks cyan and magenta (which actually produce these tones better and at least more predictably). There were additionally a couple of other issues, probably Affinity introduced, resulting in that the black marked with PANTONE Process Black U was overprinted (also when used as 0% tint) so general overprint setting for K100 had to be disabled in export settings. Additionally there was a transparency setting used in one instance that had to be replaced with a tint to avoid rasterized objects. With these changes, and globalization of the remaining RGB definitions, the design can be reproduced pretty well on paper, and easily also modified (to adjust the violet-purple area of the design), using just one spot color (PANTONE 2995). In addition, C, M and K are used as standard inks. IceHound Marketing 2021_reconstructed.afdesign IceHound Marketing 2021_reconstructed_cmyk.pdf
-
I did an exercise with redefining PANTONE spot color swatch assignments as global RGB swatches, and also making all non-swatch based RGB assignments global, It is not too bad. Part of the colored objects can be selected with Select Same command, but many objects with gradient fills need to be handled one by one. The design is not very complex though, so perfectly doable. But compared to simplicity of the same job in Illustrator, one badly misses the ability to switch between spot and process and automatic creation of global (linked) color swatches just by selecting the design and adding its colors to the Swatches palette. IceHound Marketing 2021_globalized_rgb.afdesign Here is also an sRGB and CMYK (PDF/X-1a:2003) export of the design, showing clearly the degree of desaturation, but the exact tone of the purple/violet color cannot be reproduced accurately even in standard PANTONE spot colors (using e.g. PANTONE Purple would exaggerate the effect) so this is pretty much best that can be achieved without special inks and experimenting mixing special inks and process colors (e.g. by shading with black). IceHound Marketing 2021_rgb_globalized_rgb.pdf IceHound Marketing 2021_rgb_globalized_cmyk.pdf BTW: After having had a closer look on the original AI file (which possibly was not opened completely correctly since I have CS6 and the design was created in a later version), the only PANTONE spot color that was effectively used was PANTONE 2995 U, which is a kind of cyan that cannot be printed in basic process colors. The spot black could basically be replaced with standard process black. The purple in the lower edge defined in RGB (which would effectively convert to C and M) could be produced reasonably well with process colors but in the current design it mixes partially with a gradient composed of 2995 U which makes the lower part more violet than purple (reddishness that shows in RGB is lost). But the job appears to be really designed to be printed with just one PANTONE ink (2995 U), while the presence of Purple and Cyan as spot inks do not have practical effect. But to get the reddishness, a mix of process cyan and magenta does a better job than using PANTONE inks. But if reproducing the bright cyan is important, the logo should be redefined so that the RGB global is replaced with PANTONE 2995 U, and the RGB black with which the blue creates a gradient, with K-black or PANTONE black, that is: with a a black that is produced in one ink only).
-
You're welcome. However I need to correct myself: global colors are not imported, it is just that spot colors, which are imported, are automatically also global, but there is no link to tints (children) so it is pretty much useless.
-
Yes, it can, both, it just does not automatically create swatches, and you need a swatch assignment to maintain global behavior of a color (but spot colors will export as spot colors):

-
It is not basically necessary to do that since if you open the design in RGB mode and export to RGB digital mode, it does not matter if there are spot colors amongst color definitions. You can also uncheck "Honor spot colors" when you export to automatically convert the spot inks to process colors. But if you want to change the color definitions in the design and still have Illustrator, the easiest way to do so is double clicking the four spot swatches and simply just change their status from spot to process (and RGB or Lab). This shows all color definitions that you have in the design: and here is an .afdesign file where all spot colors have been converted to process RGB: IceHound Marketing 2021_rgb.afdesign If you would like to do the same in Affinity apps, you would create all four Pantone swatches and their RGB equivalent swatches and then create objects with PANTONE swatch fills and outlines and use Select > Select Same > Fill Color (and again for Stroke Color) and assign the found objects the equivalent RGB swatches.
-
I think that PANTONE Solid Uncoated has been used as a "nice" palette, just to pick colors. There does not seem to be much point in mixing inks and process colors in gradients. In addition to that, RGB color mode has been used in design and spot colors chosen from a palette that is targeted for uncoated print stock, and to further complicate the mix, the PANTONE library used was a legacy palette with CMYK definitions, rather than with Lab definitions. Just for the reference, here is a comparison (the upper row shows the original swatches using CMYK-based PANTONE library, and lower row the current Lab-based swatches, below them a photo that I took from an actual printed color guide: So color accuracy, as regards matching the colors with PANTONE system, has not been the primary interest of the designer, but because the logo has been created in RGB color mode, brightness of e.g. purple is certainly intentional, and that will desaturate in most CMYK color spaces when printed in process colors. Therefore I would keep the logo in RGB color space and just convert all PANTONE spot colors to RGB process (that is easiest to do in Illustrator), and just export to whatever CMYK color space needed. In some circumstances a hint of purple would show on paper, but most of the time it would come pretty desaturated. If PANTONE Purple is really wanted the logo design should be fixed so that gradients are correctly defined in PANTONE Purple (tints towards white) without process color steps.
-
Sorry, I did not realize that you did not have Publisher. You can then use any vector shape as a clipping object and make it basically behave as if it were a Picture Frame, though to scale and position the contained image you would need to use the Layer panel to select the image layer, and might need to toggle the Lock Children option on the context toolbar to achieve what you want, I also realized that you can use the Fill tool to position and resize an image that has directly been converted to curves and then shaped with Boolean operations (which causes the placed PPI to be changed to one of the document DPI, and typically being enlargened within its containing object) so even if you cannot e.g. see image meta data (like its PPI etc.), you can still resize and reposition the image within its containing object, and manipulate the container object as you wish. The original image quality is also retained. Boolean_Image_AD.mp4
-
Sorry for not being able to be less confusing: the concept of (Image) and (Pixel) layers are a bit non-intuitive in Affinity apps, but fundamental. I was trying to show ways to encapsulate an image layer (e.g. a photo placed in a Publisher document) within a vector object so that you can perform Boolean operations like interchange on the encompassing vector object rather then on the image layer itself, and without using workarounds that cause rasterization of the shaped photo. One alternative would also be converting a placed image layer into a Picture Frame layer (Layer > Convert to Picture Frame) and then shaping that (similarly as was done on the video, though there an external photo is placed into an already created Picture Frame) -- and if wanted, convert the resulting Curve layer back to a Picture Frame for easier positioning and resizing of the contained image. This way you would also avoid the kinds of sizing issues that you would typically experience when converting image layers directly to curves (and then performing Boolean operations on the curved image). Converting an image layer to a Picture Frame would reset the PPI (effective pixel per inch value) to the document DPI value (e.g. 300 ppi), but you could easily resize the image within the frame by using the scale control. That is, you can manipulate the frame in any way and yet maintain the control of the contained image size and location, because the image stays encapsulated within the frame. Whichever way you encapsulate the image layer, the point is that its pixel information stays unchanged so you work non-destructively, without deteriorating the image quality.
-
You can work with an image in non-destructive way, not changing its original resolution, and use Boolean operations (like subtract or intersect) on the encompassing curve (shape). If you convert the curve to a Picture Frame, you can move and resize the contained image easily -- you can do so without using a Picture Frame by using a curve object for masking or clip masking, but then need to toggle the child-parent lock to have similar functionality. boolean_with_image.mp4 Try to avoid working with pixel layers, or converting images directly into curves, or turning pixel layers to images (using the menu command, or using the Clipboard trick) just to get the ability to shape a photo or other picture type. Note, too, that you can first create the framing shape by using any vector tools available, and once ready to place a contained image convert the object first to a Picture Frame and then just drag the image content into the Picture Frame (you can drag images directly from the file system or Stock Panel, or drag images within the document or Layers panel into a Picture Frame control in the Layers panel).
-
Great, I had totally missed this feature!
-
You can use the Style Picker Tool (instead of the Color Picker Tool or Color Picker of the Color panel), to pick (copy) the original (untranslated) color definition of another object to be applied to selected object(s), but that would copy all attributes of the source object (and attributes of both fill and stroke), so not restricting just to color.
-
Outlined text problem
lacerto replied to Adit's topic in Affinity on Desktop Questions (macOS and Windows)
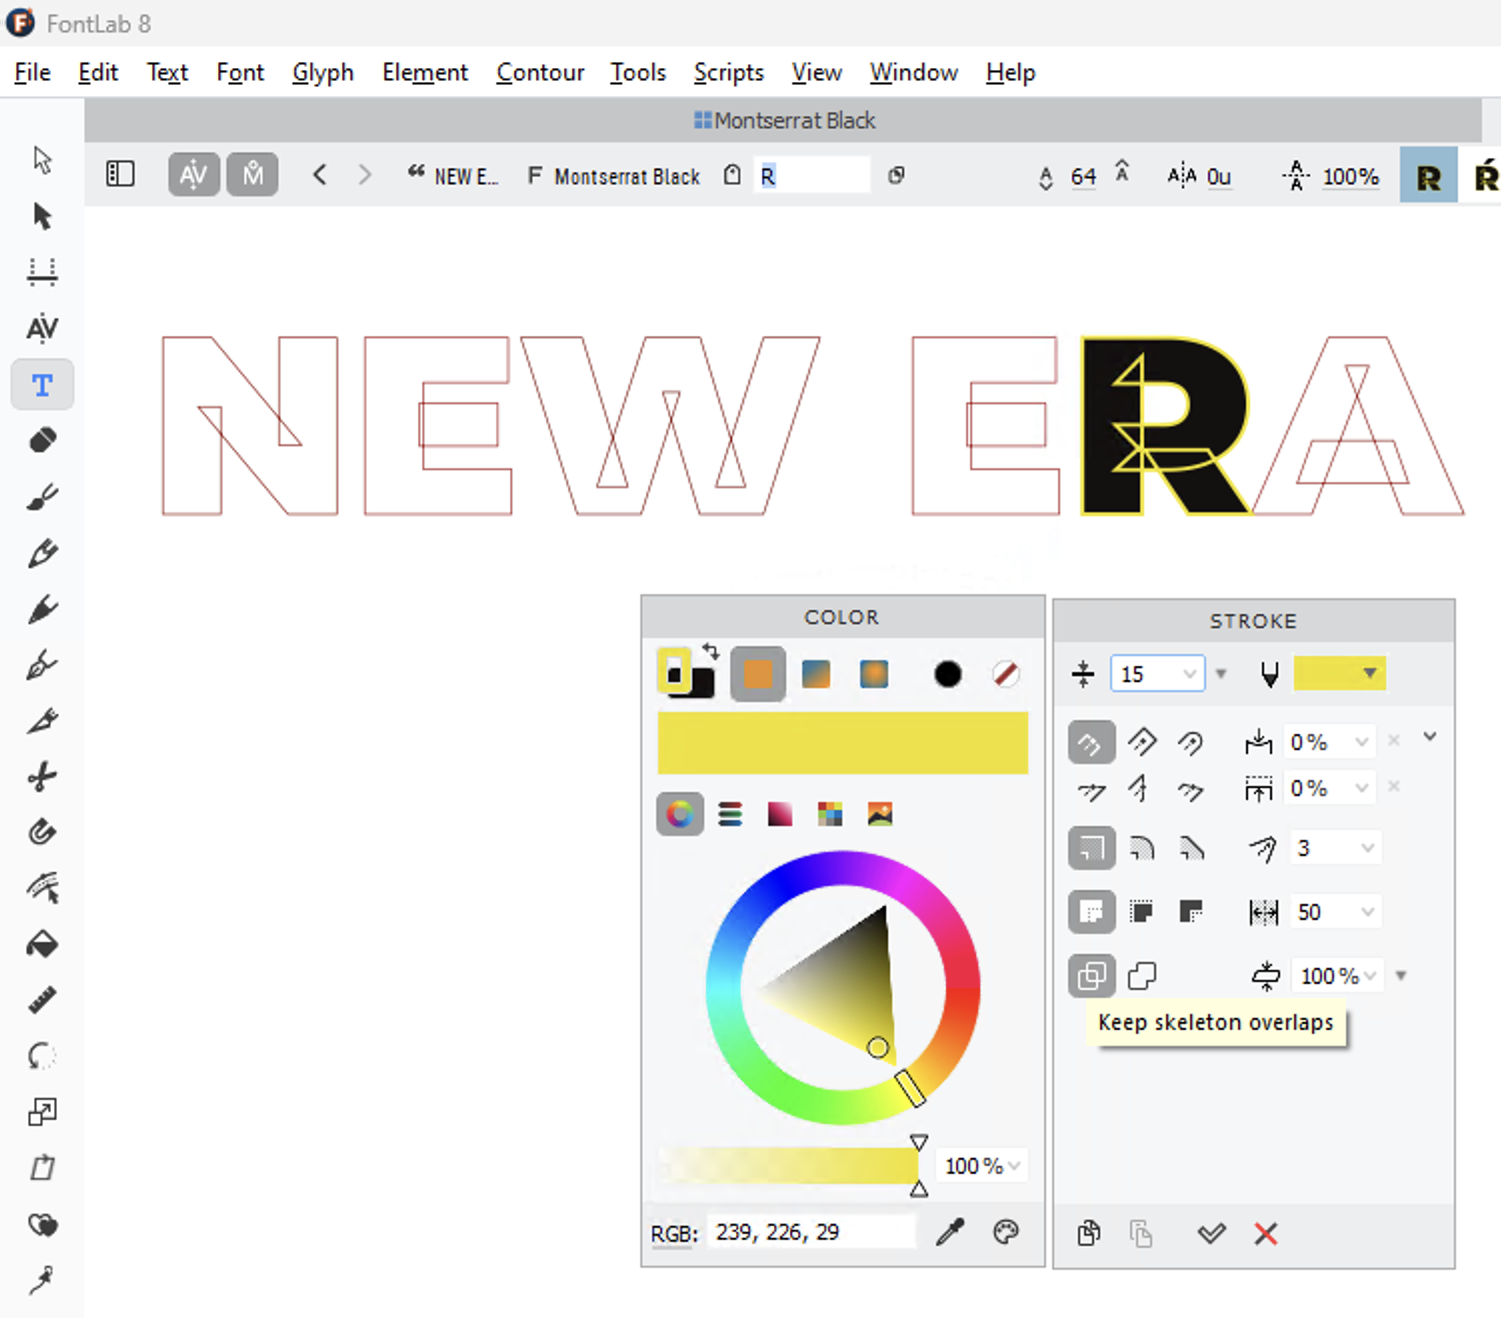
I installed version 18.2.1 of InDesign and yes, it can render these fonts without issues, so it seems that Adobe apps have been able to do so for some years now (possibly starting from late 2019 when support for variable fonts was implemented in InDesign). No, I was just sloppy when testing. There is no change from CS6 versions, it is just that if these problematic glyphs have a fill, they will be rendered correctly, not showing the overlapping outlines. If the fill is removed, they show also in the latest versions of Adobe apps (InDesign and Illustrator at least; as mentioned Photoshop handles text outlines differently and does not have this issue), both when using variable and regular fonts: Affinity apps by default draw the stroke in front so they would show the crossing outlines also if there is a fill, but this can be changed by using the Order option of the Stroke panel. EDIT: The behavior shown above in InDesign with filled text only works when using outside aligned stroke. If using center aligned stroke, the strokes would show similarly as in non-filled text. Affinity apps can avoid that by changing the paint order but when using other than the outside aligned stroke, the stroke width would of course be affected (e.g., half or all of the stroke would be covered by the fill color). EDIT2: There is also another consideration and that is whether a graphic design app, capable of converting text to outlines, should actually (by default or at least optionally) honor the original design, using the exact construction of the glyph outlines and control points? Could the designer intentionally use crossing outlines in a way that causes an effect shown above in letter "W", and that would show also in filled letter when using center aligned strokes? Perhaps not in letter shapes but e.g. in symbols? Is there a property (meta data, instruction) that allows the designer to indicate whether such shapes are to be removed when rendering the font, or honored? So far the only app that I know that can actually remove these "artifacts" and that allows full control of stroke (width, alignment, cap and join type, etc.) is FontLab 8, and there showing or hiding them is an option called "Keep/Remove skeleton overlaps". That's an option I would like to have in graphic design apps, as well (along with the ability to choose whether outlines are drawn in front or back), but perhaps this is just something that is intended to be used in font editor? But I am not sure if "removing skeleton overlaps" should be something that a graphic design app should do automatically, without giving the user an option of keeping them, instead.
-
Gobal colour and swatches.
lacerto replied to scgreentea's topic in Affinity on Desktop Questions (macOS and Windows)
At least it has (or used to have) refresh issues so you might need to deselect and reselect an object, or refresh the panel to get it redrawn. The link might still exist, though. There are limitations, and possibly bugs, too, and the behavior is not properly documented, but I am just saying that these attributes are transferrable and that the described workaround does allow creation of user-defined global swatches (including spot colors), and saving of the color attributes like overprint, tint and opacity, in a way that allows using them "as if" they were application-wide palettes. -
Outlined text problem
lacerto replied to Adit's topic in Affinity on Desktop Questions (macOS and Windows)
But which graphic design application that allows full control of glyph stroke attributes [and also conversion of text to outlines] can do that? Latest Corel, Xara, VectorStyler, Pages and Inkscape cannot, QuarkXPress 2018 cannot, nor can e.g. Illustrator or InDesign CS6 (though those two date from the time variable fonts did not exist and so such compositions were probably rare and there never was need for rendering in some specific way that removes overlapping strokes; I have currently not subscription active on those two on so cannot check if the current versions can). Word and Photoshop can, but they do not allow similar control of outline (e.g. stroke alignment) -- the latter only via an effect. I rather switch a font than do graphic design in Word, or logo design in Photoshop. [FontLab 8 Windows version can, too, in Text preview, while the macOS version is totally buggy in rendering preview.] On the other hand, if these kinds of overlapping compositions are required by variable fonts, then why does not Skia use / depend on them? Basically I am just saying that Affinity apps are not alone in this alarming inability. -
Gobal colour and swatches.
lacerto replied to scgreentea's topic in Affinity on Desktop Questions (macOS and Windows)
I do not think so but I have not properly tested this. It seems that 1.x and 2.x versions behave identically. I.e., if you copy an object from one Affinity document to another (even across versions), objects with a specific color definition (CMYK, RGB, spot, etc.), color attribute (overprint, global, tint, opacity), and even layer attribute (opactiy, blend mode) are copied along, and the attributes show in the Color panel and are also exported to e.g. PDF files, even if no swatches are automatically created in the receiving document's Swatches panel. Even if the attributes and color definitions are passed through (despite the color mode and color profiles, so the values are retained, not appearance), In order to an object to behave like a global color object (e.g. serving as a parent to children and having a capability of being redefinable and pass changed values to attributed objects), it must be linked to a swatch in the receiving document's Swatches panel. If the swatch is not there but is created the link will be automatically re-established to objects with the swatch assignment and parent-child relationships are restored. This happens even when loading an external document palette with correct color definitions and attributes, and versions 1 and 2 share the palette format. -
Gobal colour and swatches.
lacerto replied to scgreentea's topic in Affinity on Desktop Questions (macOS and Windows)
As a workaround, you can set any custom palette with global, spot and overprint attributes as a default for a specific color mode, to be loaded as a document palette when a new document of that color mode is created (the palette would then also autoload when the same document is subsequently edited). You can save such palettes on the disk and import them as document palettes and set as default for a specific color mode, thus overriding a possible previous default palette. globalworkaround.mp4 All defined attributes (spot, overprint, global, color mode) survive so the feature has some functionality of an application palette (the same palette could be made default for multiple color modes). I think this should work similarly also in 1.x versions of Affinity apps.