

Steaming T
-
Posts
55 -
Joined
-
Last visited
Posts posted by Steaming T
-
-
-
That worked but when I quit the program and start it again I have to do the same all over again. That's not right... Must be a bug...
-
Hi There!
I use a Mac Mini with Apple Silicon M1, 16GB of RAM, 1TB SSD and macOS Ventura v13. I have enclosed a simple file with a table on it. No tatter what I do the headers for rows and columns will not appear making it impossible to configure and edit a table. I initially tried this with a document I already have been working with with the same result.
Until this is fixed Publisher 2 is basically useless to me and I will have to keep on using the other version I have.
Regards,
Tor Lindberg
-
-
When I bought this MacBook it was the most top spec'ed version available in the Apple Store. It still runs great but I have noticed that video editing is slowly becoming more and more strained. I use FCPX. My main use is music and I have no problems so far. But I guess I have to reevaluate in a couple of years.
-
I have an ordinary retina display. Running Catalina (Big Sur is not possible on my oldie machine from mid 2012 (sic),
-
I just turned Transparency on and then off in Preferences. Seems to me like a bug of some kind.
-
Problem solved! Turning on transparency in the document setup did the trick. Thanks!
-
-
I have placed a 64 page PDF document (made in FileMaker 18) into Publisher and no problems with that. Although having to select each page of the PDF for each page in Publisher is a hazle. It was so much easier in InDesign where I could continue placing pages until I reached the end of the PDF file. The problem is that when I change the PDF in FileMaker and then try to update in Publisher, the program just hangs and won't respond anymore. Have anyone experienced this? I am on a Mac with macOS Catalina.
-
Great update! The new Preflight option has already been very useful. But I am still missing global layers as in InDesign. I have documents with different versions of text and graphics. Without global layers in Publisher I am forced to continue using InDesign for these docs. So please: Global Layers!!!
-
This has probably been discussed before but does anyone know if and when global layers will be introduced in Publisher? Coming from Indesign this feature is sorely missed as I deal with certain documents that requires some of the layers to be global.
-
Thanks a lot! The only place I didn't look!
-
This drives me crazy! When entering text in a text frame Publisher always capitalizes the first word of a sentence and I can't find a way to turn this off! I type in the first word of a sentence and all is fine (first screenshot) and the moment I press the space bar the first character in the word gets capitalized (second screenshot). The same also goes for tables, by the way. Anyone here knows if this can be turned off or is it a known bug?

-
In the end it was just me missing the "No break" check box under Character/Positioning and Transform. It was "On" (checked). By unchecking it the behaviour of the text returned to normal. Thanks Joachim_L.
Case Closed! :-)
-
By the way, I have discovered that this only happens when I paste directly into a Publisher document. If I draw a Text Frame first it all appears normally as it should be.
-
When pasting in some text from an email Publisher suddenly starts to behave strangely, ignoring the boundaries of the textframe. InDesign is working as expected. This is what's happening in Publisher:
It behaves normally in InDesign:
-
I am trying make a songbook in Publisher which I previously made in InDesign. The notation was initially made in Finale and the exported as a PDF-file and placed in InDesign. I want to make the same songbook in Publisher and this time I have also switched to a new notation program called Dorico. But when placing the new pdf exported from Dorico it appears with some graphic errors which never appeared in InDesign. Is this a known bug or do any of you have any suggestions? Look at the screenshots below.
Here is the old pdf exported from Finale and placed in Publisher:
And here is the new PDF exported from Dorico and placed in Publisher. I have drawn rings around the anomalies:
And here is the same PDF as above when placed in InDesign:
An exported SVG-file is coming up perfectly, so maybe that is the way to go:
-
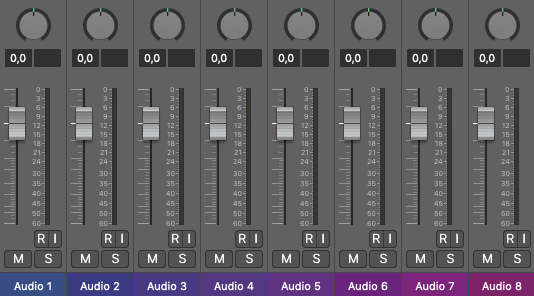
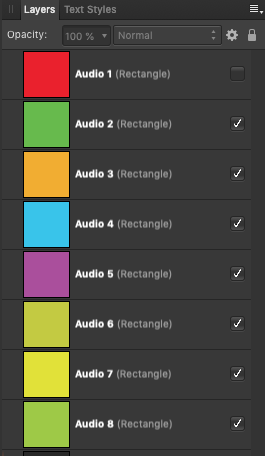
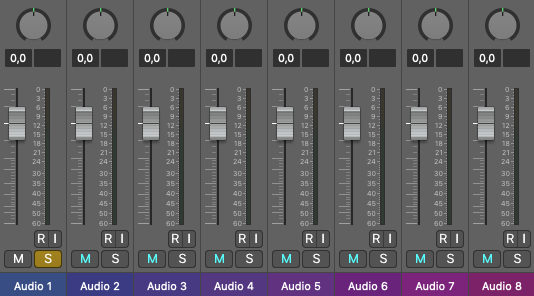
I am a musician and are an experienced user of the DAW program Logic Pro X. In most audio mixers, real or software based, there are two buttons that we users take for granted: a Mute-button and a Solo-button. The Mute-button turns off a particular track while a Solo-button turns of all other tracks except the one where you pressed the Solo-button. Wouldn't it be great to have this functionality in the Layers palette in Publisher? The equivalentof the Mute-button is already there in the form of the "is visible" check mark to the right of the layer name. By adding a Solo-button to the right of this you could make all the layers invisible except for the layer you "soloed". This would be a great feature when there is a lot of layers and you just want to view and work with one in particular. Please consult the screen shots I have provided, both from Logic Pro X and from Publisher:
The audio mixer in Logic Pro X. Notice the M(ute) and S(olo) buttons at the bottom:
Here I have muted the track "Audio 1". This would be the equivalent to make a layer invisible by removing the checkmark next to it:
Here I have soloed the track "Audio 1". The other tracks are automatically muted:
And here is a mockup screen shot of how it could appear in Publisher. V = Layer visibility on/off, S = Layer is soloed and the other layers not visible.
Please let me hear your comments. I think this would be a great featrure!
-
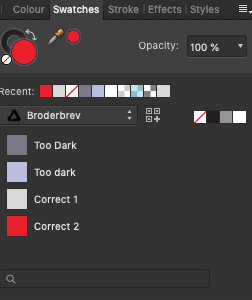
I am trying to create my own Application Swatch palette from some of the colors in a document. Some of the colors are sampled correct and some turns out darker than expected. What is the reason for this behaviour? Am I doing something wrong? Any advice? Please consult the screenshots below:
Here are the colors I sampled, blue, light gray, dark gray and red:
Here's the palette:
Here's the dark grey sample applied to a new object (too dark):
Here's the blue sample applied to a new object (too dark):
Here's the light grey sample applied to a new object (correct):
Here's the red sample applied to a new object (correct):
-
This has nothing to do with how text frames are handled. It's simply about adding a % field next to the Opacity slider just like everywhere else where you can adjust the opacity. I can't imagine this is difficult to implement and to me it looks more like an oversight than a technically difficult feature to add.
-
One of the points in using a text frame is just to avoid doing that. Makes it much more complicated than necessary to handle two objects at once.
-
I am afraid I didn't understand that...
-
There is no problems with adjusting the opacity for fills in text frames. The probIem is that without a % field it is impossible to be consistent when adjusting it. All I really want is a % field to be added to the right of the Opacity slider in the text frame tab just like everywhere else where you can adjust the opacity!


Still no Global Layers!
in Feedback for the Affinity V2 Suite of Products
Posted
Such an important omission needs to be repeated...