StudioVulcan
-
Posts
8 -
Joined
-
Last visited
Everything posted by StudioVulcan
-
Gradient Overlay (effect) fix.
StudioVulcan replied to StudioVulcan's topic in Feedback for Affinity Designer V1 on Desktop
Answer found. Using the Gradient Tool (never the Gradient Overlay effect) I can achieve this and it's not that hard to do. If you create a pixel layer, place it inside the layer you want to "clip" to, you'll apply a gradient with the gradient tool to this pixel layer. Now the layer on the top of the stack should have this gradient applied to it. Now create a second-pixel layer (still within the stack but place this 1 up from the gradient tool pixel layer) and place an image or brush design you wish to use as a texture (so that you can change the layer modes to whatever you wish). Congrats, now your design will function the same way as the image above, it just takes some getting used to. A picture for some context:
-
I can't seem to get this window? I've looked at View>Studio> and there wasn't an 'adjustments' panel there. All I can get is this and all I want is to apply preset gradient maps:
-
Gradient Overlay (effect) fix.
StudioVulcan replied to StudioVulcan's topic in Feedback for Affinity Designer V1 on Desktop
Bump. (Hoping i'm allowed to bump suggestion posts :S) -
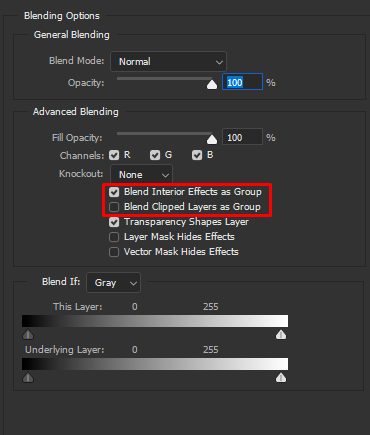
I've been looking at Affinity for quite some time now and while it has most of the features I'm looking for, there's something that I think is needed. Blending modes. If I want to put an image or object on top of an object with a gradient overlay EFFECT, the blending mode of the image I'm placing above it just simply doesn't work. In photoshop, you would have to apply a specific setting to get it to work, I'll attach a picture of that setting. Without this effect, I simply have to rely on the gradient tool when i'd greatly prefer to have styles saved with gradients that I like and just instantly apply them to my work but still be able to place images of object on top of them and use a blending mode (and in the image i supply, mask it too). Thank you for your time. (This is in Affinity Designer, however, Photo probably needs this too. I don't see much difference between the two, so I've swapped from Photoshop to Designer so that I can work in raster and vector. The image below shows a black brush i've painted quickly on top of the pink bar. I've clipped it to just the layer of the pink bar, so now it's only showing without the confines of the pink bar layer, however, it's only able to do so because of the 2nd photos setting. This layer has a gradient effect applied to it, so without this setting, it wouldn't appear unless I turned off the gradient effect.
-
We figured it out. I can't use the Gradient Overlay effect, i have to use the gradient TOOL. The effect was messing with the blending modes.
-
Ahhh, I was able to figure out one of the issues. I have effects on the text layer. So if I turn off the gradient, it /will/ work if I put the shape over the text layer and have the shorter horizontal bar apply to the text layer (that was not very well explained by me, I apologize)... However, I /want/ a gradient on the text, so how can I set it so that the shape layer that I have on "soft light" over-rides the gradient and DOES apply itself to the text?
-
I've made a video explaining what I'm looking for and why this feature should (hopefully) be in AD. If it isn't I'd be pretty upset as it's probably my most used tool and I'm really trying to migrate from Adobe for good. The suggested video sadly didn't offer up much help for what I was looking for. https://www.youtube.com/watch?v=szubPWX3Xgc
-
Hi there, I can't seem to find the right combination of keywords to find what I'm looking for, I'll try and explain as best I can (I'm migrating from Photoshop, so I'll probably be here a lot, lol. I'm attempting to see if i can achieve the same results in the vector part of the program that I would normally get from using photoshop): (Draw Persona) The effect I'm looking for is like when you would clip a layer (above) to the layer below in Photoshop. What this would do; Top layer would mask itself to whatever layer was below it (IT HAS NO EFFECT ON THE BOTTOM LAYER). By doing this, I can edit the bottom layer in any way that I'd like and the 'clipping' on the top layer would automatically adjust to the shape of the layer below it. In Draw Persona, what "Mask to Below" *ACTUALLY* does is clip the bottom layer to the layer you're "clipping" and thus is not the effect I'm looking for. Additionally, When applying masks to object that have effects on them, for some reason it wants to by default mask in the effects too (i.e drop shadows and glows), if there a way to turn this off, I'm used to not having it clip or mask to effects on the layer at hand. Thank you in advance. I shall do as much research as I can, but it seems Designer is more different than I expected, so finding ways to achieve what I'm used to will be tough. See you again soon. :P