EBC
-
Posts
13 -
Joined
-
Last visited
Everything posted by EBC
-
Refine Selection Dialog
EBC replied to Ron P.'s topic in Pre-V2 Archive of Affinity on Desktop Questions (macOS and Windows)
To answer the original question: IMO, yes it's odd for a software UI to have that degree of similarity. Legal battles have been fought over less. Will anything come of this? Who knows. It would have to come to the attention of the right people at Serif, and whether they'd choose to pursue it depends on lots of variables and priorities that we are not privy to. I'm sure it would also depend on whether this is the only copied feature. If it's just this one dialog box, my guess is that Serif would care enough to send a legal letter, to which the other company would abide, and that would be the end of it. But again, who knows. If you are personally invested in the success of this other software, it's worth mentioning this to the developer. (And to Serif, I guess, depending on where your loyalties lie and whether you are permitted to do so by the NDA). -
When learning new software, I like to really drill down and understand the nuances/use cases/intentions/inner workings of different features. Especially when there's a cluster of similar ones. Using software the way it's meant to be used usually produces better outcomes. Know the rules before you break them, and all that. The official Affinity docs say very little about these tools, and while that video is helpful, it seems mostly based on the creator's own experimentation. It's a helpful starting point but I'm not prepared to accept it as authoritative. I am hoping that someone close to the Affinity team can provide a more detailed and "official" explanation of how each tool actually works under the hood, and more guidance on when to use each. Failing that, it would at least help to know whether other users agree or disagree with the information in the OP.
-
Thank you.
-
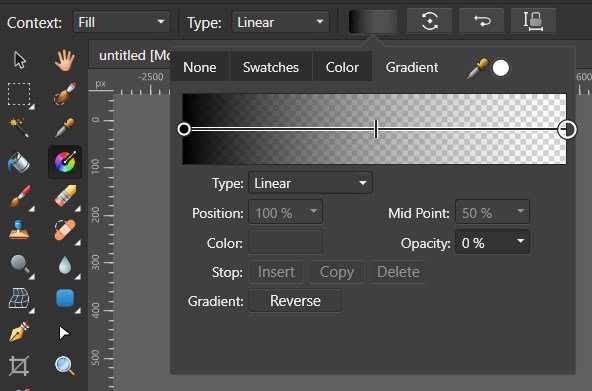
When I create a black-to-transparent gradient (pixel layer), it has the unexpected effect of lightening the layers beneath when the gradient layer is set to "Normal" blend mode. I have to change it to "Darken" to prevent this effect. Why does this lightening occur? This should not happen on a black-to-transparent gradient, even in Normal blend mode. Am I creating the gradient incorrectly? Key to images: #1 - The relevant portion of the image, before gradient is created #2 - The gradient settings #3 - The gradient placement #4 - A comparison of Normal and Darken blend modes after the gradient has been applied. On the left is Normal, and you can see a lightened haze. On the right is Darken, and there is no such haze. It is most visible on the jacket, on either side of the text.

-
Hello all, I've read the documentation and watched the tutorial, but I'm still not clear on how these features are supposed to work. In Photoshop, the Refine Edge Brush (which appears analogous to Affinity's Matte brush) adds to a total area which is the combination of everything that has been painted by Refine Edge Brush, plus whatever area is encompassed by the Radius. When you select "Show edge" in PS, it shows this combined area. And it appears this entire area is analyzed with the same algorithm. In Affinity, adjusting the "border width" slider does not also show areas painted by the Matte brush. And there is no comparable "Show edge" checkbox. So my questions are, 1. In Affinity, are the areas demarcated by "border width" indeed analyzed by the same algorithm as the areas that have been painted by the Matte brush? 2. If it is the same algorithm, is there any way to show the combined area being analyzed, similar to PS's "Show edge"? And one question not directly related to the above: 3. When I paint with the "Foreground" and "Background" brushes, every stroke appears to result in a holistic re-analysis of the matted area. The changes are not confined to the area that I paint with these tools; changes happen even outside of it. In general this has good results. But if you want to make pixel by pixel changes, what is the best solution? I've been exiting the Refine dialog and using Quick Mask, but is there any way to accomplish this without exiting Refine? Thanks a lot.
-
Brush Size Preview (Affinity Photo for iPad)
EBC replied to PoloSpace's topic in Feedback for Affinity Photo V1 on iPad
+1 -
This video describes the various repair tools as follows: Clone: A simple copy-paste of pixels without any automatic blending. Best for removing something in an area of uniform texture/color, or duplicating an object. Healing: Copies texture from source point but uses color/tone information from the destination point for blending. Possibly the most general purpose repair tool. Patch: Same algorithm as healing, but uses a selection area instead of a brush. Blemish: For fast one-click spot fixes. Automatically finds a source point to save time (unless you click-and-drag to manually set a source point). Inpainting: Most advanced, and slowest algorithm. Often used for removing big objects. Does anyone have any corrections or additions to this information? Thanks.
-
@Dazmondo77 - in what ways is Deform lacking compared to PS puppet warp?
-
Got it. Thanks @Dan C
-
If you use the pen tool to draw a curve and then press the "Mask" button, the enclosed area becomes the part that is kept. But what if you want the enclosed area to be the part that is hidden? Currently the only method I can think of is to draw another curve equal to your canvas shape and then perform a subtract operation. Is there a better way? Thanks in advance.
-
In my document, I have a few Curves objects which I've drawn with the Pen Tool. For all but one of them, the "Mask" button is available when in the Pen Tool. But inexplicably, on one Curves object, "Mask" is grayed out. There's nothing different about this Curve object as far as I can tell. It's just a regular closed path, like the others. Any ideas? Thanks in advance.