_TM
-
Posts
14 -
Joined
-
Last visited
Everything posted by _TM
-

Picture frame default?
_TM replied to MickRose's topic in Feedback for Affinity Publisher V1 on Desktop
Thanks! This did the trick, although apparently you have to set it up for each document. -
Picture frame default?
_TM replied to MickRose's topic in Feedback for Affinity Publisher V1 on Desktop
I was about to make a thread about this too. Has anyone found a way to make "Scale to Minimum Fit" the default? -
[Studio Link] Publisher and Photo: Info panel settings reset
_TM replied to _TM's topic in V1 Bugs found on Windows
Yeah, I added the RGB and CMYK info to the panel but it's annoying when the panel resets on new pages or spreads. -
[Studio Link] Publisher and Photo: Info panel settings reset
_TM replied to _TM's topic in V1 Bugs found on Windows
Yes, my document has multiple pages/spreads. That was the whole point of my workflow for editing my images through Publisher and Studio Link. :) I could just open them up individually in Photo and edit them there but that defeats the purpose of Studio Link. I use the info panel to check the RGB and CMYK values for some images and I need the same info panel throughout the document. Having the info panel with different samplers or settings for different pages or spreads seems redundant to me. -
Thank you! I wasn't aware there was a setting for that.
-
I usually work on all of my image heavy layouts in RGB to have more control over the color editing in photos and then I export the PDF into a CMYK profile as I need it. I'm aware there's always a color shift from RGB to CMYK, this is just my workflow. Now a weird thing happens when I use Publisher and Photo together and when there are adjustment layers in my file. When exporting a PDF with a CMYK profile, all the image/pixel layers get converted to CMYK as I'd expect but everything changed by adjustment layers behaves differently. It looks like the adjustment layers return data from CMYK values instead of RGB values that are in the images. So what happens is that there's a very drastic color shift in the resulting PDF. The solution is to flatten all the adjustment layers and images. Which is tedious but I can do it, but as I understand PDF/X-1a:2003 standard that I use expects the images to be flattened anyway which is what I assume happens on export. I'm guessing the CMYK conversion happens before the adjustment layers are applied to the image (or maybe the adjustment layers aren't flattened with the pixel layers) and that's why there's such a dramatic color shift. If this is a bug, please fix it.
-
Every time I open Publisher and switch to Photo, the Info panel is cleared out from the settings that I used previously (I have RGB and CMYK info opened). The info/settings are retained only until I switch back to Publisher. When I go back to Photo, it's all gone again. When I use Photo on its own it doesn't have this issue but the info panel gets reset with Studio Link. version: 1.7.3.481 system: Windows 10 Pro

-
Hi When I switch from Publisher to Photo, and create new adjustment layers, then instead of these adjustment layers appearing as new layers, they get clipped or masked to whatever layer is currently selected (usually another adjustment layer). This is frustrating because I can't see what I'm editing until I've dragged the newly created adjustment layer out of the layer that it was stuck to. Please fix this. version: 1.7.3.481 system: Windows 10 Pro
-
One more thing, could be related. When adjustment layers are not inside folders/groups, they still sometimes get cropped by bleed but it seems to be a display error. See the attached screenshot (in Publisher). I made changes to the adjustment layer but the bleed area wasn't affected by it until I zoomed in/out in the document and it started displaying it correctly.
-
Hi When I group adjustment layers in Publisher or Photo (via Studio Link), then all the adjustment layers in that group are cropped or masked to the document trim area, even though they should extend to bleed as well. I tried to edit the masks to make them cover the bleed area but it didn't work for me. The only solution so far that works is not grouping adjustment layers in the first place to make sure they will cover the whole document. Affinity version: 1.7.2.471
-
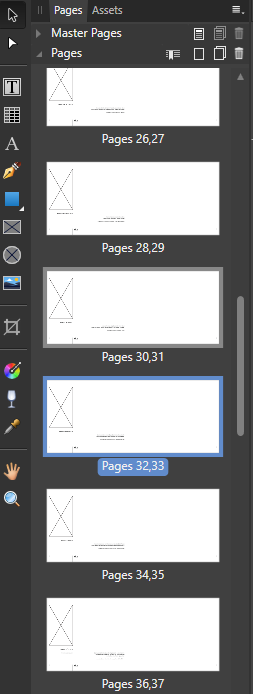
Hi I'm wondering if it's possible to change the color of the currently active page/spread color to something more easily noticeable? To clarify, I'm talking about the grey outline that's around the pages that are currently active (pages 30, 31 in my screenshot). I've scrolled through the page navigation many times trying to find which page was active, but missing it because the grey is very subtle. When I squint it all looks indistinguishable grey. I tried changing the UI colors in preferences but it didn't make much difference. The Light UI doesn't have this issue since there is enough contrast. I like the blue color when selecting pages, maybe something similar could be used for highlighting active pages too? Thank you!
-
Superscript and subscript not working properly?
_TM replied to _TM's topic in [ARCHIVE] Publisher beta on Windows threads
Thank you for your replies! I hadn't seen the Superscript/Subscript pulldown option. This works for me. -
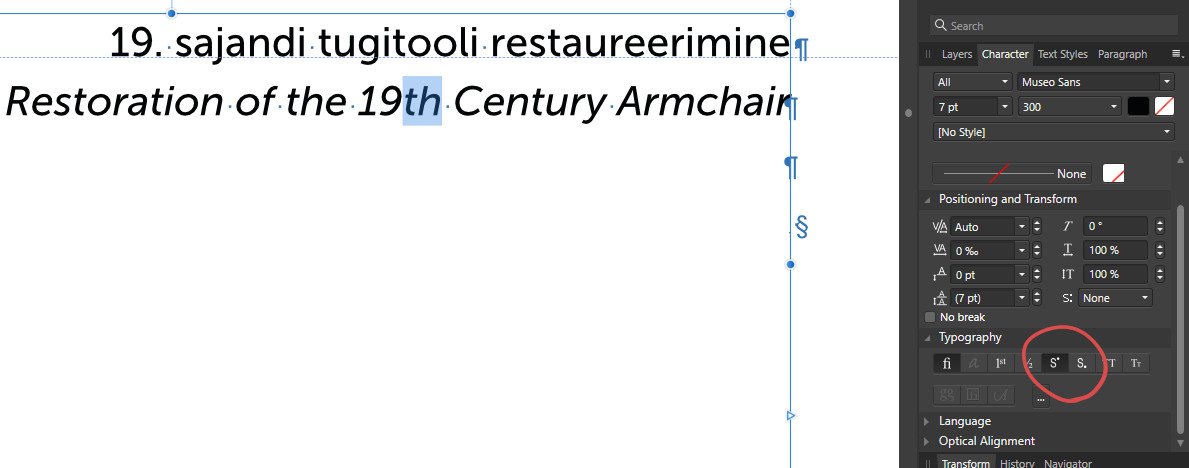
I'm not sure if this is a feature or a bug? Superscript and subscript buttons in the character panel work only when applied to certain characters and numbers (numbers become superscripts, but not text glyphs) I tried different fonts and different files, same result. For example, in the phrase "19th century" 'th' becomes a superscript automatically when typing the entire word and adding a space at the end, but trying to manually add the superscript from the character panel doesn't work. I would like to be able to apply superscript and subscript manually to any text characters and numbers, if possible. System: Windows 10 Pro
-
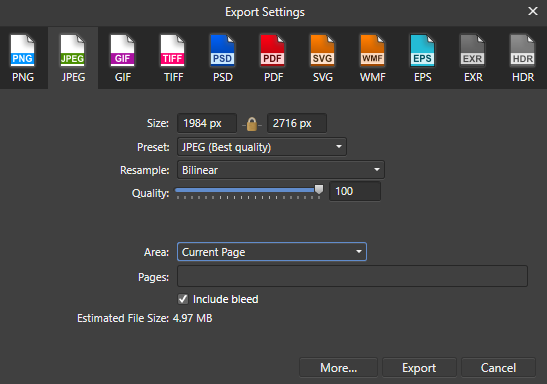
Hi When I export a single page as an image from a spread (so one half of the spread) with bleed, the resulting image is slightly narrower. If I export the entire spread as an image, the image dimensions will be correct. So based on the example below, the export settings in Publisher look correct. 1984 px x 2716 px is the correct size for the image but when I open the image in Photo, it shows that it's actually only 1915 px wide. Somehow about 6 mm of the image were gone with the export. I found this out when I imported the image back to Publisher and saw that it didn't exactly match the original layout. I tried this with different Publisher projects so it's not just an issue with a single file I was working on. I tried it with TIFF files too and got the same results. My document is set up with facing pages and I can't really switch back to single page view to export the pages from there because I designed my layout while in the spread view and when I switch it to page view it becomes messed up. This also affects exporting single pages that aren't part of a spread (the very first page and the very last page in my document) Bleed seems to be the issue since when I export a single page of a spread WITHOUT the bleed then the size is correct (I need to export it with bleed though) Publisher version 1.7.0.305