F_Kal
-
Posts
214 -
Joined
-
Last visited
Everything posted by F_Kal
-
 hah! Once again, my bad! I hadn't realized there was an Artboard tool! I would just duplicate existing artboards! Very much appreciated! :P
 -
Here's an additional idea (ie a feature request) regarding the corner tool snapping (since it keeps coming back to my mind again and again); It would be great if it would somehow "snap" to previously used corner radii values, (besides snapping to guides which is also helpful). Of course one can achieve that by replicating the numeric corner radius value on all the desired corners, but it wouldn't harm if one could do that without having to type in numbers ;-) thank you! -Fotis PS. regardless to say I'm enjoying this software so much!
-
+1 that! I'd also like to able to "add" artboards to "existing documents" that didn't have one right from the start!
-
Is there a "Live mirror" option?
F_Kal replied to Kobaiko's topic in [ARCHIVE] Designer beta on macOS threads
Would be great if this could be generalized into an "instances/clones" duplication method; Instances that retain their link to the parent, and are: - updated live when their Boba Fett (original curve) changes - or maybe changing any of these instances, causes all the other instances to change at the same time - transformable - eg. mirror, scale, skew etc - able to become part of compound objects - eg. a union between original and mirrored live-instance - able to have properties such as their stroke/fill/styles overloaded Okay, I exhausted my wishful thinking, for the day ;-) -
I used PS's ability to re-export the palette as a .ase file. - My palette also appeared "different" in the swatches panel, but on a second inspection it was only a presentation issue; when I checked the RGB color values, they were as intended - is there a chance that you had the same issue as I did? http://forum.affinity.serif.com/index.php?/topic/17212-color-thumbnails-in-swatches-are-inaccurate/
-
Hi! Not sure if this has been requested before, or whether it's a bug, or a feature (plz move it accordingly)- but here it is: Single character keyboard shorcuts don't work when I'm switched in the Greek keyboard layout. It's not the first program that has this "behavior" and I understand that this is not really a problem per se, but it's something that chips away from the UX! The long Description When does it happen? This happens in Affinity Designer, mostly when typing text, since we (non-latin-keyboard users) tend to switch languages often. It's probably related to non-latin alphabets existing in many languages. It happens in Greek for sure. I can't say on what other languages this behavior appears (for a start it doesn't appear in my romanized Chinese keyboard layout for instance) but there have to be other languages affected too - maybe Cyrillic, Thai or Korean? Usually when I press a keyboard shortcut and it doesn't work sending the "can't do" system beep sound, I press it again to make sure that I did press the correct key. Then I look at the top-right corner of the screen to see the language-bar keyboard layout flag, and then press Cmd+space to switch back to the US layout. I'm sure many computer users are familiar with that! The problem It seems that it is single character shortcuts, that don't work: eg. "α" (that is on the same key as "a") <beeps> and won't switch to the Node Tool, but modifier keys + shortcuts do work: eg. Cmd+"α" will be treated like Cmd+"a" and Perform a Select All. The desired effect Would be great if affinity designer had a way to treat them as if they were the same (it's the same key after all)! It would be great, but it would be undermining the fact that AD is already great! (it would just be greater) ;-) thank you, -Fotis
-
excellent tip crabtrem! I would probably never find that out on my own!
-
Thank you Darren! Glad to hear that!
-
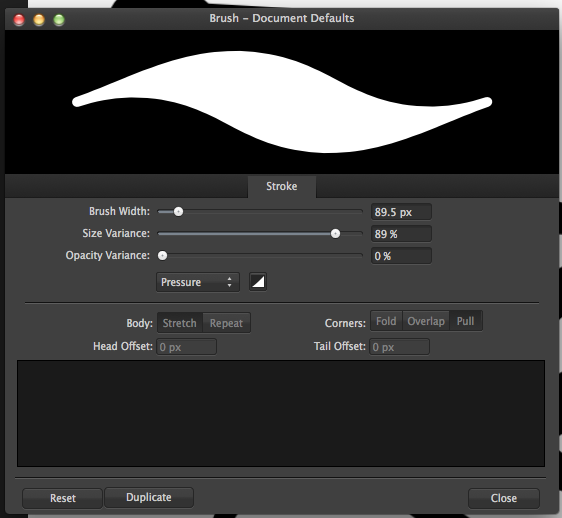
Hi! There is something (minor) that has been bugging me for quite some time: whenever I restart the program, I find the Controller for the Brush Tool reset to "None". Same applies to the current brush alterations: I have every time to press More so that I can set Size Variance to 100%, choose the pressure profile time. Of course I could save the modified-brush and avoid these steps time I open the software. This would solve the 2nd part of the problem only though. Shouldn't the program at least be saving the tool's settings? Am I missing something?

-
Hmm, they are something quite different, and I think the name is adding to the confusion. For the sake of the conversation, I'll call Pressure Profile, the little Pressure graph that can be found in the Stroke Panel. The graph found in the Brush Selection window (for instance by going to the Vector Tool toolbar-> More) I shall call it simply "a pressure curve". 1.The Pressure Profile (Stroke Panel) The Pressure Profiles found under the stroke panel, are modifiers of some variable called "Pressure". Every curve/shape can have a pressure profile, but only the ones created by the Vector brush tool have a real pressure profile that was generated through recording the pressure of your tablet's stylus! If you haven't noticed, whenever you create a brush-stroke with the Vector Brush tool, AD records a pressure profile for you: It logs the pressure you apply as you draw the stroke. All shapes/curves (ellipse, star, rectangle, path tool, line etc), may have an artificial pressure curve if we so wish, but not necessarily. We may wish to give them one if we want them to appear "hand-drawn" for instance. What is important to understand is that, this pressure profile depicts the pressure in relationship to the distance from the beginning of the curve. In other words, it's a Distance-to-Pressure curve. (unlike the pressure curve, that is a Pressure-to-Width curve and is being explained below). 2.Pressure curve (Brush - Selection) On the other hand, the "Pressure" curve found in the Brush - Selection window (eg. under the Vector Brush Tool -> More settings or under the Stroke Panel -> Properties...) tells us how this pressure profile will be mapped/translated into width/size (or opacity)! This curve, is a Pressure-to-Width curve. They complement each other, but are not the same! If for instance you choose Size Variance: 0% or you turn your pressure curve into a horizontal line, no matter what "data" your pressure profile contains, the stroke will have a constant width. Similarly, if the shape/curve's pressure profile is a horizontal line (constant) then no matter what the pressure curve for the assigned brush is, your stroke will have a constant width. Some things to consider about the pressure curve (Brush - Selection) - this curve is often useful to neutralize some drawing habits we have (eg. a heavy hand, a light hand, an unstable hand etc) - it's also useful to emulate the different dynamics in the behavior of various drawing tool (eg. pencils with different hardness - 2B/HB, different charcoals, different brushes) - it can be programmed to affect the opacity of a stroke - Personally (somebody correct me if I wrong) I think the pressure curve in the Brush Selection window, is useful for hand-drawn brush-strokes through the Vector Brush Tool exclusively, where we are trying to compensate for our hand's lack of absolute control. For Pressure Profiles that were artificially created in the Stroke Panel, a 1:1 (linear) profile is enough: all the different width/opacity effects can be simulated through that (correct me if I'm wrong) Hope this helps
-
I'm sure most people know it already: Come to think about it, it seems very standard in vector software! Yet it wasn't for me (being used to PS), and since I couldn't find the solution when I searched the forum, I decided posting it for all those who may have the same question as I did :) Problem I wanted to non-destructively clip the "contents" of one layer/shape/group, to the shape defined by its underlying "container". - especially useful when creating "flat shadows" or "textured fills". In PS you can use the Create Clipping Mask to assign an element as another element's clipping mask, while at the same time allowing the underlying layer to retain its "individuality"(own appearance). I was about to post this as a question (what is the equivalent of Photoshop's Create Clipping Mask in Affinity Designer?) when I discovered it's the simplest thing ever: Solution In the layers panel you just need to drag'n'drop the overlaying layer, onto the underlaying layer. This will make it into a child! That's it! A child is automatically masked ("contained") by its parent, but they both retain will their stroke/fill. Far more flexible approach (and intuitive) compared to the Create Clipping Mask option in PS which was limited to layers and smart objects only (you couldn't do that with groups for instance). In AD you can have whole parent/children trees used as "Clipping Masks"! for instance: Such a big improvement over PS's Create Clipping Mask tool! hope this helps somebody, someday!
-
That was so useful - I had the palette in .aso format and exported it to .ase - great! @dizeyner: If you use PS/AI, you could open/import the swatches in Photoshop (and possibly Illustrator in a similar fashion) and from the Swatches menu icon choose -> Save Swatches for Exchange. This will give you an .ase file Thank you @MEB PS. I wouldn't had thought on my own that AD would support .ase but not .aso PS. additionally I noticed a bug with the display of the palette thumbnail colors - they are off - but I'll post it in the bug section!
-
I second that! I was about to start the next icon in a series I was making and thought that finally the time had come for me to put AD to the my everyday life! So far I was only experimenting with it. Then I realized I couldn't import my PS palette - sounds silly I know... but if you have to manually copy a few dozens of colors, it's no longer fun Of course that goes both ways - If you (like me) have to still use PS but also wish to use also AD too on the same project, being able to import but also export palettes to PS format, is essential!
-
Hi! Happy New Year! I'm not sure this is a bug or an unimplemented feature (so forgive me if I got it wrong): I started playing with the corner tool and it's so amazing! However when enabling snapping, it won't snap on a) the grid or B)points on other curves - actually it snaps only on points on the same curve as the "corner". While both a), B) have their uses, it feels to me that grid-snapping in particular was unintentionally left out - isn't it the expected behavior of a standard tool after all? Thank you! PS. If it was intentionally left out though and these are not bugs, please move my message to features request pool :) :)
-
Brush Pressure Sensitivity issues
F_Kal replied to PowerPlayGraphix's topic in [ARCHIVE] Designer beta on macOS threads
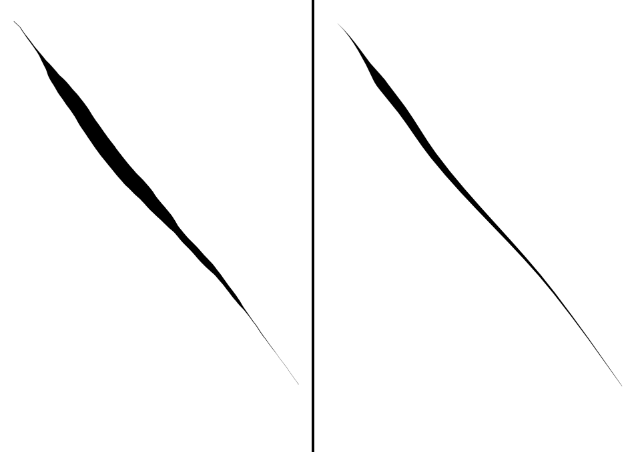
I got the same "problem": The vector brush tool feels a bit strange, since what I see is not what I get - If I got you Matt right, it's some simplification algorithm that is causing the effect; I've attached a picture of a line both before releasing the tip (left), and after releasing it (right). I don't mind about the reduced detail in the dynamics of the line (which imo is well balanced), but a thinning is often taking place that is a bit strange (as can be seen on the picture above). So, while (as some people suggest) having more control parameters is useful, I personally would focus on improving the default behavior: Trying to see what exactly is wrong with the current implementation, I'd say that it doesn't always "respect" a ) the maximum pressure and b ) the amount of ink the user wanted to put on canvas! Truth be told I'm a lousy programmer (that's why I switched to doing design :D ), but my humble solution to the issue at hand would be: -calculate the amount (surface area) of the ink(blackness) of the stroke before the simplification, -always respect the max and min thickness(pressure) that appeared in the original stroke -remap all in-between thickness values so that the resulting blackness overall remains the same to the original line. In other words, redistribute the ink - this imo would feel more intuitive. hope this helps! -Fotis
-
Hi, When creating a new node with the Path tool, node-tangent constraining (Shift+Drag) works pretty much as expected allowing you to lock on one of many snapping guides (0-45-90 degrees). But when editing an existing node, the same shortcut (Shift+Drag) is locking only on the 0 degrees axis; meaning you can only change the length of a tangent, not the direction. A direct results of this is that when you "unlock" the two tangents (forcing cusps), Shift+Alt+Drag won't allow you create a 90/270degrees corner between the two tangents as expected... In short it would be so useful (and I feel intuitive too) if during edit you could snap tangents to to the 0/45/90-degree-axis , just like when adding new nodes. Thank you, Fotis PS. Certainly snapping on both local and global axis systems have their merits as discussed in other threads and would be useful if both were implemented (don't know how though - maybe a combo box in the toolbar?)
-
Disclaimer: I'm still using Mavericks, and while I like "flat" on mobile devices/web, I haven't got the experience of having flat icons on my desktop/dock. Having said that, I prefer the original icons; both in terms of aesthetics and their ability to convey the actual role of the software. Nonentheless, we thank you anyways for the beautiful software! -Fotis
-
Non-destructive boolean operations by default
F_Kal replied to brianpattison's topic in Older Feedback & Suggestion Posts
I like the "destructive-by-default" approach best. Still having no UI clue about such a prominent feature (ie non-destructive boolean operations), is such a pity! I had to search the forum to discover it existed and was hiding under the Alt key! Maybe a checkbox/toggle on the Toolbar next to the boolean operations switching between the two modes, would allow more users to see that it is possible to have non-destructive boolean operations and choose for themselves. -
Ah! Found it! Thank you so much! -Fotis
-
Hi! I've just purchased AD and am so impressed! Thank you for such a great product! two short questions: 1)Is there a way to convert a self-intersecting vector brush stroke into a closed path surface? (for example in the image below I've used the Vector Brush tool to fill an area, but I'd like to end up with a circle-ish path filled with yellow color) 2)Is there a way to expand the stroke of a vector brush path? Thank you again, Fotis
-
Stunning Pattern Fills for AD?
F_Kal replied to lexislav's topic in Older Feedback & Suggestion Posts
me too! -
My bad!I was about to come back and comment about how huge the SVG files were turning out due to this, but seems you've got me more than covered with the expand stroke issue :) :) Nonetheless, a menu entry to simplify any path (with a nice slider to decide the amount of reduction), could be useful in more scenarios (eg the user wanting to simplify imported artwork, or create "low-fidelity" versions of freehand curves that were initially drawn complicated)
-
I would love it if there was the option to draw a line segment right from the the brush tool - click once to define the start, Shift+click to define the end point. Subsequent Shift+clicks assume last end point as the new starting point I've used it in other software (photoshop,manga studio) in the past and it feels very intuitive (to me) -Fotis
-
Hi! Just an idea; I've seen that the expand stroke took produces many many control points and I thought that having a menu item to optimize/simplify the curve by reducing the amount of points on it would be somewhat useful -Fotis
-
Hi, I've been testing out the trial of version 1.2, and to be honest, I'm so excited, with the progress! Being interesting in SVG files, I was so glad to see that the export now works so smoothly - still there is one shortcoming regarding patterns/fills: If I use a bitmap fill for a path/shape, the resulting SVG, doesn't contain any <path>s- instead everything shape/path has been rasterized into <image>s. That's such a pity! Is there any plan of rectifying this in the immediate future? Best of luck, sooo looking forward to seeing this app being part of my everyday work! -Fotis PS. please, keep up with this excellent tactic of extending the trial period for newer releases - I had installed the v1 trial, but I'm looking closely to the development, so being able to try it out every now and then is very useful!