iamscotty
-
Posts
22 -
Joined
-
Last visited
Recent Profile Visitors


-
 IndieGuy reacted to a post in a topic:
Isometric Studio?
IndieGuy reacted to a post in a topic:
Isometric Studio?
-
megalofauna reacted to a post in a topic:
Isometric Studio?
-
 iuli reacted to a post in a topic:
Isometric Studio?
iuli reacted to a post in a topic:
Isometric Studio?
-
iuli reacted to a post in a topic:
Isometric Studio?
-
 Przemysław reacted to a post in a topic:
Isometric Studio?
Przemysław reacted to a post in a topic:
Isometric Studio?
-
qwz reacted to a post in a topic:
Isometric Studio?
-
co.mbyerly reacted to a post in a topic:
Isometric Studio?
-
evtonic3 reacted to a post in a topic:
Isometric Studio?
-
RemN reacted to a post in a topic:
Isometric Studio?
-

Isometric Studio?
iamscotty replied to iamscotty's topic in Feedback for Affinity Designer V1 on Desktop
For me personally and the work I do it's more important that the shape I convert to iso fit together properly and the angles match up to each other with no gapping which I guess may affect the snapping. I'm thinking that if three paths that you want to close together like in a cube I could see that whatever drives the snapping function may not recognise that they should go together if the paths are not correct to each other if you get my drift? (I may be talking out of my back end here so sorry if that's the case.) If Designer's Isometric studio all works on the same principles and calculations so everything fits together then that would be a dream. I've worked with other peoples assets that have used a slightly different calculation and there is very little difference side by side but it's quite important to use the same process for each thing you are working on to keep continuity. I'm an Illustrator and not a Mathematician so whatever is easiest and best for workflow is a lot more important to me than decimal places. -
iamscotty reacted to a post in a topic:
Isometric Studio?
-
Isometric Studio?
iamscotty replied to iamscotty's topic in Feedback for Affinity Designer V1 on Desktop
I've just gone through the set of iso actions that I use and I got this for the top: 86.603% I'm no Mathematician but it's always worked for me. -
Bri-Toon reacted to a post in a topic:
Isometric Studio?
-
Isometric Studio?
iamscotty replied to iamscotty's topic in Feedback for Affinity Designer V1 on Desktop
I truly admire and appreciate your confidence in me. -
iamscotty reacted to a post in a topic:
Isometric Studio?
-
iamscotty reacted to a post in a topic:
Isometric Studio?
-
Isometric Studio?
iamscotty replied to iamscotty's topic in Feedback for Affinity Designer V1 on Desktop
Thanks @Kate England. That's so kind of you and I really appreciate it. Me too! Anything to make the process of making isometric easier, more fun and more accessible to others can't be a bad thing. Plus...To eventually have all that on an iPad! WOW! I've been thinking about doing an iso tut for SkillShare but I'm from the North of England so I doubt many people could understand me. -
iamscotty reacted to a post in a topic:
Isometric Studio?
-
Isometric Studio?
iamscotty replied to iamscotty's topic in Feedback for Affinity Designer V1 on Desktop
Sadly, it's not always the case @Ben and not just with Software Development. It's like me not listening to what a client wants from a design or illustration for instance. I'd be doomed if I didn't. Not all people do. For me personally Ai does the job for me pretty well but....I'm not going on an Adobe rant. I just think it's refreshing that you speak to people properly and not just a generic C + V or hyperlink reply to suggestions/questions and take the time to explain and take on board and I appreciate that for one. I'm very optimistic that Designer will be able to offer what I need and look forward to the day when I can swap. Please excuse the long winded posts as it's hard to explain and understand things when it's not face to face over a UI. I just wanted to make sure you had the grass roots of isometrics covered and it seem you do. -
Isometric Studio?
iamscotty replied to iamscotty's topic in Feedback for Affinity Designer V1 on Desktop
No...I get you @Ben! Totally understand the different way the iPad works with gestures and UI so understand the delay but I'd deffo go desktop before that and when it is integrated on iPad along side it. My ideal would be to run Affinity Designer/Photo on desktop + iPad and move away from Adobe for the most part (I'd still need Ae). I invested in a Wacom Cintiq to work with Ai and it sucked big time but I LOVED using the iPad with Procreate and heard great things About the way Affinity works with it too. I don't mind waiting a little until then but it's deffo on my road map. I'm still a little took aback at how you guys are happy to talk to your users and potential users. Good-on-ya Serif! -
iamscotty reacted to a post in a topic:
Isometric Studio?
-
Isometric Studio?
iamscotty replied to iamscotty's topic in Feedback for Affinity Designer V1 on Desktop
PHEW! That's all I needed to know but we got there in the end. LOL! Shape > SSR > Stand Alone Isometric Object Thanks for the info. Reason I need to know this is that the only thing that has stopped me moving from Ai on MacBook to Designer on iPad (when it's integrated to iPad version) is this tiny function which will allow me to do iso work and switching platforms and hardware is a big risk/investment. Hopefully it will do what you say although I'll want a refund if it doesn't. -
iamscotty reacted to a post in a topic:
Isometric Studio?
-
Isometric Studio?
iamscotty replied to iamscotty's topic in Feedback for Affinity Designer V1 on Desktop
So..The shape would behave just as if you'd drawn it using the pen tool from scratch and all the paths nodes would react normally? -
Isometric Studio?
iamscotty replied to iamscotty's topic in Feedback for Affinity Designer V1 on Desktop
That's cool but it's all about what you can do after the SSR. Is the shape after the SSR has been applied still in the "edit in plane" mode? -
Isometric Studio?
iamscotty replied to iamscotty's topic in Feedback for Affinity Designer V1 on Desktop
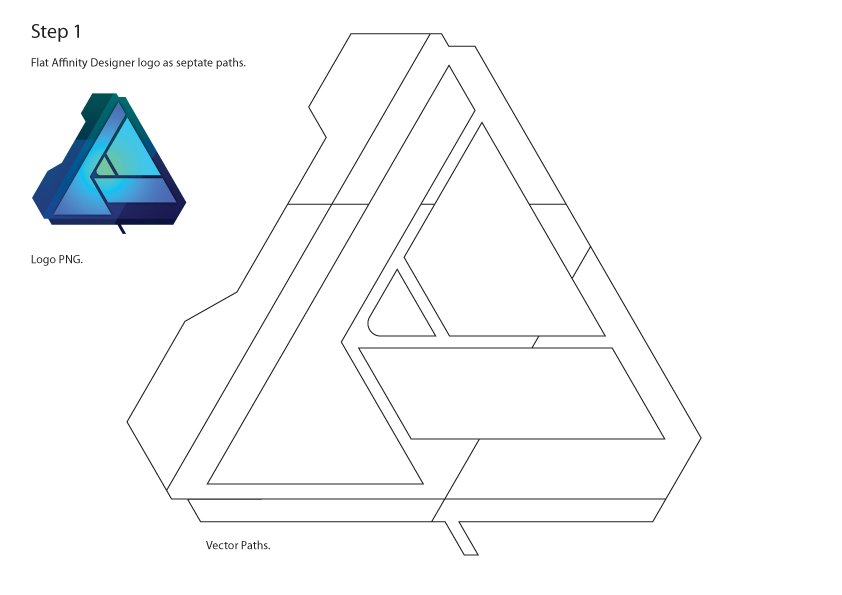
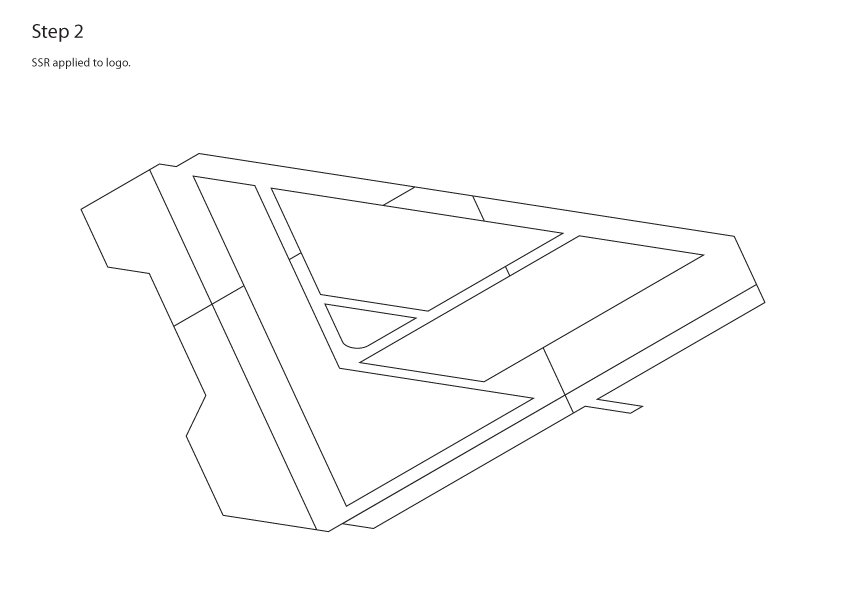
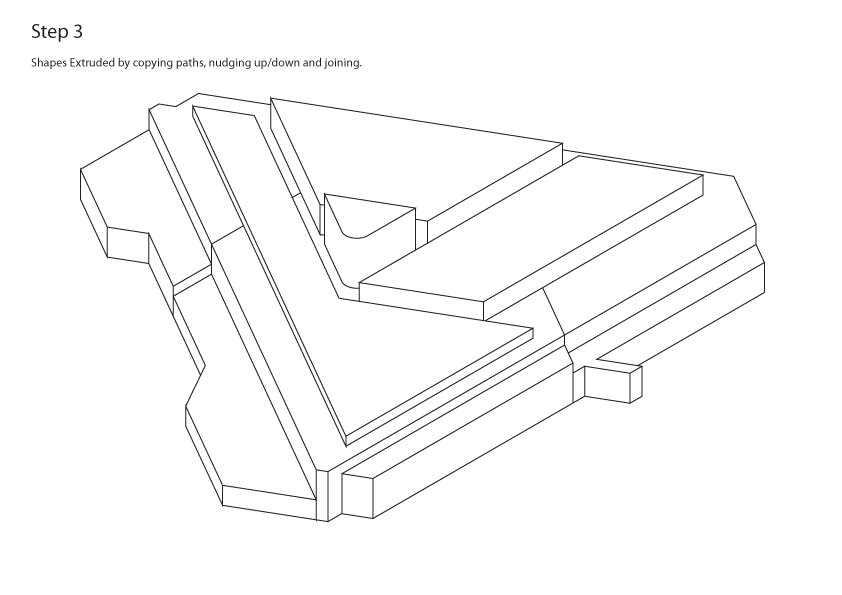
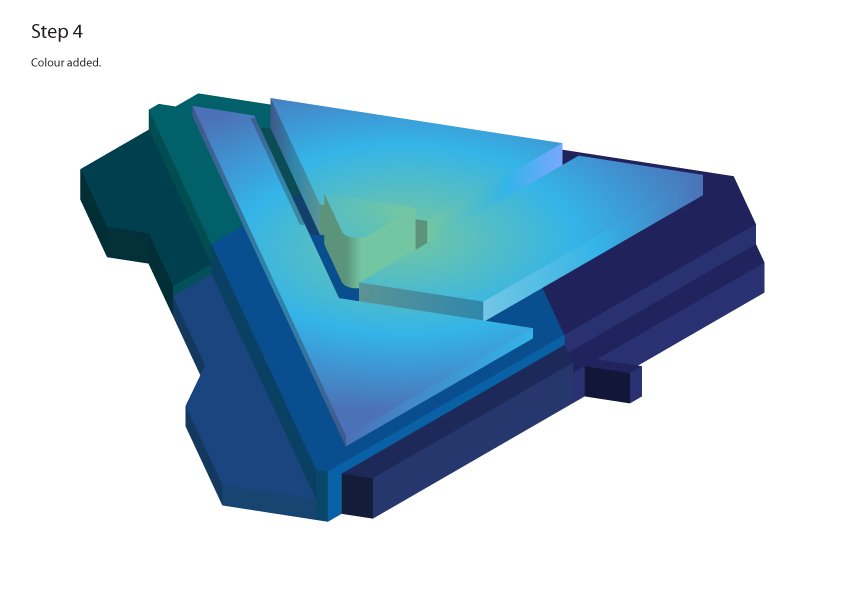
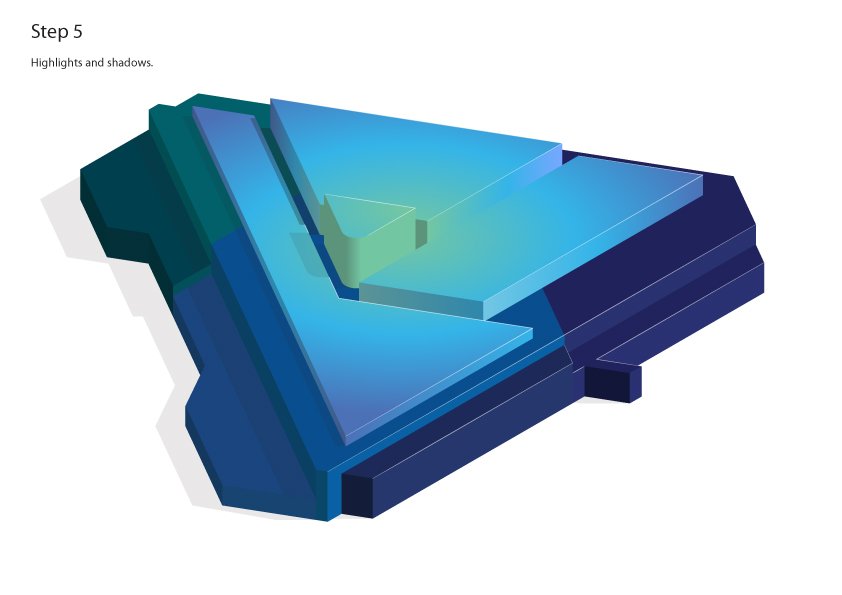
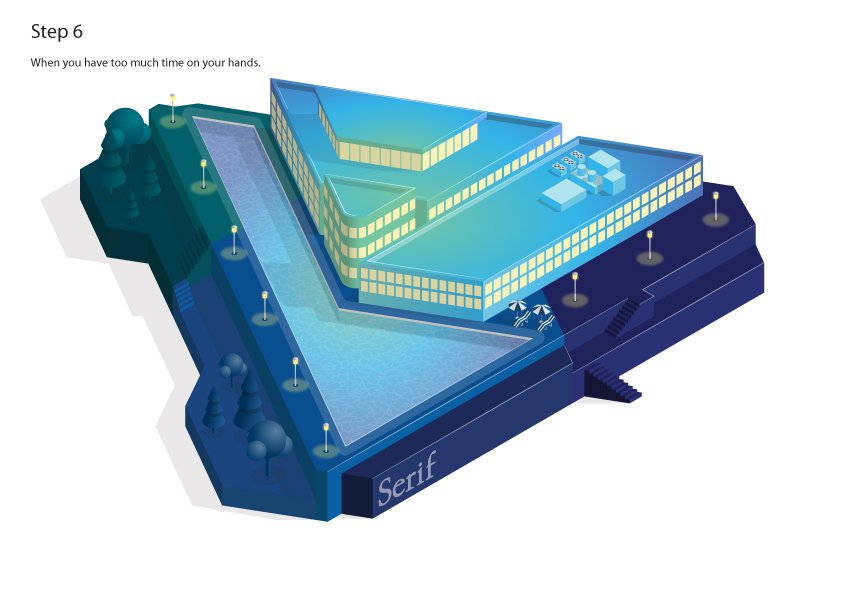
Hey @Ben, thanks for the reply. I really need to have a go myself as it's difficult to explain and understand via a forum but I think by looking at the work through that @GarryP did and what you've said the isometric function and edit in plane look great if it has the option to expand the SSR effect. I understand that Designer has a different approach to handling the SSR formula but SSR has only one task and it's super simple. To take an existing shape and convert it to an isometric/axonometric projection. Either top, right or bottom. The reason of this is that the original shape, dimensions and scale may be very important to the end (isometric) result. All the important making and doing is done in the flat elevation and then converted not the other way around. It's kind of the fundaments of working in isometrics. That could have it's use but it's like putting the horse behind the cart if you get my drift. You make flat, then convert and then build. That shape is then the basis for building whatever you want to make and you've left SSR behind at that point. Creating in the isometric plane is okay but you're already in a distorted view so it can't be accurate from the start. I've been working making isometric designs and illustrations for 32 years now so I can see it from a practitioners view point and although these tools look great they do seem to be missing the point a little from what I see but enough to render it almost useless to build complex shapes and designs that are faithful and accurate to the original. I started off doing isometrics on a drawing board using pens, iso guides and rulers and then Mac Classic's came out and someone worked out the SSR formula in Freehand. That was the big transformation but the rule has stayed the same: Make your flat shape. Apply SSR. Build your isometric object. To show you how I work and use SSR to build isometrics I wanted to take something that's original (flat) appearance is very important so I chose the Affinity Designer icon/logo. I made a flat, paths version of it, converted it to iso using SSR and only then started to build the 3D. All the information I needed is in step 1. All the conversion is done in step 2. Everything after that is just embellishment, faffing about and building using the same principles as the "cube with a punched out corner" I did above. I can't imagine recreating the Affinity Designer logo using "edit in plane" with any degree of accuracy. Please don't get me wrong here. I have HUGE respect for you guys that put these packages together and I'm telling you this with the very best intentions (I want to use Designer for isometrics) but when it comes to this area I do feel you may be missing the point a little and that would be a great pity.
- 59 replies
-
- 18
-
-
-
-
iamscotty reacted to a post in a topic:
Isometric Studio?
-
Isometric Studio?
iamscotty replied to iamscotty's topic in Feedback for Affinity Designer V1 on Desktop
Sorry....Just to clarify @Ben. Without the ability to end up with an shape that has been warped into isometric (SSR) that has no live transforms or effects applied to it (a bog standard vector path) then it's dead in the water at that point and just looks isometric but you can't do much with it from then on. Making isometric illustrations is a little bit like Lego as you need to build it and shapes that have had the SSR applied to them are the bricks. -
Isometric Studio?
iamscotty replied to iamscotty's topic in Feedback for Affinity Designer V1 on Desktop
Thanks Ben, that's very kind of you. Must admit that I'm really impressed that you guys take such close notice of all the posts on here so thanks for taking the time to acknowledge this thread and my suggestion/concern. I doubt that would be the case with the competition. (cough, wink). I'd be more than happy to give feedback but I have to admit that I'm at a bit of a disadvantage in not having my own copy of Designer so can't get the 1.7 beta and try the iso/axo tools so I'm kind of relying on you guys that have. I have tried Designer before but I had problems with the trial version as it told me it had expired on installation. Probably my bad as I may have tried it before at some point. I think I have the old beta and an old machine but without the iso stuff. What I'm seeing looks awesome. I did write a bit of a long winded reply over the weekend but it all got a bit confusing when I read it back so I've been doing a little work through to illustrate and I'll post that once I've sorted it. All the examples I've seen on this thread have been based on a cube and/or projecting images and shapes onto it's facets. If I can use Ai's '3D extrude' as an example as I occasionally use that for iso's but try to ignore the 3D, extrude aspect as I only want to focus on the original shape/facet being made isometric. In 3D extrude, you start with a 2D shape and then apply the 3D extrude which you can set to iso and you get a 3D render based on the original shape. At this point it is still a live effect that doesn't react as it would if it were made up of regular paths and nodes. It's not until you 'expand appearance" that you can get to the paths and start building on it. What I'm saying is can you expand or release the iso object from "Edit in plane" so it behaves the same as any other shape path would? In the examples I've seen above, you can pull node handles, punch shapes, bend paths but they 'seem' to be as a distorted projection of the original. Like there's an iso effect on the shape. I guess you could call what's talking about as a "destructive effect" where you can finally expand the shape from it's isometric plane. Sorry if this is a bit rambling. It's not as bad as the original. -
iamscotty reacted to a post in a topic:
Isometric Studio?
-
Isometric Studio?
iamscotty replied to iamscotty's topic in Feedback for Affinity Designer V1 on Desktop
That's AWESOME! Once you get the basics you can push the envelope like you've done here and it can get quite rewarding and addictive. -
iamscotty reacted to a post in a topic:
Isometric Studio?
-
iamscotty reacted to a post in a topic:
Isometric Studio?
-
Isometric Studio?
iamscotty replied to iamscotty's topic in Feedback for Affinity Designer V1 on Desktop
Hmmm. On the face of it it seems to be the thing so thanks SO much for taking the time to make and show that walk through. It's hard to explain so I made this which is similar to yours to show how I start pretty much every object and thing in isometric all I do is create one face which is usually the top and work down to get my basic iso shape. I then just add the details and for things that would appear on the right or left faces I'd do the same but use left or right SSR for those. Here's a tutorial I made on my blog to explain but using the grid method instead. As you can see, the basis for isometrics is insanely simple You can see that I need the shape as a stand alone thing where I can select, edit, copy, join paths to others to get a basic, 3D, isometric shape. I just manually extrude it. The "project to plane" appears to be a kind of live filter rather than a proper transform but I can't really tell without having a go.
-
Isometric Studio?
iamscotty replied to iamscotty's topic in Feedback for Affinity Designer V1 on Desktop
Hey Aammppaa, I did see that when I was looking through the long thread although it was not set to iso. That's kind of what I was looking for but taking a different path to get there. That does look like an amazing function as you can spin the shape after applying the it to the isometric plane and it remains editable unlike with Ai where you'd need to undo it. turn it and then re-apply the SSR. Out of interest (I don't have the Beta) can you expand the image/shape after applying it to the plane so it's an independent, workable shape? If so then this is a very similar thing to what I was asking. If there were the addition of some SSR transform buttons to this feature then I'd pee my pants with joy!