casterle
-
Posts
512 -
Joined
-
Last visited
Everything posted by casterle
-
Sorry if this is a stupid question, but what is Affinity Range? I've got Affinity Photo and know about Affinity Designer and the upcoming Publisher but have been able to find nothing about this product.
-
Long ago I had a PS action that would convert text to embroidered text. It had many options and produced very good results - photo realistic or nearly so. Can this type of thing be done with macros in AP?
-
I have an image with several layers. 4 of these layers are Curve Layers containing Pixel Layers. I added a Live Unsharp Mask to a Curve Layer and the effect is restricted to that of my image. This is as I'd expect. If, however, I move the Live Unsharp Mask up to the top level in the layers stack it seems to apply to everything - both layers below it (as I'd expect) as well as those above. Is this expected?
-
About the performance improvements
casterle replied to rubs's topic in [ARCHIVE] Designer beta on Windows threads
Yes, but they'd still be working on the 1.0 pre-alpha . From many years of experience I can tell you that, in general, there are far more gains to be made from architecture and algorithm improvements than coding to the metal. -
If you've got a license you can download the beta and run it in parallel with the release version. https://affinityspotlight.com/article/affinity-photo-17-beta-available-now/
-
Thanks, that worked great. At first I didn't realize that I could drag the Live Filter into my Curve Layer to restrict the effect to that element. Cool beans!
-
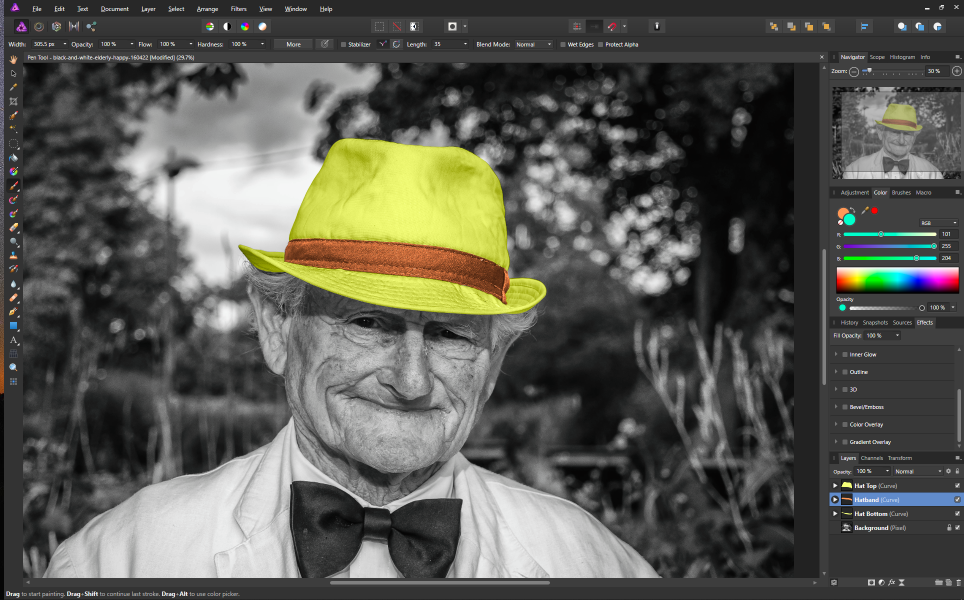
I've been playing with Curve Layers for colorizing a photo. I've got one Curve Layer for each section of the hat in the image below. Now I want to be able to bring out the texture in the hatband, but whenever I try to apply a filter (sharpen, for example), my Curve Layer is converted to a Pixel Layer and I no longer have an editable path. How can I apply filters to my Curve Layer non-destructively? If I apply a filter to the Pixel Layer created when I colorize the Curve Layer nothing is rasterized, but the filter appears to have no effect.

-
firstdefence, thank you so much. It turns out that the Pen Tool/Curve Layer combo lets me do exactly what I want. As you pointed out, when I have the Pen Tool selected, clicking on a Curve Layer displays the nodes and allows me to adjust the path. Cool. As it turns out, selecting both Curve Layers displays the nodes for both layers at the same time, independently adjustable. This way, I can nest the paths next to each other easily. But it gets better! As you move the nodes, they snap to the edge of the other mask. Not automated, but easy to do and precise.
-
Are the pen tools the same in Photo and Designer?
-
Thank you again. I think this will get me started.
-
Thank you! This appears to be done differently than the tutorial. I like that you can still edit your path - I have to save the selection (I think) using the method in the tutorial. I think I've got a lot to learn - can you point me to instruction on Curve layers? I know nothing about them and found nothing searching the help.
-
Yes, I am using the pen tool. The process I am following is described in masking the sweater in this tutorial: https://tinyurl.com/y49daomf. Outline with pen, click on 'Selection', add a pixel layer, select a color and brush and paint in the new color in the new layer. I save the selection in case I need to re-apply the mask to change the color in that layer (I skip the feather step in the tutorial 'cause I want a hard edge on the mask). I then repeat the above process for each masked area. The selections are close but don't meet up exactly. leaving a small gap.
-
Thanks, I've seen that but that seems to grow/shrink all selections and, when one touches the other they combine to form one selection. I need to keep the selections separate.
-
I'm practicing selections and masking by colorizing an old B&W photo. The man in the photo is wearing a hat with a hat band. I need to select the section of the hat above the band and below the band as well as the band itself. I selected the top of the hat and saved that selection, then did the same with the hat band and the bottom of the hat. This worked OK, but the selections do not 'meet' exactly so there is a small bit of space between the bottom of the top part of the hat and the top of the hat band. These are hard, non-feathered selections and I would like them to meet exactly. Is there some way, other than by hand, to expand a selection until it runs into an adjoining selection?
-
Hello. My name is Leroy Casterline. I'm a retired programmer who used Photoshop for UI elements and such, but didn't think I had an artistic bone in my body. Now that I'm retired I've (just) started playing around with compositing and such and finding out I may have missed a lot of fun over the years. I stopped upgrading PS at CS6 because I refuse to rent my tools. Now I think perhaps Adobe did me a favor all those years ago as their policy has led me to look at alternatives, and here I am. I played with AP for a few days and today ponied up a very reasonable price for a tool I'm falling in love with. I'm getting an overview of the product via the hundreds of videos Affinity has provided and will be honing my skills with this cool tool. As a non-photographer, non-artist I'm probably an odd duck here - I hope you all bear with my uneducated questions as I progress. See 'ya in the forums!
-
Very new user here! I was watching a tutorial that indicated when I opened a file it would appear as an Image Layer and would have to be rasterized to a Pixel Layer before I could operate on it. However, when I open an image it opens as a Pixel Layer. I'm confused. !
-
Thanks for the great overview - very understandable. I especially appreciate the link to the photo so I could play along!