razorpig
-
Posts
86 -
Joined
-
Last visited
Everything posted by razorpig
-
@Joachim_L No apology necessary. Many thanks again for your help - very neat solution.
-
@GarryP Thanks for the CTRL tip - that one had me confused for a minute until I Googled it. I even tried pressing S + T + R + G and dragging :-D
-
@carl123 You're correct - it is nested under the Node Tool. I just reset the program defaults to double check.
-
@Joachim_L Perfect ! Thank you so much
-
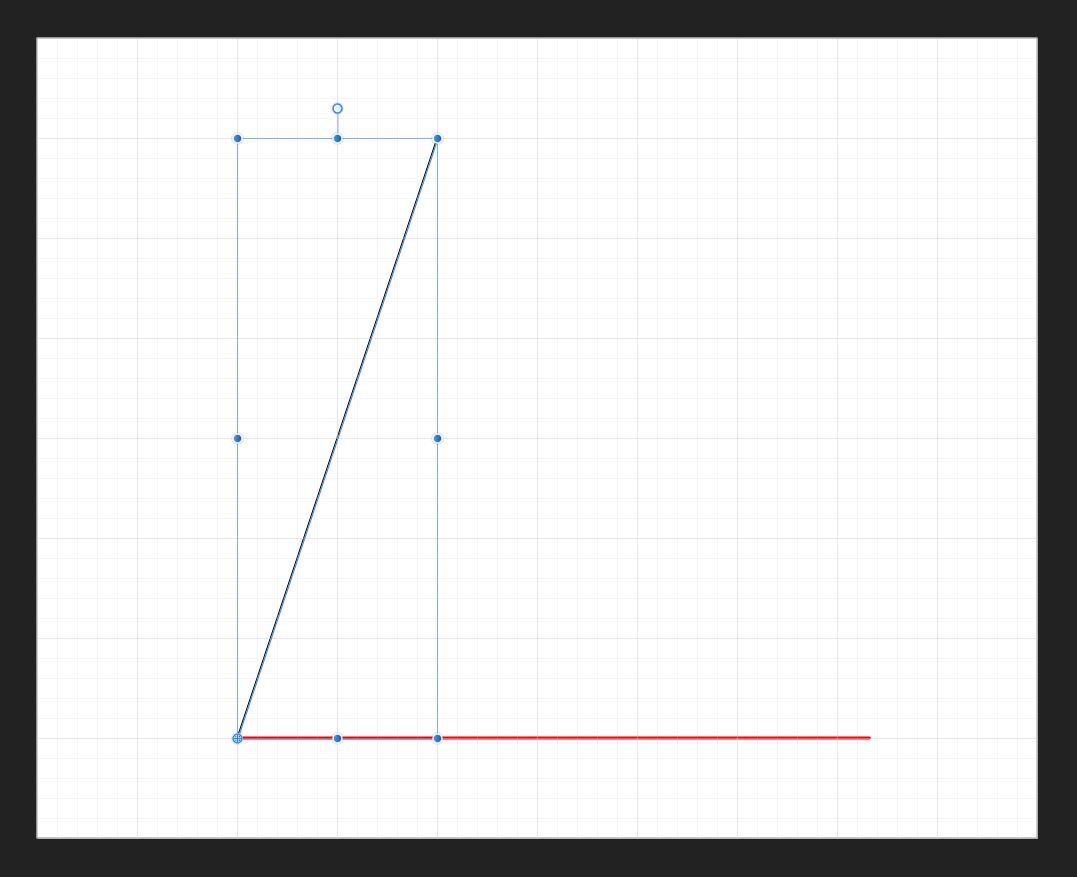
I have a problem which I feel sure must have a very simple solution but for all my efforts, I can't find it. Referring to the image, I have a non-vertical line which I simply want to rotate and snap to the horizontal axis ( shown in red ). I've moved the rotation centre but can't figure out how to snap it to the horizontal position. I can use the node tool but this doesn't preserve the length. Any help would be much appreciated.

-
@Hilltop Thanks for the reply - I appreciate you taking the time. Why would anyone want this behaviour? It's called a 'first draft' Unfortunately I'm not blessed with your ability to place everything perfectly and purposefully the first time. For the benefit of others who might be reading this thread, the solution in my case involved a combination of text wrap settings ( specifically Jump ) and pinning objects to their required position within the text. Pinning is explained here : https://affinity.serif.com/en-gb/tutorials/publisher/desktop/video/337296999
-
Hi, If I have a document containing lots of different elements ( text frames, images, tables etc ) and I want to insert another table ( for example ) in to the middle of the document, do I have to move all the subsequent elements manually to make room, or can it be set up so these subsequent elements shift further down the document automatically to accommodate the new table, creating additional pages where necessary? I hope I've explained that clearly. I'm sure it must be possible and I'm probably overlooking something very basic - in which case some quick clarification would be greatly appreciated.
-
Hi, I must be doing something wrong or overlooking something simple - is there a quick and easy way to create a borderless table ( ie. no table frame or cell borders) ? UPDATE : Nevermind. Just worked it out.
- 1 reply
-
- 1
-

-
@Dr. Dave Thanks Dr Dave ! - that works very nicely with two different nodes but I can't seem to get it working with the two transform handles of a single node. How do you select both transform handles? I've tried holding CTRL, SHIFT, ALT and all the usual combinations.
-
Does anyone know if this is possible yet? I've tried several modifier key combinations but none of them seem to work.
-
Vertical Screen Real Estate
razorpig replied to razorpig's topic in Feedback for Affinity Designer V1 on Desktop
@AndyQ Cheers Andy - glad it's not just me ! You might also find this thread useful for reclaiming a bit of that vertical real estate - gets rid of the info bar along the bottom if you decide you no longer need it. -
Pixel Selection From Shape
razorpig replied to razorpig's topic in Feedback for Affinity Publisher V1 on Desktop
@fde101 Ah so they are ! Thanks fde101 - very much appreciated. -
@pjglad@LittleFella Totally agree with you guys. It's step backwards in terms of functionality.
-
Pixel Selection From Shape
razorpig replied to razorpig's topic in Feedback for Affinity Publisher V1 on Desktop
Many thanks for all your suggestions. @thomaso Geometry options weren't available in Publisher Beta but now the Personas are active it's all good. @Aammppaa Your solution also now works :-) -
I work mostly on a laptop so vertical screen real estate is always at a premium. I think it would be nice to have the option to dock the toolbar vertically either left or right, especially as the default buttons leave quite a lot of empty space on the toolbar and horizontal real estate seems plentiful. I realize many designers are working on large desktops so this probably isn't much of an issue, but I'd be curious to know how others feel. PS : I'v posted this in the Designer forum but it applies equally to Photo and Publisher.
-
Pixel Selection From Shape
razorpig replied to razorpig's topic in Feedback for Affinity Publisher V1 on Desktop
Thank you both for your input. I would like to use the shape ( inverted ) as a mask for another layer, but keep the original shape. -
Is it possible to create a pixel selection from a shape in Publisher?
-
Copy Embedded Object
razorpig replied to razorpig's topic in Feedback for Affinity Publisher V1 on Desktop
Thanks thomaso. Yeah this is what I had to do in the end. Was hoping for something equivalent to New Smart Object via Copy from PS. -
Is it possible to make a copy of an embedded object that can be edited independently of the original?
-
Deselect All Layers on Windows
razorpig replied to razorpig's topic in Feedback for Affinity Photo V1 on Desktop
Hi Ron, Sorry to be so brief, but you clearly haven't read the original thread. I posted it here by mistake. -
You wouldn't have to click any more buttons. Instead of clicking 'X' you would click APPLY ( or OK ), instead of clicking DELETE you would click CANCEL.
-
Deselect All Layers on Windows
razorpig replied to razorpig's topic in Feedback for Affinity Photo V1 on Desktop
Thanks for the reply Ron. This was already mentioned in the original thread. If you read the thread carefully, it would just be nice if it worked on Windows the way I'm told it works on MAC. Confirmation from other Windows and MAC users would also be useful - could just be a glitch on my system. -
We're just getting crossed wires about the terminology here. I want to preview it on the canvas ( so yes, in that sense it's being applied to the live image on the screen ) before committing the changes permanently to the document ( or as I call it, applying them ). Yes, you can use the Delete button but the change has already been applied and added to the history panel. This isn't a major issue for adjustment layers or live filters as you will have only three entries each time, add, edit and delete ( see attachment adjustment.jpg ) - although if you experimented with lots of adjustments and/or filters it could quickly become an issue. However, try experimenting with some FX and keep an eye on the history panel - every tiny edit creates an entry even if you're just experimenting with ideas and decide not to use them ( see attachment effect.jpg ).
-
Thanks R C-R. After some experimentation and with help from this forum I now fully understand how it works. However, I can't help feeling it would be far more intuitive if there was at least some correlation between the Transform Panel and transforming objects on canvas. As mentioned previously, we seem to have two entirely independent Transform Origins and yet one of them is activated by clicking ( a second time ) over the area intended for the other.
-
@Frozen Death Knight Thanks again :-) Some very useful commands indeed, especially the first one to only show and work on a single layer - love that one ! I thought I'd already logged a bug report but just checked and I accidentally posted it in the wrong forum - put it under Suggestions for Affinity Photo instead. If it doesn't get any attention there I'll re-post in the bugs forum later. Think the team has rather a lot on presently with the new releases ! Many thanks again. Much appreciated.