Hadriscus
-
Posts
93 -
Joined
-
Last visited
Everything posted by Hadriscus
-
 Ah good idea ! Thanks a bunch for the example file, much appreciated. It's better automated than my previous attempt. A custom font is a clever idea but probably too much work for this specific job, plus I don't know much about font editing/creation... -I've dabbled with FontForge but it is super glitchy (by the way if you know an alternative I'm a taker).
 -
Here is what I used to have : It is all hand painted and has a little wiggliness to it. There's a "drop shadow" layer effect on top as well. I liked the look of it but it didn't play nice with the text flow, since every time the text changed ever so slightly I had to reposition it below the chapter text by hand, and this defeats the purpose of using a publishing program. I wish style decorations were a little more fleshed out so I could use my own image in place of the outline and fill settings in there.

-
Thanks for the tip @Lagarto ! I didn't think of using several decorations to achieve this. Unfortunately there are no blending modes as with layers, so the circle is not being clipped by the other rectangular blue style... do you know if by any chance there's a way to use an actual image as decoration for a paragraph style ?
-
Hi everybody, I've learned a lot recently about publishing, and although there is plenty I don't know yet, I feel like my layout is becoming more and more orthodox, so to say. It all flows nicely, pictures and text hand in hand, I made pretty styles for my chapter headings, and the few hiccups I've encountered so far have been solved by you guys, of this I am very thankful. Here I am trying to change a paragraph style's decoration settings to "gradient" and place the gradient where I want, just as I would do with a gradient on a regular shape, such as a rectangle. It works with the default linear gradient, but I'd like something fancier and change it to an elliptical gradient. However the buttons in the color popover only allow for changing gradient stops and color/opacity settings, but not the actual origin and direction of the gradient... I've tried using the fill tool, but it only seems to operate on the actual text, rather than the text style decoration, no matter which mode I set in the tool settings above. This is not a vital matter at all, but I would appreciate any help. I feel like I'm overlooking something. Cheers, Hadrien _______________________ Here's the heading in question. The decoration is a fill that takes up the entire column width, with a linear gradient going from brown to blue (I didn't find how to change interpolation between gradient stops, so I just added two of them very close together). What I'd like to do is have the brown/blue separation be somewhat curvy, hence the elliptical gradient.
-
Hi @MEB, thank you I was not aware of this function ! From quick testing, it seems like I can override visibility, as well as insert layers anywhere in the stack -but not override layer transforms (position, rotation, scale). Instead when I transform layers while in "edit detached", my changes propagate back to the master page. Well, that's great already ! I think I can live without transform overrides. @prophet's workaround is not necessary anymore (although precious to know it can be done!). Thanks again !
-
I see. The problem seems to be that the layer structure in master pages is fixed, as in nothing can be inserted in between any two layers that come from a master page. Generally, master pages are the solution to making a change in one place and see it propagate in all pages where that master page is present/applied (which is the same concept as file referencing in Maya or linking in Blender) but what's lacking here (at least in my use case) is the ability to make overrides to the layer structure of the master page : rearrange layer order, insert other objects in-between, toggle visibility and other properties, and so on. I consider my issue fixed, thanks a lot ! Hadrien
-
That's clever, thanks for the suggestion ! What are global layers ? Is this lingo from another software ? Aaaaaand it worked perfectly. Thanks a bunch !!
-
Hi folks, here I am with my second question for the day. I'm afraid that one won't be as straightforward as the previous ones, but let's see. Here's my issue : I have a master page created with all my graphical elements, text frames, etc. and I created a double page from this master page -so far so good. Now there is some content (pictures) on that page that I'd like to slip behind some other elements from the master page (page corners), but I can't seem to be able to change the hierarchy at all. Is my only option to remove the occluding element from the master page, and add it to the actual page, so that it can pass in front of the pictures ? Here's a capture. Thanks ! Cheers, Hadrien
-
Oooooh it had to be a character style ! Thank you so much @Old Bruce ! I couldn't see what I was doing wrong, the style in question was a paragraph style so it didn't show up in the list. Thank you ! Have an excellent day ! Hadrien
-
Hi folks, here I am asking for help again. It's probably nothing, but I've been searching on these forums for over an hour an still can't find the answer. Here's my problem : I would like to apply a different style to the bullet number at the start of my chapter title (see capture), and as far as I understood from all the forum posts I read, this should be possible. I went in my paragraph style settings, in the "bullets and numbering" section, and typed a name inside the "Name" field. I then created a style with the same name, hoping that my bullet number would take it, but it didn't. I also tried toggling the "Global" checkbox to the right of the name field, but it didn't seel to have an effect. It's actually undocumented in Publisher's help files... Anyone knows how this works ? Cheers, Hadrien
-
I understand. My minimum text size is 12, and that's for the body of text, so I set the baseline to 12. All other text styles being slightly bigger (usually 14), they jump an additional line when I hit return, thus creating a gap, which seems to work fine. I have to ship something in two days so I'll stick with that for the time being. Thanks for your advice ! Hadrien
-
Oh, THANK YOU ! I'm starting to play with its settings. Would you advise using it for a booklet ? or does it get in the way ? This particular booklet has quite a few images and text styles, and since the results are dramatically differently whether I check "use baseline grid" or not (I mean the setting located in the baseline grid manager), I'd rather make a decision right now and stick to it ! So many thanks.
-
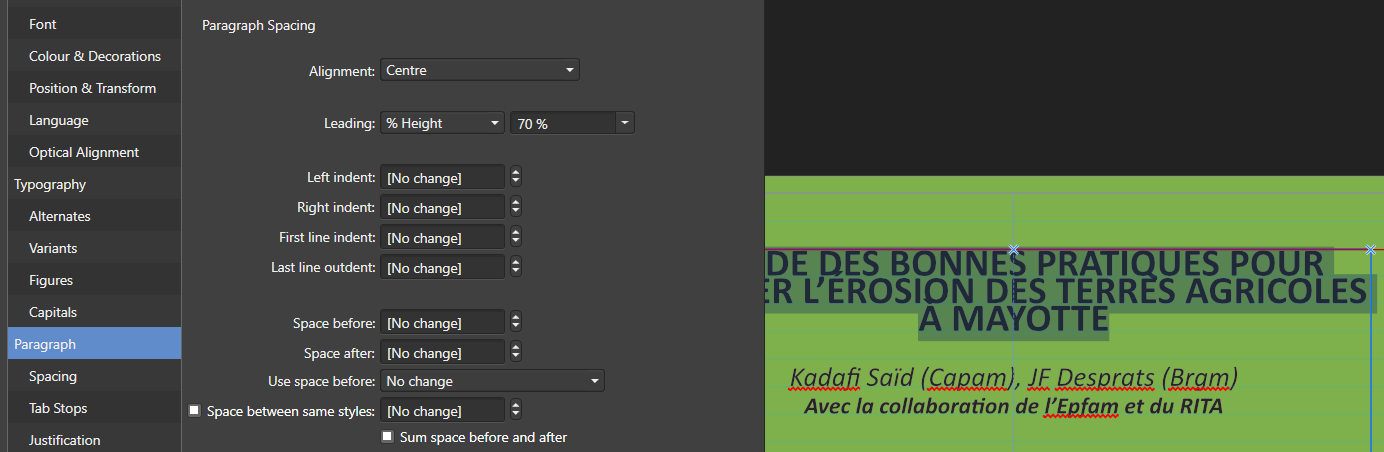
Hi folks, I am rather new to Publisher and this line of work in general (I come from animation and graphic design), and I am encountering a few problems. The program works like a breeze, iti's probably me not knowing my way around. Anyway, most problems I manage to solve, but this one I'm at a loss... Maybe you can help me ? So in the process of making a booklet I created a bunch of text styles, and that worked fine, except when I tried to change the "leading" property (in "paragraph") : at default inherited value the lines are too close together, so I tried incrementing the value, but the text only reflects the changes once the value reaches 15pt and at that point it's way too big. The same thing happens when I try specifying the value in percent : for some reason it suddenly jumps when I go over 70%. Here are two screenshots. I would appreciate any... leads. Cheers, Hadrien edit : the behaviour seems to be the same when using "leading override" instead. edit 2 : leading changes happen at 70%, 140%, 210%... all multiples of 70.
-
Ayyyy mine is from 2013 and isn't tactile... but good to know... hoping it'll last some more years still !
-
Polygonal selection problem
Hadriscus replied to Hadriscus's topic in Feedback for Affinity Photo V1 on Desktop
That's not what I meant, but thanks for the tip ! I am aware of spare channels, they're invaluable. When I say "redo", I just mean whatever selection I just tried to make and was botched by the aforementioned glitch has to be redone -done at all, in fact. I did not mean "to retrieve a selection previously made". -
Thanks, I have no problem panning with MMB but it's good to know there is another shortcut. Unfortunately I don't use a mouse so I don't have a wheel to zoom with, hence my request. Thanks ! I just did ! Ability to freely rotate (ie not in increments) would be ideal but this is already very handy. Cheers, Hadrien
-
Hi all, I'd love to have a simpler way to zoom around the canvas, I mean without having to switch to the zoom tool and then switch back. Since MMB is used for panning the document already, I thought ctrl+MMB would be nice. Krita does this (as well as shift+MMB to freely rotate the view) and it's great : it can be adjusted at any time, regardless of the active tool. Cheers ! Hadrien
-
Polygonal selection problem
Hadriscus replied to Hadriscus's topic in Feedback for Affinity Photo V1 on Desktop
Thanks @Alfred for the tip. That's a good idea. @walt.farrell yes it does, however I have to then redo the selection, and that's where the problem lies. When it happens it screws up the last operation, so I have come to make my entire selections in batches of smaller, "less risky" selections, which helps work around the issue. And indeed the double-click speed can be adjusted ! unfortunately I am already set to the highest. The accidental double-clicks must be in the range of <150ms or something like that, and they're hard to avoid. Thanks to you both for your input. Hadrien -
Hi everybody, I do quite a bit of cutting out scans for further colorization and for that I use the polygonal lasso, because I can't keep an enough steady hand for the entire selection using the freehand lasso, and the cutouts can get really intricate in places -not to mention some parts are actually pretty straight so it makes most sense to use the polygonal over the freehand. Anyway, once in a while the selection suddenly validates, seemingly on its own -cutting mindelessly through the selection outline I just carefully drew. Over time I found this was because some of my clicks were happening too close together in time, and this triggered the double-click event, and double-click does guess what... it closes the selection. Now I get this is "standard behaviour" in most programs but with this particular tool, it happens to get in the way : this tool's usage is intrisically a series of clicks, and the action of closing the selection is also a "series of clicks", there is a clash. It's not even actually necessary to have this, because a selection can be closed two other ways : by releasing the click (freehand) or clicking the starting node (polygonal), so it's not like double-click is necessary in order to close the selection. I may have missed a preference to disable this, please point me to it if I did. If not I would like to request for this to be deactivate-able, or to give users deeper access to the keymap : right now tool modal keymaps seem to be hardcoded (such as the modifier keys to either substract, add or replace a selection, etc). Thanks for your attention, Hadrien edit : just to clear things up, these double-clicks are not always intentional. Most often they're not : it's the intrinsic inaccuracy of the pen that makes me accidentally double-click sometimes. It happens in other software, other contexts, etc. but in this particular situation, when it does it leads to the problem aforementioned.
-
Thanks @stokerg ! while we're on the subject, I would like to creep in a feature request that is related to the issue raised here : mirroring operations right now are done in world space (or document space, not sure how that would be called internally), which means that mirroring a rotated object will change its orientation as well. It would be really cool to have an option to mirror in object space as well (line of symmetry going along the object's own axes, instead of the document's). Alternatively, this could be made to work by letting the user snap to the inverted size of an object when scaling it negatively (which is exactly like mirroring, except currently the user can't constrain the object to the original ratio while doing that, and will inevitably stretch it in one direction or another). Hadrien
-
I may be wrong but I think this only applies to image layers, from which AP can deduce the ratio between original and scaled. For pixel layers, there is no such ratio, because there is no "original" to compare with.
-
Oh ok, I can see it now -thank you ! The inconsistency still exists, but at least it is documented. Hadrien By the way -I assumed this was an oversight, but maybe I'm missing something ? is there a rationale for keeping this disparity ?
-
Hi, the mirror operations found in move tool > right-click menu > transform > horizontal/vertical mirror do not respect "lock children" preferences as set in the tool settings (ie any underlying mask or child layer will be mirrored as well). Hadrien
-
Thanks ! where exactly do you get that ? The tooltip I'm seeing on hovering the button in question does not contain this information (maybe it's an oversight in the french translation?).
-
Hi, activating "transformation origin" in the tool settings bar (with move tool) works flawlessly with rotation, but for it to be taken into account when scaling or shearing an object, the user has to hold down ctrl, which I don't think is documented (unless I missed it, always possible). It is quite hidden, but the real problem is it's inconsistent with rotation, which doesn't require holding down ctrl (and I believe is the correct way to handle it : either you require the user to hold down a modifier key, or to check a button, but not both). Hadrien